(function() {
document.addEventListener('DOMContentLoaded', function() {
var componentMetadata = JSON.parse('\x7b\x22componentName\x22\x3a\x22Breadcrumb_f975cc5a-7b6e-483d-8338-5c45a39cbbde\x22,\x22deferOptions\x22\x3a\x7b\x22deferComponent\x22\x3afalse,\x22deferType\x22\x3a\x22None\x22,\x22deferId\x22\x3a\x22rb7ae25d431f14f20bf1dc3d49e35df61\x22,\x22deferredContainerId\x22\x3a\x22\x2fcommonBreadcrumb\x22,\x22deferredContainerView\x22\x3anull\x7d,\x22viewName\x22\x3a\x22Breadcrumb\x22\x7d');
var configuration = {"links":[{"url":"/","label":"Home"},{"url":"/holidays-celebrations","label":"Holidays \u0026 Celebrations"},{"url":"/holidays-celebrations/christmas","label":"Festive \u0026 Fuss-Free Christmas Recipes"},{"url":"/holidays-celebrations/christmas/how-to-make-christmas-cookies","label":"How to Make Christmas Cookies"}]};
var moduleName = 'breadcrumb';
var isVueModule = true;
GeneralMills.PandoSites.RegisterControlInstance(moduleName, configuration, componentMetadata, isVueModule)
});
})();
(function() {
document.addEventListener('DOMContentLoaded', function() {
var componentMetadata = JSON.parse('\x7b\x22componentName\x22\x3a\x22ActionToolbar_bcfe5168-4c6e-4b8a-8181-233a0a250020\x22,\x22deferOptions\x22\x3a\x7b\x22deferComponent\x22\x3atrue,\x22deferType\x22\x3a\x22OnDemand\x22,\x22deferId\x22\x3a\x22rac3e43d86a6942a2b17fd27c0e051efa\x22,\x22deferredContainerId\x22\x3a\x22\x2ffloatingActionToolbar\x2ffloatingActionToolbar_interop\x22,\x22deferredContainerView\x22\x3a\x22InteropDeferWrapper\x22\x7d,\x22viewName\x22\x3a\x22ActionToolbar\x22\x7d');
var configuration = {"contentId":"f975cc5a-7b6e-483d-8338-5c45a39cbbde","toolbarSettings":{"id":"bcfe5168-4c6e-4b8a-8181-233a0a250020","regAction":"FAVORITE","eSourceCode":14171,"namePassedToEvents":"ArticleStandardLongFormToolbar","buttons":[{"providerName":"pinterest","providerNamePassedToEvents":"Pinterest","shareUrlFormat":"//pinterest.com/pin/create/link/?url={0}","id":"63cf42f0-8fed-4b1c-acbe-0fe44811231d","allowedForAnonymousUsers":true,"type":"Social","displayName":"Pinterest","toggleDisplayName":"","namePassedToEvents":"Pinterest","cssClassName":"atButtonPinterest","privacyOptOutMessage":"\u003cdiv class=\u0027privacyMessage\u0027\u003e\n\u003ch3\u003eThis feature is not available with your current cookie settings.\u003c/h3\u003e\n\u003cp\u003eYou can \u003ca href=\u0027#\u0027 data-show-preference-center=\u00271\u0027\u003eupdate your privacy settings\u003c/a\u003e to enable this content. Please enable “Functional Cookies” to use this feature.\u003c/p\u003e\n\u003c/div\u003e","showPrivacyOptOutMessage":false},{"addFavoriteErrorMessage":"Sorry, something went wrong. Please save again.","removeFavoriteErrorMessage":"Error occurred while removing from favorites","regAction":"FAVORITE","eSourceCode":14171,"isCurrentUserAnonymous":false,"isFavoriteItem":false,"id":"351369d5-f1b1-4a90-b495-16074575bb8a","allowedForAnonymousUsers":false,"type":"Favorite","displayName":"Save","toggleDisplayName":"Saved","namePassedToEvents":"Favorite","cssClassName":"atButtonFavorite","privacyOptOutMessage":"\u003cdiv class=\u0027privacyMessage\u0027\u003e\n\u003ch3\u003eThis feature is not available with your current cookie settings.\u003c/h3\u003e\n\u003cp\u003eYou can \u003ca href=\u0027#\u0027 data-show-preference-center=\u00271\u0027\u003eupdate your privacy settings\u003c/a\u003e to enable this content. Please enable “Functional Cookies” to use this feature.\u003c/p\u003e\n\u003c/div\u003e","showPrivacyOptOutMessage":false},{"providerName":"facebook","providerNamePassedToEvents":"Facebook","shareUrlFormat":"//facebook.com/sharer/sharer.php?u={0}","id":"6d176960-1afd-4a34-83b5-795429359551","allowedForAnonymousUsers":true,"type":"Social","displayName":"Facebook","toggleDisplayName":"","namePassedToEvents":"Facebook","cssClassName":"atButtonFacebook","privacyOptOutMessage":"\u003cdiv class=\u0027privacyMessage\u0027\u003e\n\u003ch3\u003eThis feature is not available with your current cookie settings.\u003c/h3\u003e\n\u003cp\u003eYou can \u003ca href=\u0027#\u0027 data-show-preference-center=\u00271\u0027\u003eupdate your privacy settings\u003c/a\u003e to enable this content. Please enable “Functional Cookies” to use this feature.\u003c/p\u003e\n\u003c/div\u003e","showPrivacyOptOutMessage":false},{"templateId":"eb460499-2547-4f84-a197-60f31934a3b9","dialogHeading":"Email Article","emailCode":"PB_ContentEmail","dialogSettings":{"cancelButtonText":"Cancel","copyToSenderLabel":"Send a copy to myself","emailAddressesLabel":"* Email Address","emailInstructionText":"Separate email addresses with commas","fromText":"From:","privacyPolicyText":"\u003cp\u003e\u0026copy;2026 General Mills, Inc. All Rights Reserved. This information will only be used to send an email to your friend(s) and will not be saved. Please read our \u003ca rel=\u0022noopener noreferrer\u0022 rel=\u0022noopener noreferrer\u0022 href=\u0022http://www.generalmills.com/company/privacy-policies/privacy-policy-us\u0022 target=\u0022_blank\u0022 shape=\u0022rect\u0022\u003ePrivacy Policy\u003c/a\u003e.\u003c/p\u003e","requiredFieldText":"* Required","sendButtonText":"Send","senderEmailAddressLabel":"* Your Email Address","senderFirstNameLabel":"* Your First Name","sendToText":"Send To:"},"id":"2a5b12c8-299b-467d-812e-41e9a0afb70d","allowedForAnonymousUsers":true,"type":"Email","displayName":"Email","toggleDisplayName":"","namePassedToEvents":"Email","cssClassName":"atButtonEmail","privacyOptOutMessage":"\u003cdiv class=\u0027privacyMessage\u0027\u003e\n\u003ch3\u003eThis feature is not available with your current cookie settings.\u003c/h3\u003e\n\u003cp\u003eYou can \u003ca href=\u0027#\u0027 data-show-preference-center=\u00271\u0027\u003eupdate your privacy settings\u003c/a\u003e to enable this content. Please enable “Functional Cookies” to use this feature.\u003c/p\u003e\n\u003c/div\u003e","showPrivacyOptOutMessage":false},{"layoutParameter":"p%3d1","id":"783fefb5-010a-4be1-b84d-f0447da7c52c","allowedForAnonymousUsers":true,"type":"Print","displayName":"Print","toggleDisplayName":"","namePassedToEvents":"Print","cssClassName":"atButtonPrint","privacyOptOutMessage":"\u003cdiv class=\u0027privacyMessage\u0027\u003e\n\u003ch3\u003eThis feature is not available with your current cookie settings.\u003c/h3\u003e\n\u003cp\u003eYou can \u003ca href=\u0027#\u0027 data-show-preference-center=\u00271\u0027\u003eupdate your privacy settings\u003c/a\u003e to enable this content. Please enable “Functional Cookies” to use this feature.\u003c/p\u003e\n\u003c/div\u003e","showPrivacyOptOutMessage":false}],"isSticky":true},"userSettings":{"isCurrentUserAnonymous":true,"isFavoriteItem":false,"isAnonymousUserWithFavorites":false},"pageAttributes":{"url":"https%3a%2f%2fwww.pillsbury.com%2fholidays-celebrations%2fchristmas%2fhow-to-make-christmas-cookies","contentId":"f975cc5a-7b6e-483d-8338-5c45a39cbbde"},"recaptchaPublicKey":"6LdHXsMsAAAAAJzsSiwvVxa_uiUh3yjXYdY1xq7l"};
var moduleName = 'actionToolbar';
var isVueModule = true;
GeneralMills.PandoSites.RegisterControlInstance(moduleName, configuration, componentMetadata, isVueModule)
});
})();
Introduction
To make the classic Christmas cookie you’ll need cookie dough, frosting or icing, and decorations. You have options for all three so choose your own adventure and pick the options that you are most comfortable with. Making cookies is fun, and there’s no need to stress out. We’re here to help!
Cookie Dough:
- Basic Method: Pillsbury Sugar Cookie Dough + Flour
- Deluxe Method: Pillsbury Sugar Cookie Dough + Flour + Cream Cheese + almond or vanilla extract + sprinkles
- From Scratch Method: cookie dough from scratch
Frosting or Icing:
Kitchen Tools Needed:
- Mixing Bowls
- Rolling Pin
- Cookie Cutters
- Spatula
- Cookie Sheets
- Parchment Paper (optional)
- Oven Mitts
- Cooling Racks
- Plastic Squeeze Bottles (optional for icing)
How to Make Cookie Dough: Basic Method
If you have a busy holiday schedule and want to skip the hassle of making sugar cookie dough from scratch, starting with refrigerated dough can make things way easier. All you need to do is remove dough from the package, place into a mixing bowl and mix in 1/4 cup flour per cookie dough package with your fingers, a rubber spatula, or wooden spoon.
Basic Iced Holiday Sugar Cookie Video
See how easy the basic method is with homemade icing.
This feature is not available with your current cookie settings.
You can update your privacy settings to enable this content. Please enable all cookies to use this feature.
How to Make Cookie Dough: Deluxe Method
Are you feeling a little more adventurous, but not quite ready to make your own dough from scratch? Use our deluxe method to make a richer, more decadent cookie dough by adding cream cheese and other ingredients to a roll of refrigerated dough.
How to Make Cookie Dough: From Scratch
If you have more time on your hands, you can also make your cookie dough from scratch with this easy, classic recipe. Shape the dough into disks, wrap in plastic wrap and refrigerate for about one hour—this will make the dough much easier to roll out later!
How to Roll Out Christmas Cookie Dough
Gather some flour in between your fingers and lightly sprinkle onto your clean countertop. Divide your mixed dough in half—placing half onto your flour-dusted surface and leaving half in your mixing bowl. Pop the extra dough into the fridge to keep it from getting warm and sticky while you work.
Work dough into a smooth ball, adding more flour as needed if your dough starts getting sticky. Dust your surface again, and then slightly flatten your dough ball with the palm of your hand. Rub a little flour on your rolling pin. Start in the center and roll up, then back to the center and roll down. Flip your rolling pin vertical and roll from the center to the left and then… Well, you get the general gist. The point being when you start in the center and work out, you get a more uniform layer of dough. You’re looking for about 1/4 of an inch thickness, or about the height of a pencil. Keep adding flour when needed to keep the dough from sticking to the countertop and your rolling pin.
How to Cut Out Christmas Cookies
Grab the kids! They can help pick out cookie cutters. The ideal size is between 2 and 3 inches in diameter, but it’s Christmas and the options are limitless. Snowmen, trees and jingle bells, oh my! If you don’t have Christmas-specific cutters, that’s okay too. Stars are very festive and you can even make a round cookie look like an ornament or Christmas bulb when it gets time to decorate.
Metal cutters, whether stainless steel or copper, tend to hold their shape a little better than their plastic counterparts. Ones with plastic grips or other features are really more about durability than anything else. Whatever cookie cutters you select, just try to bake similar-size shapes on one cookie sheet so they are evenly cooked. If the dough is still sticky, dip your cookie cutter into some more flour before you make your cutout, and wiggle a bit before lifting to release the dough.
Now, when kids are helping this can be hard, but try to cut as close to the edges and to other cookies as possible. This reduces the amount of work you’ll have to do gathering scraps and re-rolling, and the amount of flour you add into the dough. The less flour you need to mix in, the softer your final cookie will be.
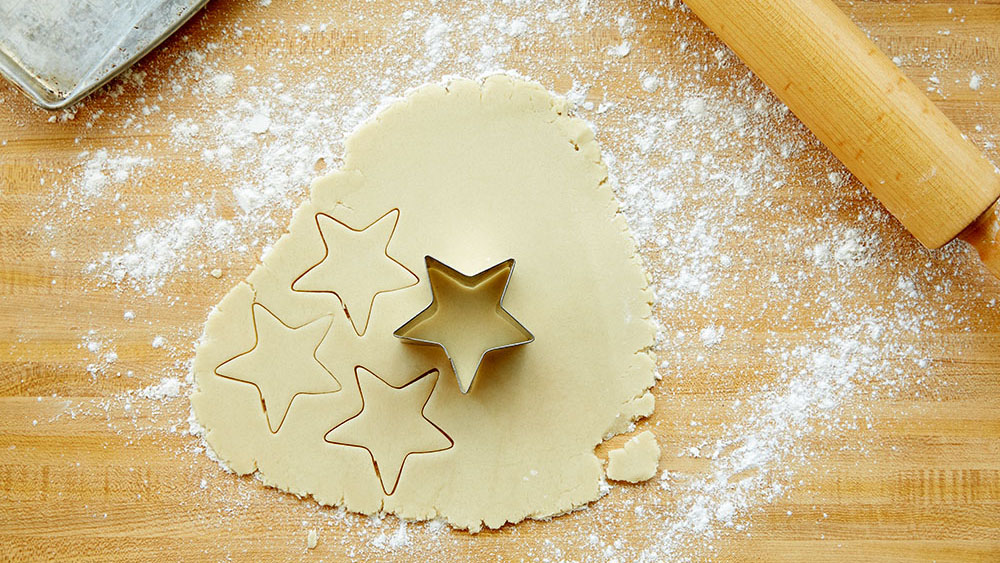
Use your fingers to pull up the extra dough and reveal your fun shapes. Then, use a small spatula to place the cookies about 1 inch apart onto your baking sheet. You want to leave enough space so if your cookies expand they don’t merge into one another. Again, dipping your spatula in a little flour can prevent sticking and preserve your fun cookie shapes.
Depending on your dough, you can prepare the sheet with nonstick cooking spray or line with parchment to prevent sticking. With this recipe, we found the best result straight on an ungreased cookie sheet. Win-win!
Now, gather up your scraps and repeat the rolling and cutting process as needed. Don’t forget to put any extra cookie dough in the fridge.
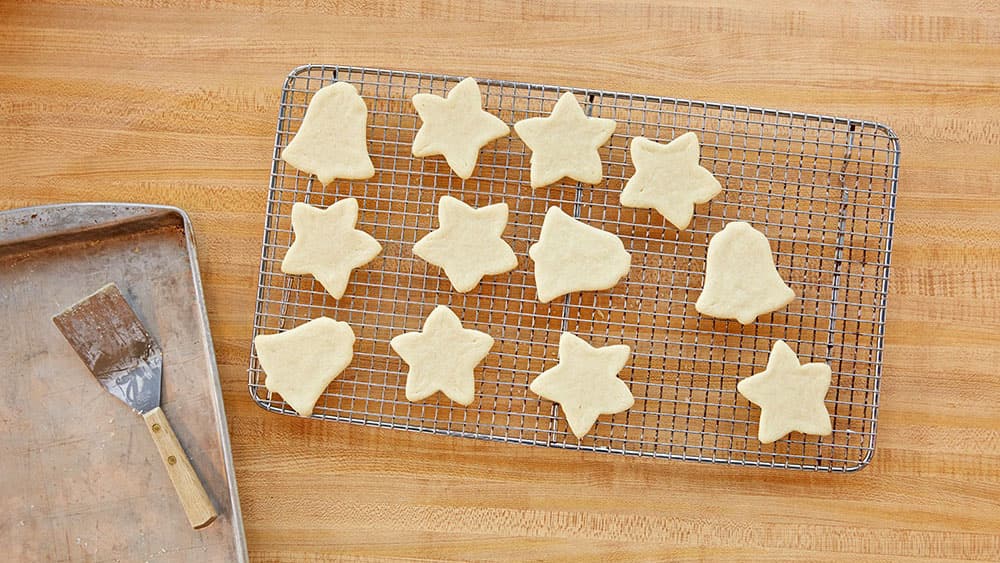
How to Bake Christmas Cookies
Now, you could do a little pre-decorating and sprinkle your cookies with colored sugar. If you’re all about ease, this is the way to go. Once your sprinkle-topped cookies are baked, you’re done. Bake cookies for 9 to 12 minutes in an oven preheated to 350°F. Keep an eye on your first batch; you’re looking for a slightly golden color. If your cookies are spreading out too much and not holding their shape, place the entire cookie sheet of cut cookies into the fridge or freezer for a bit, maybe 5 minutes, before baking.
Cool on the pan for 1 minute before removing onto a cooling rack. Letting the cookies cool allows them to firm up a bit. Trying to remove warm cookies can lead to sticking and cookie tearing. Some people use a cut-up paper bag instead of a cooling rack. This method is better for drop cookies and ones that have a higher quantity of butter; the paper absorbs the excess.
A Note on Baking Sheets. Backing up a bit, there’s a lot of people who swear by one type of cookie sheet over another. Here’s a quick run down on the details as it relates to Christmas cookies.
- Darker nonstick cookie sheets are a breeze to clean up. They do bake cookies a little more quickly than other cookie sheets so keep an eye on your first batch.
- Basic aluminum cookie sheets make the best cookies—slightly buttery and browned on the bottom.
- You can also buy double-thick aluminum and heavy-gauge aluminum pans. But those varieties are known more for durability than better baking results.
- Insulated cookie sheets (known by the Air-Bake brand name) are good for thin and delicate cookies. But, they prevent crispy edges and brown bottoms, which can be preferred for cutout sugar cookies. Note: You might have to bake your cookies a bit longer.
- Regardless of your cookie sheet choice, be sure to let the pan fully cool before putting your next batch of cookies on it. These cookies are so thin they can start to cook slightly before they’ve even made it to the oven, and you’ll end up with puffier cookies that don’t have those nice crisp cutout edges. If you’re in a rush between batches, run your warm pan under cool water and then dry.
5 Ways to Decorate Christmas Cookies
This is when it really starts to feel like Christmas. There are a lot of ways to go here. You can frost with a creamy buttercream frosting, you can go with traditional icing that hardens when dry, dip in almond bark or white chocolate, stack in a sandwich—there’s not much you can’t do when it comes to decorating sugar cookies!
How to Make Frosted Sugar Cookies
You can make your own, or buy ready-to-spread frosting. Mix in a few drops of food coloring if you’re feeling super festive. Finish with your favorite colored sugar or sprinkles.
How to Make Dipped Sugar Cookies
Melt up some chocolate and dip the top of each cookie, or simply dip the whole cookie halfway (like you’re dunking in milk). Let chocolate harden on waxed paper. Then add sprinkles. Always sprinkles.
How to Make Sugar Cookie Sandwiches
Spread your favorite frosting between two cookies. This version has round cookies, but why not stars or Christmas trees?
How to Drizzle Sugar Cookies
Use frosting, chocolate or almond bark in different colors to quickly drizzle cookies. It’s so easy and so cute, even the kids can’t mess it up. Tip: Put your topping of choice in a sealed plastic baggie, then cut off one corner, for the easiest drizzling.
How to Make Iced Christmas Sugar Cookies
The most traditional of all cutout cookie decorating! This one is a bit more complicated, but you can do it. Here’s how.
Mix up an easy 5-ingredient homemade icing. Simply stir the ingredients until smooth. You leave out the food coloring to make things really easy—plus this way the sprinkles really pop on the cookies.
- 2 cups powdered sugar
- 1/4 teaspoon vanilla
- 1/8 teaspoon almond extract
- 4 tablespoons milk
- Food color, if desired
The consistency should be fairly thin. When you use a spoon to stir and then drizzle, icing should kind of melt into itself. If you still see lines where you drizzled, add a little milk a few teaspoons at time. Set aside half of this mixture for what’s called “flooding.” We recommend putting it straight into a plastic squeeze bottle. You can get these at most grocery or craft stores and they really make decorating a breeze.
Now, mix in powdered sugar a tablespoon at a time to reach a thicker consistency. This time, you want a distinguishable line in your icing after you’ve drizzled. You’ll be using this icing to create a border or outline of your cookie. You can also put this mixture in a plastic squeeze bottle, but we prefer a piping bag or food storage bag with the smallest corner cut.
Now, use your thicker icing to create a border around the tops of each shaped cookie. Move slowly and pause on any corners or points to create an even outline. It doesn’t have to be perfect, but it should be a solid line. If your frosting is running, put it back into your bowl and add some more powdered sugar to thicken it up, then start again.
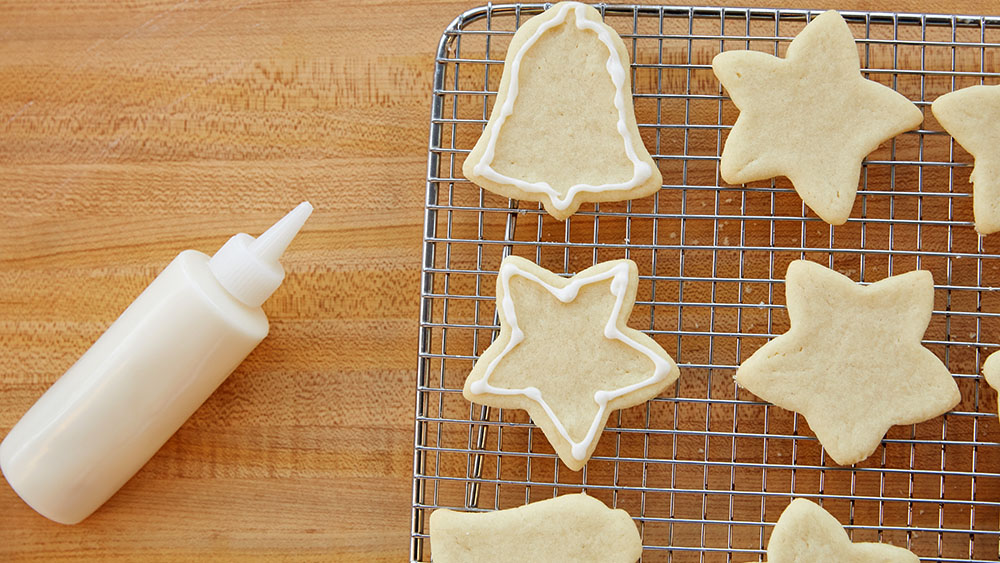
Switch to your thin icing for flooding, which is just a fancy word for filling in the outline you created. Think of it as coloring inside the lines of your cookie. You can leave a few gaps—as the thinner icing settles, it will spread out a bit to fill in the outline.
To save time, the process seems to go quicker if you do all of your outlines at once, and all of the flooding at once. If your kids are older, you can divvy up the tasks based on skill level.
Now, it’s important to add your sprinkles while your frosting is wet! If you want to get fancy you can swirl together different colors of flooding icing, but plain white icing with colored sprinkles looks pretty darn adorable too!
While sprinkles are the crowd-favorite in some families, you can use all sorts of things to make really cute Christmas cookies.
How to Store Christmas Cookies
Short-Term Storage
Cookies that are dipped in chocolate or almond bark can be stacked inside resealable plastic bags, since they won’t stick to one another. Frosted and iced cookies need a firm-sided container. Once icing has set, stack in airtight containers with pieces of waxed paper between layers. They’ll stay fresh this way for about a week. Storage tip: If you have room, toss in the heel from a loaf of bread. The bread soaks up moisture and the cookies stay soft. If you don’t have something that seals well, or are planning on gifting your cookies, you can use plates tightly wrapped in plastic cling wrap.
Expert tip: If you’re storing multiple different types of cookies, make sure you use a separate container for each cookie variety to avoid mingling the flavors and changing the texture.
Long-Term Storage: How to Freeze Christmas Cookies
To freeze cookies: Place unfrosted, baked cookies in containers with tight-fitting lids and freeze for up to 12 months. For frosted cookies, first freeze them uncovered on a baking sheet, then package the frozen cookies between layers of waxed paper in a rigid container for up to 2 months.
To thaw frozen cookies: Thaw soft-textured cookies in the container at room temperature or place them briefly in a microwave oven. Crisp-textured cookies should be removed from the container before thawing.
Tips for Making Christmas Cookies
Butter
If you are making cookie dough from scratch, make sure your butter is at room temperature. This will make a difference when creaming the butter and sugar together and the overall quality of your sugar cookie dough. How can you tell if your butter is ready? Room temperature butter should be soft enough for your finger to leave a mark on it went touched.
Making Uniform Cookies
You’ll want all of your cookies to be generally the same thickness so that they will bake in the same amount of time. Take care when rolling out your dough to be certain the thickness is uniform. Once your cookies are cut out, place them about 2 inches apart so they have room to spread.
Avoid Overbaking Cookies
No one wants a burnt cookie! To avoid this, always set your oven timer to the minimum baking time listed on the recipe. When your cookies come out of the oven, don’t leave them on the baking sheet to cool—they will continue to bake on the hot sheet if not removed after a minute or so.
Crazy for Christmas Cookies!
Ready to put all these methods and tips into action? Check out these recipes that mix and match the techniques we just went over in more detail.
(function() {
document.addEventListener('DOMContentLoaded', function() {
var componentMetadata = JSON.parse('\x7b\x22componentName\x22\x3a\x22ContentList_79c4799c-6931-4c3f-99e2-15a70f62f46c\x22,\x22deferOptions\x22\x3a\x7b\x22deferComponent\x22\x3atrue,\x22deferType\x22\x3a\x22OnDemand\x22,\x22deferId\x22\x3a\x22r6eccd2da0e29457489ae264da65cc79c\x22,\x22deferredContainerId\x22\x3a\x22\x2ffloatingActionToolbar\x2ffloatingActionToolbar_interop\x22,\x22deferredContainerView\x22\x3a\x22InteropDeferWrapper\x22\x7d,\x22viewName\x22\x3a\x22ContentList\x22\x7d');
var configuration = {"contentListSettings":{"backgroundColor":"","tileSize":"86px","mobileLayout":"carousel","id":"79c4799c-6931-4c3f-99e2-15a70f62f46c","title":"Keep Exploring Christmas Recipes","description":"Looking for more cooking inspiration? Check out even more dishes by category below.","headingAlignment":"center","listType":"categoryTile","defaultButtonText":"Save","favoritedButtonText":"Saved","unfavoriteButtonLabel":"Unsave","registrationUrl":"/user-profile/login","displayTitle":true,"displayDescription":true,"displayRatings":false,"displayFavoriteButton":false,"loadingIndicatorCount":7,"loadingIndicatorWidth":"86px","dataSource":"9bd61d2d-190e-4bd8-9e70-3e7d8430a3c0","maxItems":10,"pageSize":10,"listItemLayout":" -sm -md -lg","mediumScreenMaxWidth":"999px","enableJsonLdSearchResults":false,"contentTypeFilterValues":[{"id":"69df285a-7930-49bd-aed0-d90813323f29","name":"Answerbase","defaultImage":"/-/media/GMI/Core-Sites/PB/PB/Images/Shared/SearchNx/no-recipe-image.jpg"},{"id":"d80edd66-c0b8-4930-ae6f-d09a92684ffe","name":"Article","defaultImage":"/-/media/GMI/Core-Sites/PB/PB/Images/Shared/SearchNx/no-recipe-image.jpg"},{"id":"d3dd2f40-5baf-43f9-b8f3-15913ad39d8f","name":"CardCoupon","defaultImage":"/-/media/GMI/Core-Sites/PB/PB/Images/Shared/SearchNx/no-recipe-image.jpg"},{"id":"c35684f4-4ac7-48d3-8d57-d16051c88357","name":"Category","defaultImage":"/-/media/GMI/Core-Sites/PB/PB/Images/Shared/SearchNx/no-recipe-image.jpg"},{"id":"4a60d191-4765-4c27-96a1-bcf96bb271ab","name":"Collection","defaultImage":"/-/media/GMI/Core-Sites/PB/PB/Images/Shared/SearchNx/no-recipe-image.jpg"},{"id":"ba6ddfd1-8630-4ba4-b6e5-afeb24b975f3","name":"Guide","defaultImage":"/-/media/GMI/Core-Sites/PB/PB/Images/Shared/SearchNx/no-recipe-image.jpg"},{"id":"39375dc3-217d-42a0-9caa-81b9364f615a","name":"Home","defaultImage":"/-/media/GMI/Core-Sites/PB/PB/Images/Shared/SearchNx/no-recipe-image.jpg"},{"id":"fc57bf6c-6033-4a00-aa42-b69454ad32d5","name":"CardCoupon","defaultImage":"/-/media/GMI/Core-Sites/PB/PB/Images/Shared/SearchNx/no-recipe-image.jpg"},{"id":"2997ce26-ae3d-4262-90d6-9ca12c9f5b5e","name":"Other","defaultImage":"/-/media/GMI/Core-Sites/PB/PB/Images/Shared/SearchNx/no-recipe-image.jpg"},{"id":"ff312e5d-ec14-47f4-8254-e4a34a654ec4","name":"PrintedCoupon","defaultImage":"/-/media/GMI/Core-Sites/PB/PB/Images/Shared/SearchNx/no-recipe-image.jpg"},{"id":"c5b7629c-a6bf-48af-9302-1a34d8bb3426","name":"Product","defaultImage":"/-/media/GMI/Core-Sites/PB/PB/Images/Shared/SearchNx/no-recipe-image.jpg"},{"id":"8f91ec64-8841-49bc-a25d-cd8efed43895","name":"Product Category","defaultImage":"/-/media/GMI/Core-Sites/PB/PB/Images/Shared/SearchNx/no-recipe-image.jpg"},{"id":"0f474c05-f730-416d-b46f-2f35b81f8d36","name":"Recipe","defaultImage":"/-/media/GMI/Core-Sites/PB/PB/Images/Shared/SearchNx/no-recipe-image.jpg"},{"id":"ba563f7c-01a8-480f-8797-7c39ac248776","name":"Recipe","defaultImage":"/-/media/GMI/Core-Sites/PB/PB/Images/Shared/SearchNx/no-recipe-image.jpg"},{"id":"7c66bc4f-6698-4a79-8f9c-7f468b7c6d63","name":"Video","defaultImage":"/-/media/GMI/Core-Sites/PB/PB/Images/Shared/SearchNx/no-recipe-image.jpg"}],"defaultContentTypeFilters":[],"showFilters":false,"showSortOptions":false,"sortOptions":[],"dataSourceIds":["9bd61d2d-190e-4bd8-9e70-3e7d8430a3c0"],"disablePrefetch":false},"listDataSourceSettingsIds":["9bd61d2d-190e-4bd8-9e70-3e7d8430a3c0"],"serverSearchResponse":{"count":6,"results":[{"id":"81d67d02-ce7f-4f72-abe7-82c702bbc783","title":"Appetizers","removeTitleLink":false,"itemUrl":"/holidays-celebrations/christmas/appetizers","link":{"url":"/holidays-celebrations/christmas/appetizers","target":"_self","title":"Christmas Appetizer Recipes","class":"","text":"Christmas Appetizer Recipes"},"standardImages":{"standardImageUrl":"/-/media/GMI/Core-Sites/PB/PB/Images/holidays-celebrations/christmas/how-to-make-christmas-cookies/Category-Tile-1-Appetizers.jpg?sc_lang=en","alternateImageUrl":"/-/media/GMI/Core-Sites/PB/PB/Images/holidays-celebrations/christmas/how-to-make-christmas-cookies/Category-Tile-1-Appetizers.jpg?sc_lang=en","gridViewImageUrl":"/-/media/GMI/Core-Sites/PB/PB/Images/holidays-celebrations/christmas/how-to-make-christmas-cookies/Category-Tile-1-Appetizers.jpg?sc_lang=en","alternateGridViewImageUrl":"/-/media/GMI/Core-Sites/PB/PB/Images/holidays-celebrations/christmas/how-to-make-christmas-cookies/Category-Tile-1-Appetizers.jpg?sc_lang=en","thumbnailImageUrl":"/-/media/GMI/Core-Sites/PB/PB/Images/holidays-celebrations/christmas/how-to-make-christmas-cookies/Category-Tile-1-Appetizers.jpg?sc_lang=en","alternateThumbnailImageUrl":"/-/media/GMI/Core-Sites/PB/PB/Images/holidays-celebrations/christmas/how-to-make-christmas-cookies/Category-Tile-1-Appetizers.jpg?sc_lang=en","extraSmallImageUrl":"/-/media/GMI/Core-Sites/PB/PB/Images/holidays-celebrations/christmas/how-to-make-christmas-cookies/Category-Tile-1-Appetizers.jpg?sc_lang=en","alternateExtraSmallImageUrl":"/-/media/GMI/Core-Sites/PB/PB/Images/holidays-celebrations/christmas/how-to-make-christmas-cookies/Category-Tile-1-Appetizers.jpg?sc_lang=en","smallImageUrl":"/-/media/GMI/Core-Sites/PB/PB/Images/holidays-celebrations/christmas/how-to-make-christmas-cookies/Category-Tile-1-Appetizers.jpg?sc_lang=en","alternateSmallImageUrl":"/-/media/GMI/Core-Sites/PB/PB/Images/holidays-celebrations/christmas/how-to-make-christmas-cookies/Category-Tile-1-Appetizers.jpg?sc_lang=en","mediumImageUrl":"/-/media/GMI/Core-Sites/PB/PB/Images/holidays-celebrations/christmas/how-to-make-christmas-cookies/Category-Tile-1-Appetizers.jpg?sc_lang=en","alternateMediumImageUrl":"/-/media/GMI/Core-Sites/PB/PB/Images/holidays-celebrations/christmas/how-to-make-christmas-cookies/Category-Tile-1-Appetizers.jpg?sc_lang=en","largeImageUrl":"/-/media/GMI/Core-Sites/PB/PB/Images/holidays-celebrations/christmas/how-to-make-christmas-cookies/Category-Tile-1-Appetizers.jpg?sc_lang=en","alternateLargeImageUrl":"/-/media/GMI/Core-Sites/PB/PB/Images/holidays-celebrations/christmas/how-to-make-christmas-cookies/Category-Tile-1-Appetizers.jpg?sc_lang=en","extraLargeImageUrl":"/-/media/GMI/Core-Sites/PB/PB/Images/holidays-celebrations/christmas/how-to-make-christmas-cookies/Category-Tile-1-Appetizers.jpg?sc_lang=en","alternateExtraLargeImageUrl":"/-/media/GMI/Core-Sites/PB/PB/Images/holidays-celebrations/christmas/how-to-make-christmas-cookies/Category-Tile-1-Appetizers.jpg?sc_lang=en"},"contributor":{"id":"00000000-0000-0000-0000-000000000000","name":"Created by Joanna","avatarUrl":"","pageUrl":"/about-us/joanna"},"contentType":"Category","contentTypeLower":"category","unicaTag":"ev=searchresult_clicked\u0026searchcontenttype=Category\u0026Itemid=81d67d02-ce7f-4f72-abe7-82c702bbc783\u0026itemrank=1\u0026relevancyscore=65\u0026sorttype=\u0026facetfilters=\u0026ActionType=Other","contentTypeOverlayCSS":"overlay category","contentItemCSS":"category","description":"Start your holiday gathering on a delicious note with these festive, family-friendly appetizers. Easy to make and fun to share, these bites are perfect for parties, potlucks, or cozy nights at home.","shortDescription":"Start your holiday gathering on a delicious note with these festive, family-friendly appetizers. Easy to make and fun...","modifiedDate":"12/12/2025","displayDate":"November 26, 2025","isFavorite":false,"language":"en","numberOfAssociatedVideos":0,"propertyBag":{},"itemRank":1,"relevancyScore":65.0,"metadataIds":["5a04794f-94bc-43d4-8fdd-e51a139e4c6a","a23e1681-c922-487b-9f0d-f33fbcab31f8","72e2b2d7-d0c8-4ef4-baac-298a7d544c06","90a12e8e-3151-44c0-af1f-e09fca9ec77a"],"infoProperties":[{"template":"PandoSites/RecordTypePropertyView","name":"RecordType","value":"","additionalInfo":{},"showGraphicalRating":false,"averageRating":0.0,"ratingCount":0},{"template":"PandoSites/TitlePropertyView","name":"","value":"","additionalInfo":{},"showGraphicalRating":false,"averageRating":0.0,"ratingCount":0}],"pageViewCount":15252,"favoriteCount":0,"emailCount":0,"printCount":0,"averageRatingClass":"0","averageRatingLabel":"0","ratingCount":0,"isSponsored":false},{"id":"af14eb5b-fe84-4181-9bac-6a8a13a72403","title":"Desserts","removeTitleLink":false,"itemUrl":"/holidays-celebrations/christmas/desserts","link":{"url":"/holidays-celebrations/christmas/desserts","target":"_self","title":"Christmas Dessert Recipes","class":"","text":"Christmas Dessert Recipes"},"standardImages":{"standardImageUrl":"/-/media/GMI/Core-Sites/PB/PB/Images/holidays-celebrations/christmas/how-to-make-christmas-cookies/Category-Tile-2--Desserts-PeppermintBark.jpg?sc_lang=en","alternateImageUrl":"/-/media/GMI/Core-Sites/PB/PB/Images/holidays-celebrations/christmas/how-to-make-christmas-cookies/Category-Tile-2--Desserts-PeppermintBark.jpg?sc_lang=en","gridViewImageUrl":"/-/media/GMI/Core-Sites/PB/PB/Images/holidays-celebrations/christmas/how-to-make-christmas-cookies/Category-Tile-2--Desserts-PeppermintBark.jpg?sc_lang=en","alternateGridViewImageUrl":"/-/media/GMI/Core-Sites/PB/PB/Images/holidays-celebrations/christmas/how-to-make-christmas-cookies/Category-Tile-2--Desserts-PeppermintBark.jpg?sc_lang=en","thumbnailImageUrl":"/-/media/GMI/Core-Sites/PB/PB/Images/holidays-celebrations/christmas/how-to-make-christmas-cookies/Category-Tile-2--Desserts-PeppermintBark.jpg?sc_lang=en","alternateThumbnailImageUrl":"/-/media/GMI/Core-Sites/PB/PB/Images/holidays-celebrations/christmas/how-to-make-christmas-cookies/Category-Tile-2--Desserts-PeppermintBark.jpg?sc_lang=en","extraSmallImageUrl":"/-/media/GMI/Core-Sites/PB/PB/Images/holidays-celebrations/christmas/how-to-make-christmas-cookies/Category-Tile-2--Desserts-PeppermintBark.jpg?sc_lang=en","alternateExtraSmallImageUrl":"/-/media/GMI/Core-Sites/PB/PB/Images/holidays-celebrations/christmas/how-to-make-christmas-cookies/Category-Tile-2--Desserts-PeppermintBark.jpg?sc_lang=en","smallImageUrl":"/-/media/GMI/Core-Sites/PB/PB/Images/holidays-celebrations/christmas/how-to-make-christmas-cookies/Category-Tile-2--Desserts-PeppermintBark.jpg?sc_lang=en","alternateSmallImageUrl":"/-/media/GMI/Core-Sites/PB/PB/Images/holidays-celebrations/christmas/how-to-make-christmas-cookies/Category-Tile-2--Desserts-PeppermintBark.jpg?sc_lang=en","mediumImageUrl":"/-/media/GMI/Core-Sites/PB/PB/Images/holidays-celebrations/christmas/how-to-make-christmas-cookies/Category-Tile-2--Desserts-PeppermintBark.jpg?sc_lang=en","alternateMediumImageUrl":"/-/media/GMI/Core-Sites/PB/PB/Images/holidays-celebrations/christmas/how-to-make-christmas-cookies/Category-Tile-2--Desserts-PeppermintBark.jpg?sc_lang=en","largeImageUrl":"/-/media/GMI/Core-Sites/PB/PB/Images/holidays-celebrations/christmas/how-to-make-christmas-cookies/Category-Tile-2--Desserts-PeppermintBark.jpg?sc_lang=en","alternateLargeImageUrl":"/-/media/GMI/Core-Sites/PB/PB/Images/holidays-celebrations/christmas/how-to-make-christmas-cookies/Category-Tile-2--Desserts-PeppermintBark.jpg?sc_lang=en","extraLargeImageUrl":"/-/media/GMI/Core-Sites/PB/PB/Images/holidays-celebrations/christmas/how-to-make-christmas-cookies/Category-Tile-2--Desserts-PeppermintBark.jpg?sc_lang=en","alternateExtraLargeImageUrl":"/-/media/GMI/Core-Sites/PB/PB/Images/holidays-celebrations/christmas/how-to-make-christmas-cookies/Category-Tile-2--Desserts-PeppermintBark.jpg?sc_lang=en"},"contributor":{"id":"00000000-0000-0000-0000-000000000000","name":"Created by Joanna","avatarUrl":"","pageUrl":"/about-us/joanna"},"contentType":"Category","contentTypeLower":"category","unicaTag":"ev=searchresult_clicked\u0026searchcontenttype=Category\u0026Itemid=af14eb5b-fe84-4181-9bac-6a8a13a72403\u0026itemrank=2\u0026relevancyscore=65\u0026sorttype=\u0026facetfilters=\u0026ActionType=Other","contentTypeOverlayCSS":"overlay category","contentItemCSS":"category","description":"Christmas isn\u0026rsquo;t complete without dessert, and we\u0026rsquo;ve got the recipes to make your holiday table unforgettable. From classic pies and festive cookies to creative bars and more, these treats are made to impress without adding stress to your holiday prep. Whether you\u0026rsquo;re carrying on family traditions or starting new ones, these Christmas desserts are the perfect way to end the celebration on a sweet note.","shortDescription":"Christmas isn\u0026rsquo;t complete without dessert, and we\u0026rsquo;ve got the recipes to make your holiday table unforgetta...","modifiedDate":"12/12/2025","displayDate":"November 26, 2025","isFavorite":false,"language":"en","numberOfAssociatedVideos":0,"propertyBag":{},"itemRank":2,"relevancyScore":65.0,"metadataIds":["98458458-40b3-4bd7-a118-37400136705d","b7e8851f-b230-4759-80c9-768232fb4f56","a23e1681-c922-487b-9f0d-f33fbcab31f8","72e2b2d7-d0c8-4ef4-baac-298a7d544c06","90a12e8e-3151-44c0-af1f-e09fca9ec77a"],"infoProperties":[{"template":"PandoSites/RecordTypePropertyView","name":"RecordType","value":"","additionalInfo":{},"showGraphicalRating":false,"averageRating":0.0,"ratingCount":0},{"template":"PandoSites/TitlePropertyView","name":"","value":"","additionalInfo":{},"showGraphicalRating":false,"averageRating":0.0,"ratingCount":0}],"pageViewCount":12385,"favoriteCount":0,"emailCount":0,"printCount":0,"averageRatingClass":"0","averageRatingLabel":"0","ratingCount":0,"isSponsored":false},{"id":"52726794-f6bf-46fc-a1f4-c0b519c3f464","title":"Cookies","removeTitleLink":false,"itemUrl":"/recipes/dish-type/cookies/christmas","link":{"url":"/recipes/dish-type/cookies/christmas","target":"_self","title":"Pillsbury’s Best Christmas Cookies","class":"","text":"Pillsbury’s Best Christmas Cookies"},"standardImages":{"standardImageUrl":"/-/media/GMI/Core-Sites/PB/PB/Images/holidays-celebrations/christmas/how-to-make-christmas-cookies/Category-Tile-3-Cookies.jpg?sc_lang=en","alternateImageUrl":"/-/media/GMI/Core-Sites/PB/PB/Images/holidays-celebrations/christmas/how-to-make-christmas-cookies/Category-Tile-3-Cookies.jpg?sc_lang=en","gridViewImageUrl":"/-/media/GMI/Core-Sites/PB/PB/Images/holidays-celebrations/christmas/how-to-make-christmas-cookies/Category-Tile-3-Cookies.jpg?sc_lang=en","alternateGridViewImageUrl":"/-/media/GMI/Core-Sites/PB/PB/Images/holidays-celebrations/christmas/how-to-make-christmas-cookies/Category-Tile-3-Cookies.jpg?sc_lang=en","thumbnailImageUrl":"/-/media/GMI/Core-Sites/PB/PB/Images/holidays-celebrations/christmas/how-to-make-christmas-cookies/Category-Tile-3-Cookies.jpg?sc_lang=en","alternateThumbnailImageUrl":"/-/media/GMI/Core-Sites/PB/PB/Images/holidays-celebrations/christmas/how-to-make-christmas-cookies/Category-Tile-3-Cookies.jpg?sc_lang=en","extraSmallImageUrl":"/-/media/GMI/Core-Sites/PB/PB/Images/holidays-celebrations/christmas/how-to-make-christmas-cookies/Category-Tile-3-Cookies.jpg?sc_lang=en","alternateExtraSmallImageUrl":"/-/media/GMI/Core-Sites/PB/PB/Images/holidays-celebrations/christmas/how-to-make-christmas-cookies/Category-Tile-3-Cookies.jpg?sc_lang=en","smallImageUrl":"/-/media/GMI/Core-Sites/PB/PB/Images/holidays-celebrations/christmas/how-to-make-christmas-cookies/Category-Tile-3-Cookies.jpg?sc_lang=en","alternateSmallImageUrl":"/-/media/GMI/Core-Sites/PB/PB/Images/holidays-celebrations/christmas/how-to-make-christmas-cookies/Category-Tile-3-Cookies.jpg?sc_lang=en","mediumImageUrl":"/-/media/GMI/Core-Sites/PB/PB/Images/holidays-celebrations/christmas/how-to-make-christmas-cookies/Category-Tile-3-Cookies.jpg?sc_lang=en","alternateMediumImageUrl":"/-/media/GMI/Core-Sites/PB/PB/Images/holidays-celebrations/christmas/how-to-make-christmas-cookies/Category-Tile-3-Cookies.jpg?sc_lang=en","largeImageUrl":"/-/media/GMI/Core-Sites/PB/PB/Images/holidays-celebrations/christmas/how-to-make-christmas-cookies/Category-Tile-3-Cookies.jpg?sc_lang=en","alternateLargeImageUrl":"/-/media/GMI/Core-Sites/PB/PB/Images/holidays-celebrations/christmas/how-to-make-christmas-cookies/Category-Tile-3-Cookies.jpg?sc_lang=en","extraLargeImageUrl":"/-/media/GMI/Core-Sites/PB/PB/Images/holidays-celebrations/christmas/how-to-make-christmas-cookies/Category-Tile-3-Cookies.jpg?sc_lang=en","alternateExtraLargeImageUrl":"/-/media/GMI/Core-Sites/PB/PB/Images/holidays-celebrations/christmas/how-to-make-christmas-cookies/Category-Tile-3-Cookies.jpg?sc_lang=en"},"contributor":{"id":"00000000-0000-0000-0000-000000000000","name":"","avatarUrl":"","pageUrl":""},"contentType":"Category","contentTypeLower":"category","unicaTag":"ev=searchresult_clicked\u0026searchcontenttype=Category\u0026Itemid=52726794-f6bf-46fc-a1f4-c0b519c3f464\u0026itemrank=3\u0026relevancyscore=65\u0026sorttype=\u0026facetfilters=\u0026ActionType=Other","contentTypeOverlayCSS":"overlay category","contentItemCSS":"category","description":"Nothing inspires jolly feelings quite like holiday cookies. Check out this festive collection of Christmas cookie ideas to make the season sweeter.","shortDescription":"Nothing inspires jolly feelings quite like holiday cookies. Check out this festive collection of Christmas cookie ide...","modifiedDate":"11/21/2023","displayDate":"November 20, 2023","isFavorite":false,"language":"en","numberOfAssociatedVideos":0,"propertyBag":{},"itemRank":3,"relevancyScore":65.0,"metadataIds":["290ca72f-9ed3-436d-a40a-fc972b7a5343","b7e8851f-b230-4759-80c9-768232fb4f56","72326acf-2931-447d-bafa-82f0583bcb7a","a23e1681-c922-487b-9f0d-f33fbcab31f8","72e2b2d7-d0c8-4ef4-baac-298a7d544c06","f178a219-0b27-4b39-ad32-591390039484","90a12e8e-3151-44c0-af1f-e09fca9ec77a"],"infoProperties":[{"template":"PandoSites/RecordTypePropertyView","name":"RecordType","value":"","additionalInfo":{},"showGraphicalRating":false,"averageRating":0.0,"ratingCount":0},{"template":"PandoSites/TitlePropertyView","name":"","value":"","additionalInfo":{},"showGraphicalRating":false,"averageRating":0.0,"ratingCount":0}],"pageViewCount":21954,"favoriteCount":0,"emailCount":0,"printCount":0,"averageRatingClass":"0","averageRatingLabel":"0","ratingCount":0,"isSponsored":false},{"id":"fc60d4bf-17d6-47cc-8442-cd81dabf9e19","title":"Breakfast \u0026 Brunch","removeTitleLink":false,"itemUrl":"/holidays-celebrations/christmas/breakfast-brunch","link":{"url":"/holidays-celebrations/christmas/breakfast-brunch","target":"_self","title":"Christmas Brunch Recipes","class":"","text":"Christmas Brunch Recipes"},"standardImages":{"standardImageUrl":"/-/media/GMI/Core-Sites/PB/PB/Images/holidays-celebrations/christmas/how-to-make-christmas-cookies/Category-Tile-4Breakfast--Brunch.jpg?sc_lang=en","alternateImageUrl":"/-/media/GMI/Core-Sites/PB/PB/Images/holidays-celebrations/christmas/how-to-make-christmas-cookies/Category-Tile-4Breakfast--Brunch.jpg?sc_lang=en","gridViewImageUrl":"/-/media/GMI/Core-Sites/PB/PB/Images/holidays-celebrations/christmas/how-to-make-christmas-cookies/Category-Tile-4Breakfast--Brunch.jpg?sc_lang=en","alternateGridViewImageUrl":"/-/media/GMI/Core-Sites/PB/PB/Images/holidays-celebrations/christmas/how-to-make-christmas-cookies/Category-Tile-4Breakfast--Brunch.jpg?sc_lang=en","thumbnailImageUrl":"/-/media/GMI/Core-Sites/PB/PB/Images/holidays-celebrations/christmas/how-to-make-christmas-cookies/Category-Tile-4Breakfast--Brunch.jpg?sc_lang=en","alternateThumbnailImageUrl":"/-/media/GMI/Core-Sites/PB/PB/Images/holidays-celebrations/christmas/how-to-make-christmas-cookies/Category-Tile-4Breakfast--Brunch.jpg?sc_lang=en","extraSmallImageUrl":"/-/media/GMI/Core-Sites/PB/PB/Images/holidays-celebrations/christmas/how-to-make-christmas-cookies/Category-Tile-4Breakfast--Brunch.jpg?sc_lang=en","alternateExtraSmallImageUrl":"/-/media/GMI/Core-Sites/PB/PB/Images/holidays-celebrations/christmas/how-to-make-christmas-cookies/Category-Tile-4Breakfast--Brunch.jpg?sc_lang=en","smallImageUrl":"/-/media/GMI/Core-Sites/PB/PB/Images/holidays-celebrations/christmas/how-to-make-christmas-cookies/Category-Tile-4Breakfast--Brunch.jpg?sc_lang=en","alternateSmallImageUrl":"/-/media/GMI/Core-Sites/PB/PB/Images/holidays-celebrations/christmas/how-to-make-christmas-cookies/Category-Tile-4Breakfast--Brunch.jpg?sc_lang=en","mediumImageUrl":"/-/media/GMI/Core-Sites/PB/PB/Images/holidays-celebrations/christmas/how-to-make-christmas-cookies/Category-Tile-4Breakfast--Brunch.jpg?sc_lang=en","alternateMediumImageUrl":"/-/media/GMI/Core-Sites/PB/PB/Images/holidays-celebrations/christmas/how-to-make-christmas-cookies/Category-Tile-4Breakfast--Brunch.jpg?sc_lang=en","largeImageUrl":"/-/media/GMI/Core-Sites/PB/PB/Images/holidays-celebrations/christmas/how-to-make-christmas-cookies/Category-Tile-4Breakfast--Brunch.jpg?sc_lang=en","alternateLargeImageUrl":"/-/media/GMI/Core-Sites/PB/PB/Images/holidays-celebrations/christmas/how-to-make-christmas-cookies/Category-Tile-4Breakfast--Brunch.jpg?sc_lang=en","extraLargeImageUrl":"/-/media/GMI/Core-Sites/PB/PB/Images/holidays-celebrations/christmas/how-to-make-christmas-cookies/Category-Tile-4Breakfast--Brunch.jpg?sc_lang=en","alternateExtraLargeImageUrl":"/-/media/GMI/Core-Sites/PB/PB/Images/holidays-celebrations/christmas/how-to-make-christmas-cookies/Category-Tile-4Breakfast--Brunch.jpg?sc_lang=en"},"contributor":{"id":"00000000-0000-0000-0000-000000000000","name":"Created by Joanna","avatarUrl":"","pageUrl":"/about-us/joanna"},"contentType":"Category","contentTypeLower":"category","unicaTag":"ev=searchresult_clicked\u0026searchcontenttype=Category\u0026Itemid=fc60d4bf-17d6-47cc-8442-cd81dabf9e19\u0026itemrank=4\u0026relevancyscore=65\u0026sorttype=\u0026facetfilters=\u0026ActionType=Other","contentTypeOverlayCSS":"overlay category","contentItemCSS":"category","description":"Make your holiday mornings extra special with these crowd-pleasing breakfast and brunch recipes. From cozy casseroles and make-ahead bakes to festive twists on family favorites, these dishes are perfect for sharing around the table\u0026mdash;whether you\u0026rsquo;re hosting a big gathering or enjoying a relaxed morning at home.","shortDescription":"Make your holiday mornings extra special with these crowd-pleasing breakfast and brunch recipes. From cozy casseroles...","modifiedDate":"12/12/2025","displayDate":"December 02, 2025","isFavorite":false,"language":"en","numberOfAssociatedVideos":0,"propertyBag":{},"itemRank":4,"relevancyScore":65.0,"metadataIds":["791af8dc-9028-4e85-8751-562ab0493a62","932c1e65-5b4e-4c2d-b427-5aafedda3fbb","6ef34fda-f849-4070-8786-dd66ed976ca2","a23e1681-c922-487b-9f0d-f33fbcab31f8","72e2b2d7-d0c8-4ef4-baac-298a7d544c06","90a12e8e-3151-44c0-af1f-e09fca9ec77a"],"infoProperties":[{"template":"PandoSites/RecordTypePropertyView","name":"RecordType","value":"","additionalInfo":{},"showGraphicalRating":false,"averageRating":0.0,"ratingCount":0},{"template":"PandoSites/TitlePropertyView","name":"","value":"","additionalInfo":{},"showGraphicalRating":false,"averageRating":0.0,"ratingCount":0}],"pageViewCount":5867,"favoriteCount":0,"emailCount":0,"printCount":0,"averageRatingClass":"0","averageRatingLabel":"0","ratingCount":0,"isSponsored":false},{"id":"4307c8b4-9535-404f-91de-44c2c7a1bd97","title":"Dinner","removeTitleLink":false,"itemUrl":"/holidays-celebrations/christmas/dinner","link":{"url":"/holidays-celebrations/christmas/dinner","target":"_self","title":"Christmas Dinner Recipes","class":"","text":"Christmas Dinner Recipes"},"standardImages":{"standardImageUrl":"/-/media/GMI/Core-Sites/PB/PB/Images/holidays-celebrations/christmas/how-to-make-christmas-cookies/Category-Tile-5-Dinner.jpg?sc_lang=en","alternateImageUrl":"/-/media/GMI/Core-Sites/PB/PB/Images/holidays-celebrations/christmas/how-to-make-christmas-cookies/Category-Tile-5-Dinner.jpg?sc_lang=en","gridViewImageUrl":"/-/media/GMI/Core-Sites/PB/PB/Images/holidays-celebrations/christmas/how-to-make-christmas-cookies/Category-Tile-5-Dinner.jpg?sc_lang=en","alternateGridViewImageUrl":"/-/media/GMI/Core-Sites/PB/PB/Images/holidays-celebrations/christmas/how-to-make-christmas-cookies/Category-Tile-5-Dinner.jpg?sc_lang=en","thumbnailImageUrl":"/-/media/GMI/Core-Sites/PB/PB/Images/holidays-celebrations/christmas/how-to-make-christmas-cookies/Category-Tile-5-Dinner.jpg?sc_lang=en","alternateThumbnailImageUrl":"/-/media/GMI/Core-Sites/PB/PB/Images/holidays-celebrations/christmas/how-to-make-christmas-cookies/Category-Tile-5-Dinner.jpg?sc_lang=en","extraSmallImageUrl":"/-/media/GMI/Core-Sites/PB/PB/Images/holidays-celebrations/christmas/how-to-make-christmas-cookies/Category-Tile-5-Dinner.jpg?sc_lang=en","alternateExtraSmallImageUrl":"/-/media/GMI/Core-Sites/PB/PB/Images/holidays-celebrations/christmas/how-to-make-christmas-cookies/Category-Tile-5-Dinner.jpg?sc_lang=en","smallImageUrl":"/-/media/GMI/Core-Sites/PB/PB/Images/holidays-celebrations/christmas/how-to-make-christmas-cookies/Category-Tile-5-Dinner.jpg?sc_lang=en","alternateSmallImageUrl":"/-/media/GMI/Core-Sites/PB/PB/Images/holidays-celebrations/christmas/how-to-make-christmas-cookies/Category-Tile-5-Dinner.jpg?sc_lang=en","mediumImageUrl":"/-/media/GMI/Core-Sites/PB/PB/Images/holidays-celebrations/christmas/how-to-make-christmas-cookies/Category-Tile-5-Dinner.jpg?sc_lang=en","alternateMediumImageUrl":"/-/media/GMI/Core-Sites/PB/PB/Images/holidays-celebrations/christmas/how-to-make-christmas-cookies/Category-Tile-5-Dinner.jpg?sc_lang=en","largeImageUrl":"/-/media/GMI/Core-Sites/PB/PB/Images/holidays-celebrations/christmas/how-to-make-christmas-cookies/Category-Tile-5-Dinner.jpg?sc_lang=en","alternateLargeImageUrl":"/-/media/GMI/Core-Sites/PB/PB/Images/holidays-celebrations/christmas/how-to-make-christmas-cookies/Category-Tile-5-Dinner.jpg?sc_lang=en","extraLargeImageUrl":"/-/media/GMI/Core-Sites/PB/PB/Images/holidays-celebrations/christmas/how-to-make-christmas-cookies/Category-Tile-5-Dinner.jpg?sc_lang=en","alternateExtraLargeImageUrl":"/-/media/GMI/Core-Sites/PB/PB/Images/holidays-celebrations/christmas/how-to-make-christmas-cookies/Category-Tile-5-Dinner.jpg?sc_lang=en"},"contributor":{"id":"00000000-0000-0000-0000-000000000000","name":"","avatarUrl":"","pageUrl":""},"contentType":"Category","contentTypeLower":"category","unicaTag":"ev=searchresult_clicked\u0026searchcontenttype=Category\u0026Itemid=4307c8b4-9535-404f-91de-44c2c7a1bd97\u0026itemrank=5\u0026relevancyscore=65\u0026sorttype=\u0026facetfilters=\u0026ActionType=Other","contentTypeOverlayCSS":"overlay category","contentItemCSS":"category","description":"Give your family the gift of an incredible Christmas dinner! These sure-to-please dishes offer simple, stress-free prep.","shortDescription":"Give your family the gift of an incredible Christmas dinner! These sure-to-please dishes offer simple, stress-free prep.","modifiedDate":"8/15/2022","displayDate":"November 12, 2021","isFavorite":false,"language":"en","numberOfAssociatedVideos":0,"propertyBag":{},"itemRank":5,"relevancyScore":65.0,"metadataIds":["bd6338ce-de94-4e95-a7c6-80e6a927e3a2","7c21641c-2229-40fd-8c62-9b4c9346c6c0","a23e1681-c922-487b-9f0d-f33fbcab31f8","72e2b2d7-d0c8-4ef4-baac-298a7d544c06","90a12e8e-3151-44c0-af1f-e09fca9ec77a"],"infoProperties":[{"template":"PandoSites/RecordTypePropertyView","name":"RecordType","value":"","additionalInfo":{},"showGraphicalRating":false,"averageRating":0.0,"ratingCount":0},{"template":"PandoSites/TitlePropertyView","name":"","value":"","additionalInfo":{},"showGraphicalRating":false,"averageRating":0.0,"ratingCount":0}],"pageViewCount":253,"favoriteCount":0,"emailCount":0,"printCount":0,"averageRatingClass":"0","averageRatingLabel":"0","ratingCount":0,"isSponsored":false},{"id":"0d855354-bc5e-4acc-b3d1-d97d8e58464b","title":"All Christmas Recipes","removeTitleLink":false,"itemUrl":"/holidays-celebrations/christmas","link":{"url":"/holidays-celebrations/christmas","target":"_self","title":"Festive \u0026 Fuss-Free Christmas Recipes","class":"","text":"Festive \u0026 Fuss-Free Christmas Recipes"},"standardImages":{"standardImageUrl":"/-/media/GMI/Core-Sites/PB/PB/Images/holidays-celebrations/christmas/how-to-make-christmas-cookies/Category-Title-All-Christmas.jpg?sc_lang=en","alternateImageUrl":"/-/media/GMI/Core-Sites/PB/PB/Images/holidays-celebrations/christmas/how-to-make-christmas-cookies/Category-Title-All-Christmas.jpg?sc_lang=en","gridViewImageUrl":"/-/media/GMI/Core-Sites/PB/PB/Images/holidays-celebrations/christmas/how-to-make-christmas-cookies/Category-Title-All-Christmas.jpg?sc_lang=en","alternateGridViewImageUrl":"/-/media/GMI/Core-Sites/PB/PB/Images/holidays-celebrations/christmas/how-to-make-christmas-cookies/Category-Title-All-Christmas.jpg?sc_lang=en","thumbnailImageUrl":"/-/media/GMI/Core-Sites/PB/PB/Images/holidays-celebrations/christmas/how-to-make-christmas-cookies/Category-Title-All-Christmas.jpg?sc_lang=en","alternateThumbnailImageUrl":"/-/media/GMI/Core-Sites/PB/PB/Images/holidays-celebrations/christmas/how-to-make-christmas-cookies/Category-Title-All-Christmas.jpg?sc_lang=en","extraSmallImageUrl":"/-/media/GMI/Core-Sites/PB/PB/Images/holidays-celebrations/christmas/how-to-make-christmas-cookies/Category-Title-All-Christmas.jpg?sc_lang=en","alternateExtraSmallImageUrl":"/-/media/GMI/Core-Sites/PB/PB/Images/holidays-celebrations/christmas/how-to-make-christmas-cookies/Category-Title-All-Christmas.jpg?sc_lang=en","smallImageUrl":"/-/media/GMI/Core-Sites/PB/PB/Images/holidays-celebrations/christmas/how-to-make-christmas-cookies/Category-Title-All-Christmas.jpg?sc_lang=en","alternateSmallImageUrl":"/-/media/GMI/Core-Sites/PB/PB/Images/holidays-celebrations/christmas/how-to-make-christmas-cookies/Category-Title-All-Christmas.jpg?sc_lang=en","mediumImageUrl":"/-/media/GMI/Core-Sites/PB/PB/Images/holidays-celebrations/christmas/how-to-make-christmas-cookies/Category-Title-All-Christmas.jpg?sc_lang=en","alternateMediumImageUrl":"/-/media/GMI/Core-Sites/PB/PB/Images/holidays-celebrations/christmas/how-to-make-christmas-cookies/Category-Title-All-Christmas.jpg?sc_lang=en","largeImageUrl":"/-/media/GMI/Core-Sites/PB/PB/Images/holidays-celebrations/christmas/how-to-make-christmas-cookies/Category-Title-All-Christmas.jpg?sc_lang=en","alternateLargeImageUrl":"/-/media/GMI/Core-Sites/PB/PB/Images/holidays-celebrations/christmas/how-to-make-christmas-cookies/Category-Title-All-Christmas.jpg?sc_lang=en","extraLargeImageUrl":"/-/media/GMI/Core-Sites/PB/PB/Images/holidays-celebrations/christmas/how-to-make-christmas-cookies/Category-Title-All-Christmas.jpg?sc_lang=en","alternateExtraLargeImageUrl":"/-/media/GMI/Core-Sites/PB/PB/Images/holidays-celebrations/christmas/how-to-make-christmas-cookies/Category-Title-All-Christmas.jpg?sc_lang=en"},"contributor":{"id":"00000000-0000-0000-0000-000000000000","name":"","avatarUrl":"","pageUrl":""},"contentType":"Category","contentTypeLower":"category","unicaTag":"ev=searchresult_clicked\u0026searchcontenttype=Category\u0026Itemid=0d855354-bc5e-4acc-b3d1-d97d8e58464b\u0026itemrank=6\u0026relevancyscore=65\u0026sorttype=\u0026facetfilters=\u0026ActionType=Other","contentTypeOverlayCSS":"overlay category","contentItemCSS":"category","description":"Deck the halls and fill your table with holiday cheer! From festive appetizers and savory sides to show-stopping desserts and sweet treats, these recipes make it easy to create a magical holiday feast for the ones you love.","shortDescription":"Deck the halls and fill your table with holiday cheer! From festive appetizers and savory sides to show-stopping dess...","modifiedDate":"12/12/2025","displayDate":"September 24, 2025","isFavorite":false,"language":"en","numberOfAssociatedVideos":0,"propertyBag":{},"itemRank":6,"relevancyScore":65.0,"metadataIds":["911c4b93-3e90-44ce-b747-0f1ff8671798","a23e1681-c922-487b-9f0d-f33fbcab31f8","90a12e8e-3151-44c0-af1f-e09fca9ec77a"],"infoProperties":[{"template":"PandoSites/RecordTypePropertyView","name":"RecordType","value":"","additionalInfo":{},"showGraphicalRating":false,"averageRating":0.0,"ratingCount":0},{"template":"PandoSites/TitlePropertyView","name":"","value":"","additionalInfo":{},"showGraphicalRating":false,"averageRating":0.0,"ratingCount":0}],"pageViewCount":68600,"favoriteCount":0,"emailCount":0,"printCount":0,"averageRatingClass":"0","averageRatingLabel":"0","ratingCount":0,"isSponsored":false}],"isLastPage":true,"facetCounts":{},"searchTemplateUsed":"pmc.site_search_template_v2.5"},"isAnonymous":true,"isAnonymousUserWithFavorites":true,"favoritesCallTime":0};
var moduleName = 'contentList';
var isVueModule = true;
GeneralMills.PandoSites.RegisterControlInstance(moduleName, configuration, componentMetadata, isVueModule)
});
})();
(function() {
document.addEventListener('DOMContentLoaded', function() {
var componentMetadata = JSON.parse('\x7b\x22componentName\x22\x3a\x22NewsletterCTA_592b7e30-5c94-49d6-8316-3c4546d1dac2\x22,\x22deferOptions\x22\x3a\x7b\x22deferComponent\x22\x3atrue,\x22deferType\x22\x3a\x22OnDemand\x22,\x22deferId\x22\x3a\x22r24235ad73c244f2197556265041f409d\x22,\x22deferredContainerId\x22\x3a\x22\x2fprimaryColumn\x2finteropInlineNewsletterCta\x22,\x22deferredContainerView\x22\x3a\x22InteropDeferWrapper\x22\x7d,\x22viewName\x22\x3a\x22NewsletterCTA\x22\x7d');
var configuration = {"unsubscribedNewsletters":[{"listId":"6d3e858f-4804-4f38-9b8a-712a9a5668cc","thumbnailImageUrl":"/-/media/GMI/Core-Sites/PB/Images/Shared/myaccount/newsletters/PB_Email_Thumb_200x200.gif?sc_lang=en","previewUrl":"https://morpheus3.idpk.net/email_sends/10626/preview","name":"Pillsbury\u0027s Email","isPromo":false}],"settings":{"anonymousCopy":"Family-friendly meals made easy!","anonymousDescriptionCopy":"Make everyday family moments count, with easy recipes that everyone will love. Join our email community to receive tested recipes and tips.","anonymousThankYouCopy":"Thanks! Your first email is on its way.","anonymousThankYouDescriptionCopy":"\u003cp\u003e\u003cspan\u003eNow that you\u0026rsquo;re signed up, create an account on Pillsbury.com to save your favorite recipes, learn more about special promotions and get meal inspiration for any occasion.\u003c/span\u003e\u003c/p\u003e","anonymousButtonText":"Help me make mealtimes easier!","anonymousEmailInvalidErrorText":"Please enter a valid email address.","anonymousSubscribeErrorText":"We encountered an error while signing you up. Please try again.","anonymousEmailAddressPlaceholderText":"Enter your email address","anonymousEmailAddressLabel":"Email Address","anonymousLegalCopy":"By signing up, you accept our\u0026nbsp;\u003cspan style=\u0022text-decoration: underline;\u0022\u003e\u003ca rel=\u0022noopener noreferrer\u0022 href=\u0022https://www.generalmills.com/privacy-security/us-english-privacy-policy\u0022 target=\u0022_blank\u0022\u003ePrivacy Policy\u003c/a\u003e\u003c/span\u003e\u0026nbsp;and agree that your information may be used across our\u0026nbsp;\u003cspan style=\u0022text-decoration: underline;\u0022\u003e\u003ca rel=\u0022noopener noreferrer\u0022 href=\u0022https://www.generalmills.com/food-we-make/brands\u0022 target=\u0022_blank\u0022\u003efamily of brands\u003c/a\u003e.\u003c/span\u003e","requiredFieldText":"","backgroundColor":"#002E6D","accentColor":"","registrationUrl":"/user-profile/register?RegAction=SUBSCRIBERUPGRADE\u0026esrc=14171\u0026returnUrl=%2fholidays-celebrations%2fchristmas%2fhow-to-make-christmas-cookies","registrationLinkText":"Sign up now","enableExpandedFields":false,"hideForSessionCookieExpiration":0,"ctaType":"StandardAnonymous","location":"Inline","userState":"Anonymous","sourceCodeOverride":0}};
var moduleName = 'newsletterCta';
var isVueModule = true;
GeneralMills.PandoSites.RegisterControlInstance(moduleName, configuration, componentMetadata, isVueModule)
});
})();