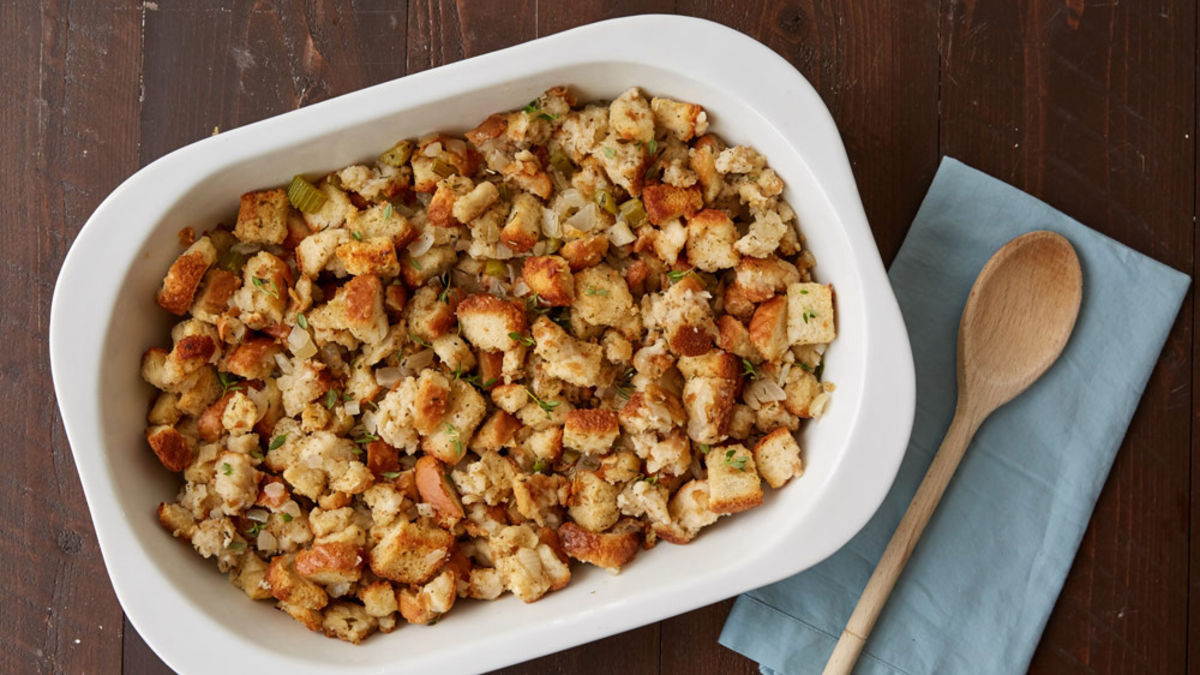
Classic Herb Stuffing
Want to make amazing stuffing? You can use almost any bread—even bagels! —but stale white bread is traditional. Beyond the bread, the key is a flavorful mix of celery, onion, herbs, and your choice of add-ins like sausage, cranberries, or mushrooms. Bake it, stovetop it, or slow cook it, then reheat leftovers in the oven, microwave, or even a waffle iron! Whether you call it stuffing (cooked inside a bird) or dressing (baked separately), the most important thing is to season well and have fun with it!
The Bread to Use for Stuffing
It is impossible to name all the different types of bread that can be used to make a good stuffing because just about anything works—sourdough, cornbread, wheat bread and even bagels. Traditionally dry, stale white bread is used which requires extra prep steps if you don’t have it on hand.
This Classic Herb Stuffing recipe, developed and tested by the Pillsbury Kitchens, uses fresh, soft bread cubes to show how simple stuffing can be! No need to worry about drying out your bread. This recipe works with day-old bread or croutons, but you may need to adjust it. Add additional broth 1/4 cup at a time, ensuring the dry, stale bread absorbs the liquid until softened and no extra liquid remains in the bowl. Bake as directed, noting that the uncovered baking time may increase.
Some people purchase pre-dried bread in a bag, but it’s incredibly easy to create your own stuffing croutons with just a little bit of planning. To dry fresh bread, simply leave it out on your counter for 24 to 48 hours, or if you’re in a rush, you can dry it out for an hour or so in a low-temperature oven (around 250°F), flipping the slices halfway through the cook time. Then, let it cool and tear (for a more rustic stuffing) or cut the bread to your desired size.
You certainly can use no bread at all. If you’d like to do a grain stuffing, you can use rice and quinoa in place of the bread if you are avoiding gluten. You can also include a grain like wild rice with bread cubes for a combo grain + bread stuffing. Farro and barley can also be used to make grain stuffing but know that these two grains contain gluten. Just remember, if cooking gluten free, always read labels to make sure each recipe ingredient is gluten free. Products and ingredient sources can change.
Stuffing Mix-Ins
The basis for stuffing, apart from the bread, is the rich vegetables and seasonings with other optional touches for personal flair.
Veggies and Seasonings:
A mixture of celery and onion cooked in butter or oil and seasoned with salt and pepper is a staple in any stuffing. Then you’ll add hearty herbs such as sage, thyme, and perhaps rosemary.
Binding Options:
A bit of liquid like broth, water, milk, or buttermilk keeps the mixture a little wet and helps it stick together. Lightly beaten egg is an optional binder, often paired with one of the liquids mentioned above, to help prevent dry stuffing. Egg yolk adds richness, flavor, and more binding power as eggs are emulsifiers. Pair egg with milk, buttermilk, or heavy cream for more of a richer, savory custard-like stuffing.
Meat or Seafood:
From there, you can add whatever you want. Some people add meat like sausage but if you’re using meat in your stuffing, it will need to be cooked thoroughly before being added to the rest of the ingredients. If you go for sausage, we recommend switching up the order of your steps to cook your celery and onions in the fat rendered from the meat, adding an extra layer of deliciousness. Some east coast recipes add seafood to their stuffing, including clams, oysters, shrimp, or crabmeat.
More Mix-ins:
To make a meatless dressing, simply add some dried fruit, nuts, lentils or cooked mushrooms to the bread mixture and use vegetable instead of chicken broth. Of course, these are great additions to the options above, but they will really round out a meat-free stuffing or dressing.
Other Cooking Methods
If you are short on oven space, but need to keep your cooking on schedule, try making a stovetop or slow cooker stuffing. Results are great, but texturally different from oven baked stuffing.
To achieve the chewy, crunchy richness of baked stuffing, transfer the finished stovetop or slow-cooked stuffing into a buttered casserole dish and bake in a 350°F oven for 12 to 15 minutes when space allows. You may have to do an extra step, but it saves precious oven space initially!
Storing and Reheating Leftover Stuffing
How to Store Leftover Stuffing:
All leftovers should be refrigerated within two hours of the end of the cooking time. That means on holidays, like Thanksgiving, when guests tend to stay around the table for a while, it’s important to make sure this gets taken care of. Leftover stuffing can be stored in an airtight container in the refrigerator for up to four days. If you freeze your leftovers, they’ll have the best flavor if eaten within a couple months.
How to Reheat Leftover Stuffing:
Leftover stuffing is absolutely delicious! The texture you crave can help you decide which method you pick. If you are in a hurry and don’t mind softer stuffing, the microwave will do the job in a snap. If you want a chewier texture, put the leftover stuffing into an oven-safe dish, cover it with foil and bake at 350°F for 20 to 25 minutes. Want something crispy? Pan fry on the stovetop or press into a waffle iron for a fun twist. No matter which method you choose, just be sure your stuffing reaches a safe food temperature of 165°F.
Stuffing Pro Tips
In order to be called “stuffing,” the dish technically needs to be stuffed and cooked inside of a bird, most traditionally a turkey. If it’s simply baked in a casserole dish, it’s referred to as dressing. Other than that, there isn’t much of a difference between stuffing and dressing. When you stuff a bird the resulting dish will be rich with the fat drippings from the bird. But add a bit of butter or oil to the dressing before baking and you can achieve a similar result.
Add your liquid in parts
If you pour all your liquid in at once, you risk over-soaking the mixture, leading to a mushy or gummy texture. It’s much easier to add more liquid than to fix an overly wet mixture, so start by adding the liquid 1/4 cup at a time. Stir the mixture and check before each addition. Add until the stuffing reaches a moist but not soggy texture that will hold together without falling apart. The bread should absorb most of the liquid with no extra at the bottom of the bowl. However, don’t skimp on liquid as too little liquid will leave your stuffing dry and crumbly.
Don’t over-season the stuffing
Season at each stage of cooking. Salt and pepper are your friends for building layers of flavor! But be sure not to use too much of any herb since the hearty herbs called for in stuffing can be very strong. Thyme, rosemary, and sage are all lovely, but just don’t overdo it or your tasty textures and flavors will be overpowered.
When in doubt, go with fresh ingredients
Packaged croutons might save you a little time, but they won’t be as delicious as if you made your own. If you are opting for stale bread, prep your bread the day before. Otherwise follow this recipe that uses fresh soft bread to create a classic version of stuffing.
Food Safety
When cooking your stuffing inside a bird, it needs to be brought up to 165°F (same temperature as the turkey) in order to be considered safe to eat. This can be tricky business because often the stuffing may not be up to temperature when the turkey is done. If this is the case, it’s best to remove the stuffing into a casserole dish to finish cooking until it has reached 165°F so as not to overcook the bird. Because of this, we recommend structuring this dish as a dressing which is described in the recipe steps below.
Frequently Asked Questions
While not absolutely necessary, drying out the bread helps ensure your stuffing won’t be soggy. Dry bread absorbs more liquid than soft bread which can result in richer, stronger flavors.
When making stuffing, it’s important to use the right amount of liquid to achieve the ideal texture. Since soft bread absorbs less liquid than dry bread, it’s even more important to use the right amount of liquid to avoid soggy stuffing. This recipe was developed and tested with soft bread so follow it as written for best results!
If you’re stuffing a bird, use 1/2-3/4 cup stuffing per pound of bird. So, for a 12-pound bird, you’d need 9 cups of stuffing. When planning how big of a turkey you should buy, it’s common to plan for 1 pound of turkey per person. When stuffing a bird, be sure to pack the stuffing loosely as it will expand as it cooks, and it won’t cook evenly if it’s packed too tightly. Any extra stuffing can be baked in a casserole dish alongside the bird and tastes just as delicious as if it’s cooked inside the bird.
Looking to just bake your stuffing (technically dressing, in this case) in a casserole dish? There’s no reason why you must cook it inside a bird, that’s just tradition. It tastes just as delicious when poured straight into a casserole dish, dotted with some extra butter or oil (optional) and baked that way, plus, it’s a little less messy. If you're looking to cook your bird separately from this herbed dressing, try our Roasted Turkey Recipe too.
Classic Herb Stuffing
- Prep Time 20 min
- Total 1 hr 5 min
- Ingredients 8
- Servings 12
Ingredients
- 3/4 cup butter
- 2 stalks celery, chopped
- 1 large onion, chopped
- 1 tablespoon chopped fresh thyme leaves or 1/2 teaspoon dried thyme leaves
- 1 1/2 teaspoons poultry seasoning
- 1/2 teaspoon salt
- 10 cups soft bread cubes (about 10 to 15 slices of bread)
- 3/4 cup from 1 carton (32 oz) Progresso™ Classic Chicken Broth

Instructions
-
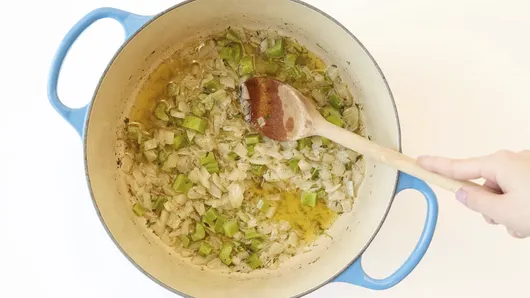
Step1Heat oven to 350°F. Spray 13 x 9-inch (3-quart) glass baking dish with cooking spray. In 4-quart Dutch oven, melt butter over medium-high heat. Cook celery and onion in butter about 5 minutes or just until tender. Stir in thyme, poultry seasoning and salt.
![]()
-
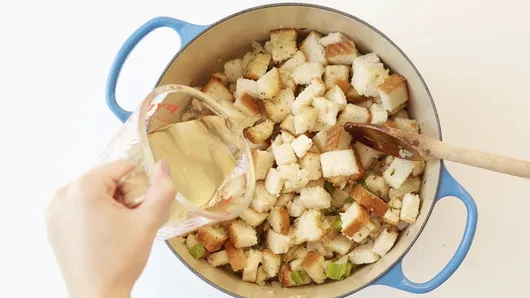
Step2Add bread cubes; toss to coat. Add chicken broth; toss until well mixed. (Add up to 1/2 cup more broth if moister stuffing is desired.)
![]()
-
Step3Spoon into baking dish. Cover with foil. Bake 20 minutes; uncover, and bake 25 to 30 minutes or until golden brown and heated through.
Nutrition
Nutrition Facts
Serving Size: 1/2 Cup
- Calories
- 190
- Calories from Fat
- 110
- Total Fat
- 13g
- 19%
- Saturated Fat
- 8g
- 38%
- Trans Fat
- 0g
- Cholesterol
- 30mg
- 10%
- Sodium
- 390mg
- 16%
- Potassium
- 80mg
- 2%
- Total Carbohydrate
- 16g
- 5%
- Dietary Fiber
- 1g
- 5%
- Sugars
- 2g
- Protein
- 3g
% Daily Value*:
- Vitamin A
- 8%
- 8%
- Vitamin C
- 0%
- 0%
- Calcium
- 6%
- 6%
- Iron
- 6%
- 6%
Exchanges:
1 Starch; 0 Fruit; 0 Other Carbohydrate; 0 Skim Milk; 0 Low-Fat Milk; 0 Milk; 0 Vegetable; 0 Very Lean Meat; 0 Lean Meat; 0 High-Fat Meat; 2 1/2 Fat;Carbohydrate Choice
1Recipe Tips
