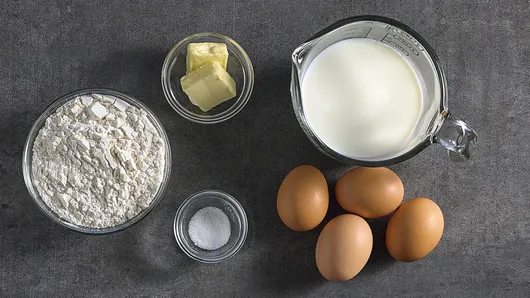
Recipe Ingredients
Basic crepe ingredients are pantry staples you likely already have in your kitchen, so get in there and start whisking!
Eggs: Eggs bind the crepe ingredients, providing structure for rolling or folding. They also add richness and flavor. We recommend using large eggs.
Milk: Milk provides moisture and helps to thin out the batter.
Flour: Flour, like eggs, provides structure to the crepes and helps to give them flexibility after they’ve been cooked.
Butter: Butter makes everything better, especially our crepes! We use salted butter to add richness and tenderness to our best crepe recipe.
Cookware You’ll Need
You’ll only need a few pieces of cookware to make this crepe recipe.
Skillet: An 8-inch nonstick skillet works great. However, a crepe pan, with its wide, flat surface and shallow sides, is the secret weapon for perfectly flipping and releasing every crepe.
Whisk: A medium whisk helps make a smooth crepe batter.
Other Cookware You’ll Need: Medium mixing bowl for making the batter, liquid and dry measuring cups, measuring spoon.
How to Make Crepes
Making this versatile dish is a lot easier than you think it is. Here’s how!
1. Make Crepe Batter
Just a bowl and whisk are all you’ll need to stir together the eggs, flour, milk, and butter into a smooth crepe batter.
2. Prep the Skillet and Cook the Crepes
Preheat the skillet and lightly grease with a little butter. Pour some of the batter into the skillet, and immediately swirl it to thinly, evenly coat the bottom of the skillet. Let the crepe cook until the edges look dry, and the center is completely set. Use a thin spatula to turn the crepe. Cook just long enough to lightly brown in spots. Remove the crepe from the pan. Repeat with remaining batter.
3. Fill and Serve
Fill the crepes with whatever sweet or savory filling you’d like and serve. For more information check out our crepe-making guide!
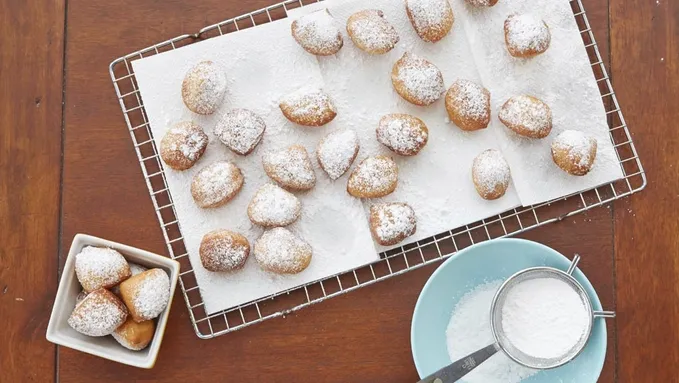
Best Crepe Filling and Toppings
We’ve heard so many great crepe toppings and fillings ideas from you! One reviewer said, “I like savory with eggs and home made basil pesto and my husband likes sweet with strawberries. Great!”
On the Sweet Side: Grab some chocolate or caramel sauce for drizzling on top, sliced berries, or bananas. Or, spread your favorite jam on the inside, roll up, and sprinkle with powdered sugar.
Make It Savory: Sliced boiled, fried, or scrambled eggs make a delicious crepe filling. Make it even better with crispy bacon and a sprinkling of grated cheese. Or, fill with sliced ham and thin slices of Swiss cheese.
Storing and Reheating
It’s easy to make crepes ahead of time or store leftovers. Here’s what we recommend.
Fridge
Stack crepes with a piece of parchment paper in between each crepe. Wrap the stack tightly with plastic wrap, and store in the fridge for up to 4 days.
Freezer
To freeze your homemade crepes, place each one between pieces of plastic wrap. Then, wrap the entire stack in foil. Freeze for up to 2 months. To thaw, place the entire package in the refrigerator overnight.
Reheating
To reheat the crepes, unwrap and place them on a baking sheet, and bake in a 250°F oven for 5 minutes or until warm.
Why Pillsbury Users Love This Recipe
While making crepes can seem a little tricky, our reviewers have told us our crepe recipe makes the process easy and results in “perfect crepes, every time.”
They also love their versatility and appreciate how they can be used with either sweet or savory fillings and toppings.
We’re told our crepe recipe is a hit with children. One user noted that their granddaughter found the recipe, and they enjoyed making it together.
Users also mention that they make the crepes for special occasions and family gatherings, such as Father's Day, and they’re loved by every member of their family.
Frequently Asked Questions
Is crepe batter the same as pancake batter?
Pancakes and crepes have different batters. Crepe batter is thinner and doesn’t have a leavening agent, like baking powder or soda, which makes for thin, light, airy crepes. Pancakes have a thicker batter that is highly leavened, giving them lift in the hot skillet and making them fluffy.
What kind of flour is best for crepes?
We use all-purpose flour in our easy crepe recipe, because it’s versatile and offers a good balance of texture for both sweet and savory crepes.
You can use other flours, like buckwheat or whole wheat flour, in crepe recipes, but you can’t just swap out one type of flour for another in this recipe as the ratio of the other ingredients would also need to be adjusted.
How can I prevent my crepes from sticking to the pan?
It’s important to preheat your skillet or crepe pan and lightly butter the pan in between crepes to ensure each crepe easily releases from the pan.
(function() {
document.addEventListener('DOMContentLoaded', function() {
var componentMetadata = JSON.parse('\x7b\x22componentName\x22\x3a\x22RecipeFAQ_e8af84a8-5198-47ca-bc1c-daf22247ecf7\x22,\x22deferOptions\x22\x3a\x7b\x22deferComponent\x22\x3afalse,\x22deferType\x22\x3a\x22None\x22,\x22deferId\x22\x3a\x22rb2f854d8d9bc4db2837073c0b11cbc7a\x22,\x22deferredContainerId\x22\x3a\x22\x2fmain\x2frdpFAQ\x22,\x22deferredContainerView\x22\x3anull\x7d,\x22viewName\x22\x3a\x22RecipeFAQ\x22\x7d');
var configuration = {"title":"Basic Crepes","introduction":"\u003cp\u003eHomemade crepes are simple, satisfying, and easily customizable, which is why we have been making this same crepe recipe since we first published it in 1979.\u003c/p\u003e\u003cp\u003eOur easy crepe recipe makes a stack of thin, ultra-delicious crepes ready to be packed with your choice of sweet or savory fillings. Whether you eat them with a swipe of chocolate hazelnut spread and sliced bananas or strawberries or topped with a fried egg and a strip of bacon, you’re going to enjoy every bite.\u003c/p\u003e\u003cp\u003eLet us show you how quick and easy it is to whisk up a batch of crepes that are perfect to serve for breakfast, lunch, dinner, or dessert.\u003c/p\u003e","servingSize":"1 Crepe","image":{"small":{"media":"(min-width: 0px)","src":"https://mojo.generalmills.com/api/public/content/KqTmcCquRzWeWPsj8jqlzw_webp_base.webp?v=246e4b51\u0026t=e724eca7b3c24a8aaa6e089ed9e611fd"},"medium":{"media":"(min-width: 500px)","src":"https://mojo.generalmills.com/api/public/content/KqTmcCquRzWeWPsj8jqlzw_webp_base.webp?v=246e4b51\u0026t=191ddcab8d1c415fa10fa00a14351227"},"large":{"media":"(min-width: 767px)","src":"https://mojo.generalmills.com/api/public/content/KqTmcCquRzWeWPsj8jqlzw_webp_base.webp?v=246e4b51\u0026t=191ddcab8d1c415fa10fa00a14351227"},"alt":"Basic Crepes"},"contributor":{"label":"By","name":"Edited by Mandy","profileUrl":"/about-us/mandy","displayDate":{"label":"Updated","date":"Jun 12, 2025"}},"ingredientGroups":[{"ingredients":[{"quantity":"4","description":"eggs"},{"quantity":"1 1/3","description":"cups milk"},{"quantity":"2","description":"tablespoons salted butter, melted, or oil"},{"quantity":"1","description":"cup all-purpose flour"},{"quantity":"1/2","description":"teaspoon salt, if desired"}]}],"steps":[{"description":"In medium bowl, beat eggs slightly. Add all remaining ingredients; beat until smooth.","stepShotImageUrl":"//mojo.generalmills.com/api/public/content/ETbT8xeiTnCa-RgIbT3Kvw_webp_base.webp?v=b0785af8\u0026t=51a43a57af4046789e5a7f20567b1195"},{"description":"\u003cp\u003eHeat crepe pan or 7- to 8-inch nonstick skillet over medium-high heat until hot, about 1 minute. Lightly grease pan with butter.\u003c/p\u003e","stepShotImageUrl":"//mojo.generalmills.com/api/public/content/1lwDPskITpeVjV2SybFl9g_webp_base.webp?v=ad313b80\u0026t=51a43a57af4046789e5a7f20567b1195"},{"description":"\u003cp\u003ePour scant 1/4 cup batter into hot pan, immediately tilting pan and swirling until batter covers bottom.\u003c/p\u003e","stepShotImageUrl":"//mojo.generalmills.com/api/public/content/TbcNSHqTTkW_-aF0-4y4Gw_webp_base.webp?v=870bbde5\u0026t=51a43a57af4046789e5a7f20567b1195"},{"description":"\u003cp\u003eWait until the crepe surface is no longer shiny, and the edge is starting to brown. Then, loosen the edge from the skillet with a thin spatula; turn and cook other side until light brown spots form.\u0026nbsp;\u003c/p\u003e","stepShotImageUrl":"//mojo.generalmills.com/api/public/content/aehmg1YoQX2Ljp0-tytzTg_webp_base.webp?v=9702b664\u0026t=51a43a57af4046789e5a7f20567b1195"},{"description":"\u003cp\u003eFill and top as desired.\u003c/p\u003e","stepShotImageUrl":"//mojo.generalmills.com/api/public/content/6TVCtwFRTVitMEy_RiXxoA_webp_base.webp?v=b5c6aa2b\u0026t=51a43a57af4046789e5a7f20567b1195"}],"tips":[{"title":"","description":"Master the basics of making crepes in our easy, step-by-step recipe. Enjoy these versatile treats filled with sweet or savory goodness any time of day!","category":"Rich Snippet","tipShots":[]},{"title":"","description":"\u003cp\u003eUse a wire whisk to stir up the batter. You want it to be very smooth. Strain it through a wire mesh sieve to remove any lumps if needed.\u003c/p\u003e","category":"Method Note","tipShots":[]},{"title":"","description":"\u003cp\u003eHeat the pan slowly, so it reaches the perfect temperature to quickly cook each crepe without sticking. Lightly butter the pan before adding the batter, buttering skillet as needed between crepes.\u003c/p\u003e","category":"Techniques","tipShots":[]},{"title":"","description":"\u003cp\u003eWe’ve found that practice makes perfect when it comes to flipping crepes. Wait until the crepe surface is no longer shiny, and the edge is starting to brown. Loosen it from the skillet with a small spatula; turn and cook other side until light brown.\u003c/p\u003e\u003cp\u003eOr, after loosening the edge of the crepe from the skillet, lift the pan up off the burner. Quickly push the skillet forward, so the crepe slides out and flips on its own, landing back in the pan to finish cooking.\u003c/p\u003e","category":"Techniques","tipShots":[]},{"title":"","description":"Recipe meets Kitchen Tested criteria. Reviewed as part of project MSO-5941 BC Audit 200 recipes","category":"Kitchen Tested","tipShots":[]}],"kitchenTips":[{"title":"","description":"\u003cp\u003eUse a wire whisk to stir up the batter. You want it to be very smooth. Strain it through a wire mesh sieve to remove any lumps if needed.\u003c/p\u003e","category":"Method Note","tipShots":[]},{"title":"","description":"\u003cp\u003eHeat the pan slowly, so it reaches the perfect temperature to quickly cook each crepe without sticking. Lightly butter the pan before adding the batter, buttering skillet as needed between crepes.\u003c/p\u003e","category":"Techniques","tipShots":[]},{"title":"","description":"\u003cp\u003eWe’ve found that practice makes perfect when it comes to flipping crepes. Wait until the crepe surface is no longer shiny, and the edge is starting to brown. Loosen it from the skillet with a small spatula; turn and cook other side until light brown.\u003c/p\u003e\u003cp\u003eOr, after loosening the edge of the crepe from the skillet, lift the pan up off the burner. Quickly push the skillet forward, so the crepe slides out and flips on its own, landing back in the pan to finish cooking.\u003c/p\u003e","category":"Techniques","tipShots":[]}],"additionalContent":[{"title":"Recipe Ingredients","description":"\u003cp\u003eBasic crepe ingredients are pantry staples you likely already have in your kitchen, so get in there and start whisking!\u003c/p\u003e\u003cp\u003e\u003cstrong\u003eEggs:\u003c/strong\u003e Eggs bind the crepe ingredients, providing structure for rolling or folding. They also add richness and flavor. We recommend using large eggs.\u003c/p\u003e\u003cp\u003e\u003cstrong\u003eMilk: \u003c/strong\u003eMilk provides moisture and helps to thin out the batter.\u003c/p\u003e\u003cp\u003e\u003cstrong\u003eFlour: \u003c/strong\u003eFlour, like eggs, provides structure to the crepes and helps to give them flexibility after they’ve been cooked.\u003c/p\u003e\u003cp\u003e\u003cstrong\u003eButter: \u003c/strong\u003eButter makes everything better, especially our crepes! We use salted butter to add richness and tenderness to our best crepe recipe.\u003c/p\u003e","category":"SEO Content_1","tipShots":[{"name":"ExtraTextTypeImageMediumUrl","sortOrder":1,"url":"//mojo.generalmills.com/api/public/content/phHWbYC3SPCWx-9c07dvRg_webp_base.webp?v=49d8503d\u0026t=51a43a57af4046789e5a7f20567b1195"}]},{"title":"Cookware You’ll Need","description":"\u003cp\u003eYou’ll only need a few pieces of cookware to make this crepe recipe.\u003c/p\u003e\u003cp\u003e\u003cstrong\u003eSkillet: \u003c/strong\u003eAn 8-inch nonstick skillet works great. However, a crepe pan, with its wide, flat surface and shallow sides, is the secret weapon for perfectly flipping and releasing every crepe.\u003c/p\u003e\u003cp\u003e\u003cstrong\u003eWhisk: \u003c/strong\u003eA medium whisk helps make a smooth crepe batter.\u003c/p\u003e\u003cp\u003e\u003cstrong\u003eOther Cookware You’ll Need: \u003c/strong\u003eMedium mixing bowl for making the batter, liquid and dry measuring cups, measuring spoon.\u003c/p\u003e","category":"SEO Content_2","tipShots":[]},{"title":"How to Make Crepes","description":"\u003cp\u003eMaking this versatile dish is a lot easier than you think it is. Here’s how!\u003c/p\u003e\u003ch3\u003e\u003cstrong\u003e1. Make Crepe Batter\u003c/strong\u003e\u003c/h3\u003e\u003cp\u003eJust a bowl and whisk are all you’ll need to stir together the eggs, flour, milk, and butter into a smooth crepe batter.\u003c/p\u003e\u003ch3\u003e\u003cstrong\u003e2. Prep the Skillet and Cook the Crepes\u003c/strong\u003e\u003c/h3\u003e\u003cp\u003ePreheat the skillet and lightly grease with a little butter. Pour some of the batter into the skillet, and immediately swirl it to thinly, evenly coat the bottom of the skillet. Let the crepe cook until the edges look dry, and the center is completely set. Use a thin spatula to turn the crepe. Cook just long enough to lightly brown in spots. Remove the crepe from the pan. Repeat with remaining batter.\u003c/p\u003e\u003ch3\u003e\u003cstrong\u003e3. Fill and Serve\u003c/strong\u003e\u003c/h3\u003e\u003cp\u003eFill the crepes with whatever sweet or savory filling you’d like and serve. For more information check out our \u003ca href=\u0022https://www.pillsbury.com/everyday-eats/breakfast-brunch/how-to-make-crepes\u0022\u003ecrepe-making guide\u003c/a\u003e!\u003c/p\u003e","category":"SEO Content_3","tipShots":[]},{"title":"Best Crepe Filling and Toppings","description":"\u003cp\u003eWe’ve heard so many great crepe toppings and fillings ideas from you! One reviewer said, “I like savory with eggs and home made basil pesto and my husband likes sweet with strawberries. Great!”\u003c/p\u003e\u003cp\u003e\u003cstrong\u003eOn the Sweet Side:\u003c/strong\u003e Grab some chocolate or caramel sauce for drizzling on top, sliced berries, or bananas. Or, spread your favorite jam on the inside, roll up, and sprinkle with powdered sugar.\u003c/p\u003e\u003cp\u003e\u003cstrong\u003eMake It Savory:\u003c/strong\u003e Sliced \u003ca href=\u0022https://www.pillsbury.com/everyday-eats/breakfast-brunch/how-to-boil-eggs\u0022\u003eboiled\u003c/a\u003e, fried, or scrambled eggs make a delicious crepe filling. Make it even better with \u003ca href=\u0022https://www.pillsbury.com/recipes/air-fryer-bacon/c75e4bd2-856c-46ff-968e-ce04360aea53\u0022\u003ecrispy bacon\u003c/a\u003e and a sprinkling of grated cheese. Or, fill with sliced ham and thin slices of Swiss cheese.\u003c/p\u003e","category":"SEO Content_4","tipShots":[]},{"title":"Storing and Reheating","description":"\u003cp\u003eIt’s easy to make crepes ahead of time or store leftovers. Here’s what we recommend.\u003c/p\u003e\u003ch3\u003e\u003cstrong\u003eFridge\u003c/strong\u003e\u003c/h3\u003e\u003cp\u003eStack crepes with a piece of parchment paper in between each crepe. Wrap the stack tightly with plastic wrap, and store in the fridge for up to 4 days.\u003c/p\u003e\u003ch3\u003e\u003cstrong\u003eFreezer\u003c/strong\u003e\u003c/h3\u003e\u003cp\u003eTo freeze your homemade crepes, place each one between pieces of plastic wrap. Then, wrap the entire stack in foil. Freeze for up to 2 months. To thaw, place the entire package in the refrigerator overnight.\u003c/p\u003e\u003ch3\u003e\u003cstrong\u003eReheating\u003c/strong\u003e\u003c/h3\u003e\u003cp\u003eTo reheat the crepes, unwrap and place them on a baking sheet, and bake in a 250°F oven for 5 minutes or until warm.\u003c/p\u003e","category":"SEO Content_5","tipShots":[]},{"title":"Why Pillsbury Users Love This Recipe","description":"\u003cp\u003eWhile making crepes can seem a little tricky, our reviewers have told us our crepe recipe makes the process easy and results in “perfect crepes, every time.”\u003c/p\u003e\u003cp\u003eThey also love their versatility and appreciate how they can be used with either sweet or savory fillings and toppings.\u003c/p\u003e\u003cp\u003eWe’re told our crepe recipe is a hit with children. One user noted that their granddaughter found the recipe, and they enjoyed making it together.\u003c/p\u003e\u003cp\u003eUsers also mention that they make the crepes for special occasions and family gatherings, such as Father\u0027s Day, and they’re loved by every member of their family.\u003c/p\u003e","category":"SEO Content_6","tipShots":[]}],"faq":[{"title":"Is crepe batter the same as pancake batter?","description":"\u003cp\u003ePancakes and crepes have different batters. Crepe batter is thinner and doesn’t have a leavening agent, like baking powder or soda, which makes for thin, light, airy crepes. Pancakes have a thicker batter that is highly leavened, giving them lift in the hot skillet and making them fluffy.\u003c/p\u003e","category":"FAQ_1","tipShots":[]},{"title":"What kind of flour is best for crepes?","description":"\u003cp\u003eWe use all-purpose flour in our easy crepe recipe, because it’s versatile and offers a good balance of texture for both sweet and savory crepes.\u003c/p\u003e\u003cp\u003eYou can use other flours, like buckwheat or whole wheat flour, in crepe recipes, but you can’t just swap out one type of flour for another in this recipe as the ratio of the other ingredients would also need to be adjusted.\u003c/p\u003e","category":"FAQ_2","tipShots":[]},{"title":"How can I prevent my crepes from sticking to the pan?","description":"\u003cp\u003eIt’s important to preheat your skillet or crepe pan and lightly butter the pan in between crepes to ensure each crepe easily releases from the pan.\u003c/p\u003e","category":"FAQ_3","tipShots":[]}],"tipCategories":[{"categoryName":"Kitchen Tested","heading":"More About This Recipe","cssClass":"recipePartStory","expandOnInit":false,"expandText":"More +","collapseText":"Less -","expandEventName":"","collapseEventName":"","image":"","tips":[{"title":"","description":"Recipe meets Kitchen Tested criteria. Reviewed as part of project MSO-5941 BC Audit 200 recipes","category":"Kitchen Tested","tipShots":[]}],"isExpandable":false},{"categoryName":"Method Note","heading":"","cssClass":"recipePartMethodNote","expandOnInit":false,"expandText":"More +","collapseText":"Less -","expandEventName":"","collapseEventName":"","image":"","tips":[{"title":"","description":"\u003cp\u003eUse a wire whisk to stir up the batter. You want it to be very smooth. Strain it through a wire mesh sieve to remove any lumps if needed.\u003c/p\u003e","category":"Method Note","tipShots":[]}],"isExpandable":false},{"categoryName":"Rich Snippet","heading":"","cssClass":"recipePartMethodNote","expandOnInit":false,"expandText":"More +","collapseText":"Less -","expandEventName":"","collapseEventName":"","image":"","tips":[{"title":"","description":"Master the basics of making crepes in our easy, step-by-step recipe. Enjoy these versatile treats filled with sweet or savory goodness any time of day!","category":"Rich Snippet","tipShots":[]}],"isExpandable":false}],"nutritionInfo":{"configuration":{"showAsTable":false,"noNutritionInformationAvailableMessage":"No nutrition information available for this recipe","poweredByText":"\u003cp\u003eNutrition information for this recipe is estimated using a leading nutrition calculation application, but is an estimate only. Actual nutrition values will vary based on the exact ingredients or brands you may use.\u003c/p\u003e\n\u003ca href=\u0022http://developer.edamam.com\u0022\u003ePowered By \u003cimg src=\u0022-/media/C4F33FD467AB4A3AB59AAC4F6306AB04.ashx\u0022 alt=\u0022Edamam\u0022 /\u003e\u003c/a\u003e","nutritionChartTitle":"Nutrition Facts","nutritionInformationLabel":"Nutrition","servingSizeText":"Serving Size:","dailyValuesDisclaimer":"*Percent Daily Values are based on a 2,000 calorie diet.","percentDailyValueText":"% Daily Value","percentDailyValueFooterTitleText":"% Daily Value*:","exchangeInformationTitleText":"Exchanges:","nutritionFactsExpandText":"More Nutrition","nutritionFactsCollapseText":"Less Nutrition"},"facts":{"carbohydrateChoice":{"amountPercent":"","amountUnits":"1/2","title":"Carbohydrate Choice"},"vitaminA":{"amountPercent":"2%","amountUnits":"2%","title":"Vitamin A"},"vitaminC":{"amountPercent":"0%","amountUnits":"0%","title":"Vitamin C"},"calcium":{"amountPercent":"2%","amountUnits":"2%","title":"Calcium"},"iron":{"amountPercent":"2%","amountUnits":"2%","title":"Iron"},"protein":{"amountPercent":"","amountUnits":"2g","title":"Protein"},"dietaryFiber":{"amountPercent":"0%","amountUnits":"0g","title":"Dietary Fiber"},"sugars":{"amountPercent":"","amountUnits":"0g","title":"Sugars"},"totalCarbohydrate":{"amountPercent":"2%","amountUnits":"6g","title":"Total Carbohydrate"},"sodium":{"amountPercent":"1%","amountUnits":"30mg","title":"Sodium"},"potassium":{"amountPercent":"1%","amountUnits":"40mg","title":"Potassium"},"cholesterol":{"amountPercent":"14%","amountUnits":"40mg","title":"Cholesterol"},"transFat":{"amountPercent":"","amountUnits":"0g","title":"Trans Fat"},"saturatedFat":{"amountPercent":"6%","amountUnits":"1 1/2g","title":"Saturated Fat"},"totalFat":{"amountPercent":"4%","amountUnits":"2 1/2g","title":"Total Fat"},"caloriesFromFat":{"amountPercent":"","amountUnits":"25","title":"Calories from Fat"},"calories":{"amountPercent":"","amountUnits":"60","title":"Calories"}},"servingSize":"1 Crepe","exchangeInfo":"1/2 Starch; 0 Fruit; 0 Other Carbohydrate; 0 Skim Milk; 0 Low-Fat Milk; 0 Milk; 0 Vegetable; 0 Very Lean Meat; 0 Lean Meat; 0 High-Fat Meat; 1/2 Fat;","showPoweredBy":false,"showRecipeTotalTime":true,"showRecipePrepTime":true,"showCarbohydrateChoices":true},"trademarks":[],"labels":{"ingredientsHeader":"Ingredients","stepsHeader":"Instructions","stepsImageHideText":"Hide Images","stepsImageShowText":"Show Images","stepNumberText":"Step","faqHeader":"Frequently Asked Questions","tipsHeader":"\u003cp class=\u0022textFirst\u0022\u003eRecipe Tips\u003c/p\u003e","tipItemHeadingFormat":"tip {0}","postedBy":"By","copyright":"© {yyyy} ®/TM General Mills All Rights Reserved","showDrawerText":"Show","hideDrawerText":"Hide","expandDescriptionText":"More +","collapseDescriptionText":"Less -","ariaLiveLabelFormat":"Showing {0} through {1} of {2}","scrollLeftButtonLabel":"Scroll Left","scrollRightButtonLabel":"Scroll Right","includeScrollIndicator":false},"primaryAttributes":[{"label":"Prep Time","values":[{"text":"30","label":"min"}]},{"label":"Total","values":[{"text":"30","label":"min"}]},{"label":"Ingredients","values":[{"text":"5"}]},{"label":"Servings","values":[{"text":"20"}]}],"secondaryAttributes":[],"badges":[{"badgeType":3,"badgeText":"","label":"Kitchen Tested","imageUrl":"/-/media/GMI/Core-Sites/PB/Images/Shared/RecipeParts/KitchenTested_PB1_new.jpg?sc_lang=en","linkUrl":"/about-us/kitchen-tested","metaDataTags":[],"showMemberInfo":false,"matchedMetadataId":"00000000-0000-0000-0000-000000000000"}],"backgroundImageUrl":"","breadcrumbs":{"links":[{"url":"/","label":"Home"},{"url":"/recipes","label":"Recipes"},{"url":"/recipes/dish-type/pancakes-and-waffles/crepes","label":"Best Easy Crepe Recipes"}],"currentPageName":"Basic Crepes"}};
var moduleName = 'recipeFaq';
var isVueModule = true;
GeneralMills.PandoSites.RegisterControlInstance(moduleName, configuration, componentMetadata, isVueModule)
});
})();