(function() {
document.addEventListener('DOMContentLoaded', function() {
var componentMetadata = JSON.parse('\x7b\x22componentName\x22\x3a\x22Breadcrumb_cb2cea37-0196-445f-aed0-2c6ff26f49d7\x22,\x22deferOptions\x22\x3a\x7b\x22deferComponent\x22\x3afalse,\x22deferType\x22\x3a\x22None\x22,\x22deferId\x22\x3a\x22r78f6da7331674591b24f394be83ec04b\x22,\x22deferredContainerId\x22\x3a\x22\x2fcommonBreadcrumb\x22,\x22deferredContainerView\x22\x3anull\x7d,\x22viewName\x22\x3a\x22Breadcrumb\x22\x7d');
var configuration = {"links":[{"url":"/","label":"Home"},{"url":"/everyday-eats/dinner-tonight/chicken/how-to-carve-a-chicken","label":"How to Carve a Chicken"}]};
var moduleName = 'breadcrumb';
var isVueModule = true;
GeneralMills.PandoSites.RegisterControlInstance(moduleName, configuration, componentMetadata, isVueModule)
});
})();
(function() {
document.addEventListener('DOMContentLoaded', function() {
var componentMetadata = JSON.parse('\x7b\x22componentName\x22\x3a\x22ActionToolbar_bcfe5168-4c6e-4b8a-8181-233a0a250020\x22,\x22deferOptions\x22\x3a\x7b\x22deferComponent\x22\x3atrue,\x22deferType\x22\x3a\x22OnDemand\x22,\x22deferId\x22\x3a\x22r9e133bc08ad14915b05d5f9b35617f32\x22,\x22deferredContainerId\x22\x3a\x22\x2ffloatingActionToolbar\x2ffloatingActionToolbar_interop\x22,\x22deferredContainerView\x22\x3a\x22InteropDeferWrapper\x22\x7d,\x22viewName\x22\x3a\x22ActionToolbar\x22\x7d');
var configuration = {"contentId":"cb2cea37-0196-445f-aed0-2c6ff26f49d7","toolbarSettings":{"id":"bcfe5168-4c6e-4b8a-8181-233a0a250020","regAction":"FAVORITE","eSourceCode":14171,"namePassedToEvents":"ArticleStandardLongFormToolbar","buttons":[{"providerName":"pinterest","providerNamePassedToEvents":"Pinterest","shareUrlFormat":"//pinterest.com/pin/create/link/?url={0}","id":"63cf42f0-8fed-4b1c-acbe-0fe44811231d","allowedForAnonymousUsers":true,"type":"Social","displayName":"Pinterest","toggleDisplayName":"","namePassedToEvents":"Pinterest","cssClassName":"atButtonPinterest","privacyOptOutMessage":"\u003cdiv class=\u0027privacyMessage\u0027\u003e\n\u003ch3\u003eThis feature is not available with your current cookie settings.\u003c/h3\u003e\n\u003cp\u003eYou can \u003ca href=\u0027#\u0027 data-show-preference-center=\u00271\u0027\u003eupdate your privacy settings\u003c/a\u003e to enable this content. Please enable “Functional Cookies” to use this feature.\u003c/p\u003e\n\u003c/div\u003e","showPrivacyOptOutMessage":false},{"addFavoriteErrorMessage":"Sorry, something went wrong. Please save again.","removeFavoriteErrorMessage":"Error occurred while removing from favorites","regAction":"FAVORITE","eSourceCode":14171,"isCurrentUserAnonymous":false,"isFavoriteItem":false,"id":"351369d5-f1b1-4a90-b495-16074575bb8a","allowedForAnonymousUsers":false,"type":"Favorite","displayName":"Save","toggleDisplayName":"Saved","namePassedToEvents":"Favorite","cssClassName":"atButtonFavorite","privacyOptOutMessage":"\u003cdiv class=\u0027privacyMessage\u0027\u003e\n\u003ch3\u003eThis feature is not available with your current cookie settings.\u003c/h3\u003e\n\u003cp\u003eYou can \u003ca href=\u0027#\u0027 data-show-preference-center=\u00271\u0027\u003eupdate your privacy settings\u003c/a\u003e to enable this content. Please enable “Functional Cookies” to use this feature.\u003c/p\u003e\n\u003c/div\u003e","showPrivacyOptOutMessage":false},{"providerName":"facebook","providerNamePassedToEvents":"Facebook","shareUrlFormat":"//facebook.com/sharer/sharer.php?u={0}","id":"6d176960-1afd-4a34-83b5-795429359551","allowedForAnonymousUsers":true,"type":"Social","displayName":"Facebook","toggleDisplayName":"","namePassedToEvents":"Facebook","cssClassName":"atButtonFacebook","privacyOptOutMessage":"\u003cdiv class=\u0027privacyMessage\u0027\u003e\n\u003ch3\u003eThis feature is not available with your current cookie settings.\u003c/h3\u003e\n\u003cp\u003eYou can \u003ca href=\u0027#\u0027 data-show-preference-center=\u00271\u0027\u003eupdate your privacy settings\u003c/a\u003e to enable this content. Please enable “Functional Cookies” to use this feature.\u003c/p\u003e\n\u003c/div\u003e","showPrivacyOptOutMessage":false},{"templateId":"eb460499-2547-4f84-a197-60f31934a3b9","dialogHeading":"Email Article","emailCode":"PB_ContentEmail","dialogSettings":{"cancelButtonText":"Cancel","copyToSenderLabel":"Send a copy to myself","emailAddressesLabel":"* Email Address","emailInstructionText":"Separate email addresses with commas","fromText":"From:","privacyPolicyText":"\u003cp\u003e\u0026copy;2026 General Mills, Inc. All Rights Reserved. This information will only be used to send an email to your friend(s) and will not be saved. Please read our \u003ca rel=\u0022noopener noreferrer\u0022 rel=\u0022noopener noreferrer\u0022 href=\u0022http://www.generalmills.com/company/privacy-policies/privacy-policy-us\u0022 target=\u0022_blank\u0022 shape=\u0022rect\u0022\u003ePrivacy Policy\u003c/a\u003e.\u003c/p\u003e","requiredFieldText":"* Required","sendButtonText":"Send","senderEmailAddressLabel":"* Your Email Address","senderFirstNameLabel":"* Your First Name","sendToText":"Send To:"},"id":"2a5b12c8-299b-467d-812e-41e9a0afb70d","allowedForAnonymousUsers":true,"type":"Email","displayName":"Email","toggleDisplayName":"","namePassedToEvents":"Email","cssClassName":"atButtonEmail","privacyOptOutMessage":"\u003cdiv class=\u0027privacyMessage\u0027\u003e\n\u003ch3\u003eThis feature is not available with your current cookie settings.\u003c/h3\u003e\n\u003cp\u003eYou can \u003ca href=\u0027#\u0027 data-show-preference-center=\u00271\u0027\u003eupdate your privacy settings\u003c/a\u003e to enable this content. Please enable “Functional Cookies” to use this feature.\u003c/p\u003e\n\u003c/div\u003e","showPrivacyOptOutMessage":false},{"layoutParameter":"p%3d1","id":"783fefb5-010a-4be1-b84d-f0447da7c52c","allowedForAnonymousUsers":true,"type":"Print","displayName":"Print","toggleDisplayName":"","namePassedToEvents":"Print","cssClassName":"atButtonPrint","privacyOptOutMessage":"\u003cdiv class=\u0027privacyMessage\u0027\u003e\n\u003ch3\u003eThis feature is not available with your current cookie settings.\u003c/h3\u003e\n\u003cp\u003eYou can \u003ca href=\u0027#\u0027 data-show-preference-center=\u00271\u0027\u003eupdate your privacy settings\u003c/a\u003e to enable this content. Please enable “Functional Cookies” to use this feature.\u003c/p\u003e\n\u003c/div\u003e","showPrivacyOptOutMessage":false}],"isSticky":true},"userSettings":{"isCurrentUserAnonymous":true,"isFavoriteItem":false,"isAnonymousUserWithFavorites":false},"pageAttributes":{"url":"https%3a%2f%2fwww.pillsbury.com%2feveryday-eats%2fdinner-tonight%2fchicken%2fhow-to-carve-a-chicken","contentId":"cb2cea37-0196-445f-aed0-2c6ff26f49d7"},"recaptchaPublicKey":"6LceAigUAAAAAC8aIQvJ9yRpRl3r1ZBKbou-tIDe"};
var moduleName = 'actionToolbar';
var isVueModule = true;
GeneralMills.PandoSites.RegisterControlInstance(moduleName, configuration, componentMetadata, isVueModule)
});
})();
Carving a whole chicken can be intimidating, especially if you’ve never done it before. It’s also a necessity when you’re jump starting dinner with a rotisserie chicken. (Our Supper Secret Weapon: Rotisserie Chicken) We turned to our resident kitchen pro to show us the way. Let’s do it!

First of all, you’ll want a cutting board big enough to hold the entire chicken. Some cutting boards even have a channel along their edges to collect any juices. If you don’t have one, simply place your cutting board inside a rimmed sheet pan to help collect the drippings.
After your chicken has reached a steady internal temperature of 165°F (we used this recipe), remove it from the oven and let rest on a cutting board for at least 5 minutes before carving, and no more than 10 minutes. Resting gives time for the juices to redistribute, ensuring every piece of meat is as tender and juicy as possible. It also makes the meat easier to carve.
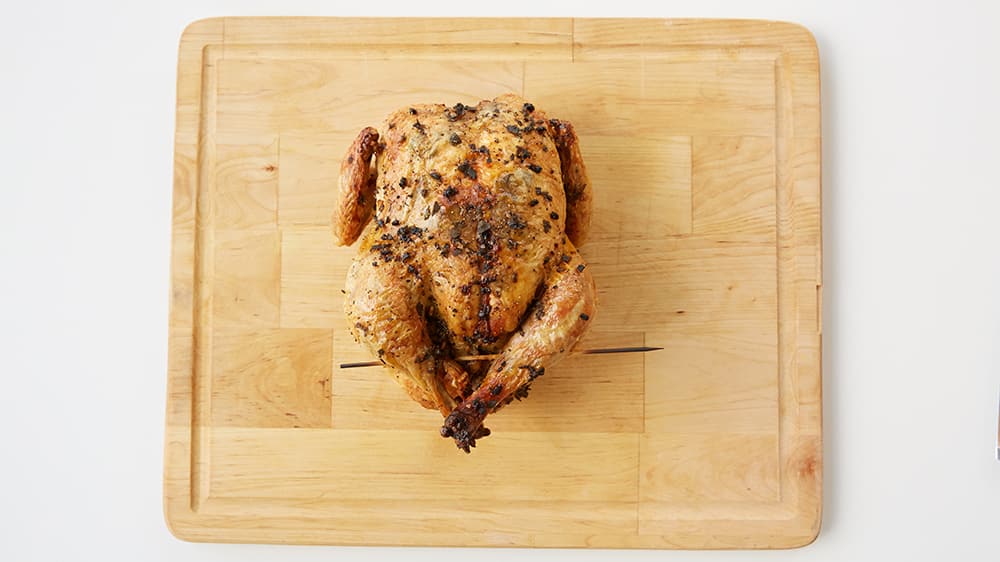
Start with the slightly cooled chicken resting breast-side up on your cutting board, with the legs facing toward you. Remove any ties or skewers from trussing.
Next, wiggle the drumsticks slightly to loosen up the leg joints and make carving easier.
Be sure to have your serving platter nearby so you can plate as you go. If your chicken is still too hot to handle, you can wear clean kitchen gloves.
STEP 1: Remove the dark meat.
While pulling leg away from body, cut to separate the drumstick from the breast. Repeat on the opposite side.
STEP 2: Carve the leg and thigh meat.
Use your hands to loosen joint where the drumstick and thigh meet. Now you can pull the thigh away from the drumstick and cut through the joint to separate.
Most people serve the drumsticks and thighs whole, so there’s no need to cut into further slices.
STEP 3: Remove the white meat.
Cut alongside the ribcage to remove the breast and tenderloin in one large piece. Use a sweeping motion to ensure you get the tenderloin underneath.
You can serve the breast meat whole, or perhaps cut it in half—depending on how many people prefer white and dark meat.
STEP 4: Remove the wings.
Rotate the wings to find the joint.
While firmly holding the wing, cut where it meets the body.
Step 5. Plate and serve.
Arrange chicken pieces on a serving platter.
Garnish with any vegetables from the roasting pan. And enjoy!
This feature is not available with your current cookie settings.
You can update your privacy settings to enable this content. Please enable all cookies to use this feature.
(function() {
document.addEventListener('DOMContentLoaded', function() {
var componentMetadata = JSON.parse('\x7b\x22componentName\x22\x3a\x22NewsletterCTA_592b7e30-5c94-49d6-8316-3c4546d1dac2\x22,\x22deferOptions\x22\x3a\x7b\x22deferComponent\x22\x3atrue,\x22deferType\x22\x3a\x22OnDemand\x22,\x22deferId\x22\x3a\x22rcc85f581fbfb4df292fce6c78b723986\x22,\x22deferredContainerId\x22\x3a\x22\x2fprimaryColumn\x2finteropInlineNewsletterCta\x22,\x22deferredContainerView\x22\x3a\x22InteropDeferWrapper\x22\x7d,\x22viewName\x22\x3a\x22NewsletterCTA\x22\x7d');
var configuration = {"unsubscribedNewsletters":[{"listId":"6d3e858f-4804-4f38-9b8a-712a9a5668cc","thumbnailImageUrl":"/-/media/GMI/Core-Sites/PB/Images/Shared/myaccount/newsletters/PB_Email_Thumb_200x200.gif?sc_lang=en","previewUrl":"https://morpheus3.idpk.net/email_sends/10626/preview","name":"Pillsbury\u0027s Email","isPromo":false}],"settings":{"anonymousCopy":"Family-friendly meals made easy!","anonymousDescriptionCopy":"Make everyday family moments count, with easy recipes that everyone will love. Join our email community to receive tested recipes and tips.","anonymousThankYouCopy":"Thanks! Your first email is on its way.","anonymousThankYouDescriptionCopy":"\u003cp\u003e\u003cspan\u003eNow that you\u0026rsquo;re signed up, create an account on Pillsbury.com to save your favorite recipes, learn more about special promotions and get meal inspiration for any occasion.\u003c/span\u003e\u003c/p\u003e","anonymousButtonText":"Help me make mealtimes easier!","anonymousEmailInvalidErrorText":"Please enter a valid email address.","anonymousSubscribeErrorText":"We encountered an error while signing you up. Please try again.","anonymousEmailAddressPlaceholderText":"Enter your email address","anonymousEmailAddressLabel":"Email Address","anonymousLegalCopy":"By signing up, you accept our\u0026nbsp;\u003cspan style=\u0022text-decoration: underline;\u0022\u003e\u003ca rel=\u0022noopener noreferrer\u0022 href=\u0022https://www.generalmills.com/privacy-security/us-english-privacy-policy\u0022 target=\u0022_blank\u0022\u003ePrivacy Policy\u003c/a\u003e\u003c/span\u003e\u0026nbsp;and agree that your information may be used across our\u0026nbsp;\u003cspan style=\u0022text-decoration: underline;\u0022\u003e\u003ca rel=\u0022noopener noreferrer\u0022 href=\u0022https://www.generalmills.com/food-we-make/brands\u0022 target=\u0022_blank\u0022\u003efamily of brands\u003c/a\u003e.\u003c/span\u003e","requiredFieldText":"","backgroundColor":"#002E6D","accentColor":"","registrationUrl":"/user-profile/register?RegAction=SUBSCRIBERUPGRADE\u0026esrc=14171\u0026returnUrl=%2feveryday-eats%2fdinner-tonight%2fchicken%2fhow-to-carve-a-chicken","registrationLinkText":"Sign up now","enableExpandedFields":false,"hideForSessionCookieExpiration":0,"ctaType":"StandardAnonymous","location":"Inline","userState":"Anonymous","sourceCodeOverride":0}};
var moduleName = 'newsletterCta';
var isVueModule = true;
GeneralMills.PandoSites.RegisterControlInstance(moduleName, configuration, componentMetadata, isVueModule)
});
})();