(function() {
document.addEventListener('DOMContentLoaded', function() {
var componentMetadata = JSON.parse('\x7b\x22componentName\x22\x3a\x22Breadcrumb_a6827a99-838e-4966-9610-26631e51d4b7\x22,\x22deferOptions\x22\x3a\x7b\x22deferComponent\x22\x3afalse,\x22deferType\x22\x3a\x22None\x22,\x22deferId\x22\x3a\x22r8be98df03a7344baa4c2e3ce71b7ea00\x22,\x22deferredContainerId\x22\x3a\x22\x2fcommonBreadcrumb\x22,\x22deferredContainerView\x22\x3anull\x7d,\x22viewName\x22\x3a\x22Breadcrumb\x22\x7d');
var configuration = {"links":[{"url":"/","label":"Home"},{"url":"/everyday-eats/dinner-tonight/break-it-down-turkey-carving-basics","label":"How to Carve and Slice a Turkey"}]};
var moduleName = 'breadcrumb';
var isVueModule = true;
GeneralMills.PandoSites.RegisterControlInstance(moduleName, configuration, componentMetadata, isVueModule)
});
})();
(function() {
document.addEventListener('DOMContentLoaded', function() {
var componentMetadata = JSON.parse('\x7b\x22componentName\x22\x3a\x22ActionToolbar_bcfe5168-4c6e-4b8a-8181-233a0a250020\x22,\x22deferOptions\x22\x3a\x7b\x22deferComponent\x22\x3atrue,\x22deferType\x22\x3a\x22OnDemand\x22,\x22deferId\x22\x3a\x22r0f636b426d504c219a108a6dd4103d87\x22,\x22deferredContainerId\x22\x3a\x22\x2ffloatingActionToolbar\x2ffloatingActionToolbar_interop\x22,\x22deferredContainerView\x22\x3a\x22InteropDeferWrapper\x22\x7d,\x22viewName\x22\x3a\x22ActionToolbar\x22\x7d');
var configuration = {"contentId":"a6827a99-838e-4966-9610-26631e51d4b7","toolbarSettings":{"id":"bcfe5168-4c6e-4b8a-8181-233a0a250020","regAction":"FAVORITE","eSourceCode":14171,"namePassedToEvents":"ArticleStandardLongFormToolbar","buttons":[{"providerName":"pinterest","providerNamePassedToEvents":"Pinterest","shareUrlFormat":"//pinterest.com/pin/create/link/?url={0}","id":"63cf42f0-8fed-4b1c-acbe-0fe44811231d","allowedForAnonymousUsers":true,"type":"Social","displayName":"Pinterest","toggleDisplayName":"","namePassedToEvents":"Pinterest","cssClassName":"atButtonPinterest","privacyOptOutMessage":"\u003cdiv class=\u0027privacyMessage\u0027\u003e\n\u003ch3\u003eThis feature is not available with your current cookie settings.\u003c/h3\u003e\n\u003cp\u003eYou can \u003ca href=\u0027#\u0027 data-show-preference-center=\u00271\u0027\u003eupdate your privacy settings\u003c/a\u003e to enable this content. Please enable “Functional Cookies” to use this feature.\u003c/p\u003e\n\u003c/div\u003e","showPrivacyOptOutMessage":false},{"addFavoriteErrorMessage":"Sorry, something went wrong. Please save again.","removeFavoriteErrorMessage":"Error occurred while removing from favorites","regAction":"FAVORITE","eSourceCode":14171,"isCurrentUserAnonymous":false,"isFavoriteItem":false,"id":"351369d5-f1b1-4a90-b495-16074575bb8a","allowedForAnonymousUsers":false,"type":"Favorite","displayName":"Save","toggleDisplayName":"Saved","namePassedToEvents":"Favorite","cssClassName":"atButtonFavorite","privacyOptOutMessage":"\u003cdiv class=\u0027privacyMessage\u0027\u003e\n\u003ch3\u003eThis feature is not available with your current cookie settings.\u003c/h3\u003e\n\u003cp\u003eYou can \u003ca href=\u0027#\u0027 data-show-preference-center=\u00271\u0027\u003eupdate your privacy settings\u003c/a\u003e to enable this content. Please enable “Functional Cookies” to use this feature.\u003c/p\u003e\n\u003c/div\u003e","showPrivacyOptOutMessage":false},{"providerName":"facebook","providerNamePassedToEvents":"Facebook","shareUrlFormat":"//facebook.com/sharer/sharer.php?u={0}","id":"6d176960-1afd-4a34-83b5-795429359551","allowedForAnonymousUsers":true,"type":"Social","displayName":"Facebook","toggleDisplayName":"","namePassedToEvents":"Facebook","cssClassName":"atButtonFacebook","privacyOptOutMessage":"\u003cdiv class=\u0027privacyMessage\u0027\u003e\n\u003ch3\u003eThis feature is not available with your current cookie settings.\u003c/h3\u003e\n\u003cp\u003eYou can \u003ca href=\u0027#\u0027 data-show-preference-center=\u00271\u0027\u003eupdate your privacy settings\u003c/a\u003e to enable this content. Please enable “Functional Cookies” to use this feature.\u003c/p\u003e\n\u003c/div\u003e","showPrivacyOptOutMessage":false},{"templateId":"eb460499-2547-4f84-a197-60f31934a3b9","dialogHeading":"Email Article","emailCode":"PB_ContentEmail","dialogSettings":{"cancelButtonText":"Cancel","copyToSenderLabel":"Send a copy to myself","emailAddressesLabel":"* Email Address","emailInstructionText":"Separate email addresses with commas","fromText":"From:","privacyPolicyText":"\u003cp\u003e\u0026copy;2026 General Mills, Inc. All Rights Reserved. This information will only be used to send an email to your friend(s) and will not be saved. Please read our \u003ca rel=\u0022noopener noreferrer\u0022 rel=\u0022noopener noreferrer\u0022 href=\u0022http://www.generalmills.com/company/privacy-policies/privacy-policy-us\u0022 target=\u0022_blank\u0022 shape=\u0022rect\u0022\u003ePrivacy Policy\u003c/a\u003e.\u003c/p\u003e","requiredFieldText":"* Required","sendButtonText":"Send","senderEmailAddressLabel":"* Your Email Address","senderFirstNameLabel":"* Your First Name","sendToText":"Send To:"},"id":"2a5b12c8-299b-467d-812e-41e9a0afb70d","allowedForAnonymousUsers":true,"type":"Email","displayName":"Email","toggleDisplayName":"","namePassedToEvents":"Email","cssClassName":"atButtonEmail","privacyOptOutMessage":"\u003cdiv class=\u0027privacyMessage\u0027\u003e\n\u003ch3\u003eThis feature is not available with your current cookie settings.\u003c/h3\u003e\n\u003cp\u003eYou can \u003ca href=\u0027#\u0027 data-show-preference-center=\u00271\u0027\u003eupdate your privacy settings\u003c/a\u003e to enable this content. Please enable “Functional Cookies” to use this feature.\u003c/p\u003e\n\u003c/div\u003e","showPrivacyOptOutMessage":false},{"layoutParameter":"p%3d1","id":"783fefb5-010a-4be1-b84d-f0447da7c52c","allowedForAnonymousUsers":true,"type":"Print","displayName":"Print","toggleDisplayName":"","namePassedToEvents":"Print","cssClassName":"atButtonPrint","privacyOptOutMessage":"\u003cdiv class=\u0027privacyMessage\u0027\u003e\n\u003ch3\u003eThis feature is not available with your current cookie settings.\u003c/h3\u003e\n\u003cp\u003eYou can \u003ca href=\u0027#\u0027 data-show-preference-center=\u00271\u0027\u003eupdate your privacy settings\u003c/a\u003e to enable this content. Please enable “Functional Cookies” to use this feature.\u003c/p\u003e\n\u003c/div\u003e","showPrivacyOptOutMessage":false}],"isSticky":true},"userSettings":{"isCurrentUserAnonymous":true,"isFavoriteItem":false,"isAnonymousUserWithFavorites":false},"pageAttributes":{"url":"https%3a%2f%2fwww.pillsbury.com%2feveryday-eats%2fdinner-tonight%2fbreak-it-down-turkey-carving-basics","contentId":"a6827a99-838e-4966-9610-26631e51d4b7"},"recaptchaPublicKey":"6LceAigUAAAAAC8aIQvJ9yRpRl3r1ZBKbou-tIDe"};
var moduleName = 'actionToolbar';
var isVueModule = true;
GeneralMills.PandoSites.RegisterControlInstance(moduleName, configuration, componentMetadata, isVueModule)
});
})();
Tools You’ll Need
Before you begin, make sure to gather the right tools. These key kitchen gadgets will save you time. Ensure that all your tools are clean and sanitized before use to lower the risk of foodborne illnesses, as recommended by the CDC's guidelines.
- A sharp carving knife: Opt for a long, thin blade to help you make clean and precise cuts.
- A carving fork: Helps stabilize the turkey while slicing.
- A sturdy cutting board: Choose one large enough to fit the bird comfortably — you’ll want a large cutting board one big enough to hold the entire turkey. Some cutting boards even have a channel along their edges to collect any juices. If you don’t have one, simply place your cutting board inside a rimmed sheet pan to help collect the drippings for making gravy later, or drizzling over your carved turkey as-is.
- Tongs: Useful for handling the meat with ease and reducing direct contact to help prevent contamination.
Prepping the Bird for Slicing
Now that you’ve got your tools, let’s focus on prepping the turkey for carving. An essential first step is to make sure the turkey has been cooked to a safe internal temperature of 165°F, measured using a food thermometer in the thickest part of the breast, thigh, and wing as advised by the USDA. This ensures any potentially present harmful bacteria like Salmonella has been eliminated.
Once cooked, give your turkey time to rest. Resting the bird for at least 20-30 minutes after cooking Resting gives time for the juices to redistribute, ensuring everyone gets a tender piece of meat. It also makes it much easier to carve the turkey. It can rest up to 30 minutes and still be warm enough for serving. It’s not essential to cover the turkey with foil while it rests, but if you do decide to cover it do so loosely to prevent steaming and keep the skin crisp.
Once your turkey has rested, transfer it to your cutting board, and you’re ready to start carving.
Steps for Carving
Start with the slightly cooled turkey resting breast-side up on your cutting board, with the legs facing toward you. Remove any ties or skewers from trussing. Be sure to have your serving platter nearby so you can plate as you go. If your turkey is still too hot to handle, you can wear clean kitchen gloves.
Step 1. Separate the white and dark meats
While pulling leg away from body, cut to separate the drumstick from the breast. Repeat on the opposite side.
Lift the breast while holding down the legs to separate the top from the bottom. Use one firm cut through the backbone to cut your turkey in half. Set aside the breast meat—either on a second cutting board or by returning it to your roasting pan.
Step 2. Carve the leg and thigh meat
Use your hands to open the turkey thighs and reveal the joints. Cut down again, this time separating the thigh from the backbone.
Now you can pull the thigh away from the drumstick and cut through the joint connecting the leg to the turkey’s body. Once separated, gently cut along the thigh bone to release the meat.
Most people serve the drumstick whole. Remove the thigh bone from the underside of the meat. You should easily be able to do this with your hands. With the skin-side up, cut into slices.
Step 3. Remove the wings
Clear your cutting board and bring your white meat back to the cutting board. Rotate the wings to find the joint. The wings are often a fun side item to serve alongside the main cuts. Wiggle each wing away from the body, while firmly holding the wing, cut through the joint to remove them where it meets the body. Serve whole and ready for the fastest grabbers!
Step 4. Carve the breast meat
Remove excess skin by lifting from the neck cavity and cutting close to the body.
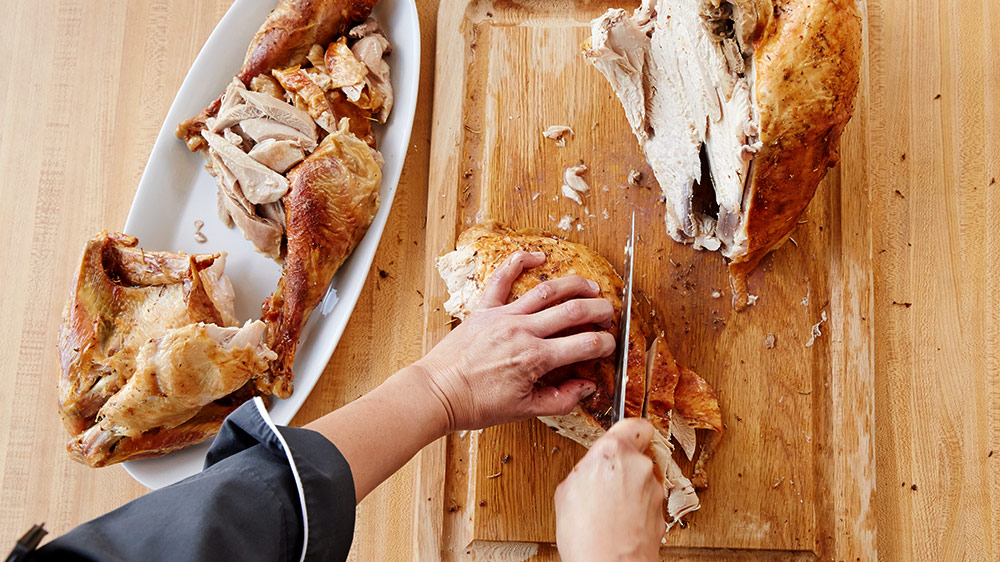
Locate the breastbone running down the center of the turkey and cut alongside the ribcage to remove the breast and tenderloin in one large piece. Use a sweeping motion to ensure you get the tenderloin underneath. Continue slicing until the entire breast half is separated from the bird.
Hold the skin in place as you cut into slices, being careful to tuck your fingers and run your knife alongside the path of your knuckles for safety. Your slices should run opposite, or perpendicular to, the direction of your cuts to remove the meat from the ribcage. This across-the-grain cut ensures tender, evenly sized pieces that stay together for serving.

Don’t forget the wishbone! It’s easier to locate when the wings and breast meat are gone. Look in the centered V-shaped space above the breasts. Cut only as necessary around the wishbone to free it from the cooked turkey meat being delicate of the wishbone itself. Once removed, clean it off with hot soapy water. After a few days or weeks the now dried wishbone is a fun family favorite for a competitive wishbone break!
Step 5. Plate, serve, and store
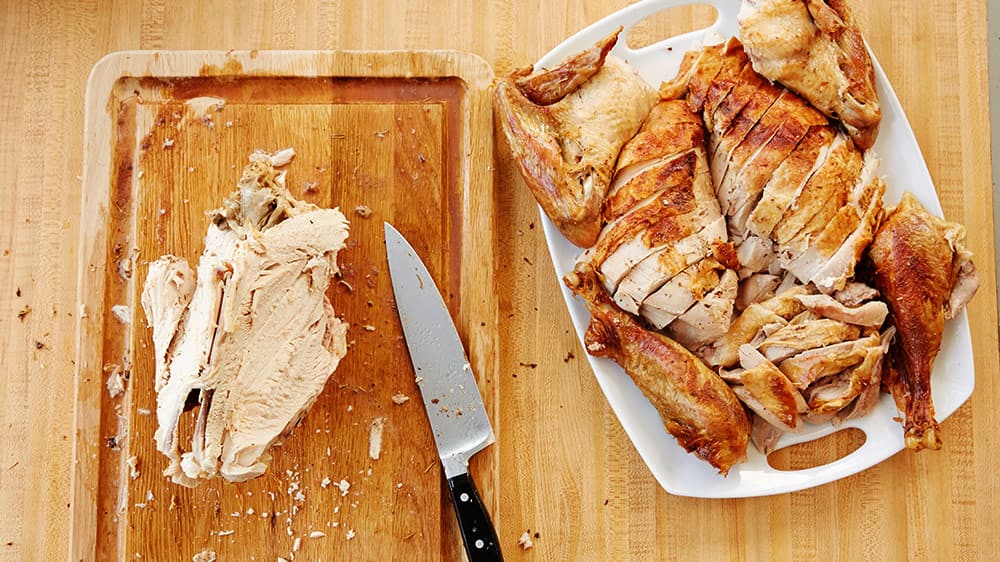
As you can see, the whole process can get kind of messy, so we recommend carving in the kitchen before arranging your sliced turkey on a cleaned platter for a perfect presentation.
Store any leftover turkey promptly. According to the CDC, cooked turkey should not be left out at room temperature for more than 2 hours. If serving food outdoors and it is warmer than 90°F, reduce this time to 1 hour. Store in airtight containers or wrap tightly with aluminum foil and refrigerate leftovers at 40°F or lower within the appropriate time frame.
If you choose to reheat the turkey later, ensure it reaches an internal temperature of 165°F.

Gather those juices from your carving board and strain them into your pan to create your gravy.
Troubleshooting Common Turkey Carving Questions
- How do you carve a turkey without it shredding? Resting is critical. Slice across the grain of the meat to create tender, non-shredded slices.
- Is there a secret to quick carving? If you’re short on time, remove large sections of meat first, such as the breast and thigh, and slice them on a separate, clean cutting board. Minimizing the time the turkey is exposed can help maintain temperature and safety. Instead of slicing sections, allow family and other guests to peel the meat from these larger sections at the table.
- Is it okay to carve the turkey in the kitchen? Yes! While you can carve a turkey at the table, the kitchen is an ideal option too. You can carve the turkey beforehand and bring the slices out on a beautiful platter when the meal begins. This option also helps to prevent cross-contamination in busy kitchen environments.
Master Your Thanksgiving with Safe and Perfect Carving
Learning how to slice a turkey doesn’t have to feel intimidating. With the right tools, proper food safety protocols, and a solid game plan, you’ll be carving like a pro in no time. Remember to always follow USDA guidelines for safe cooking temperatures (165°F), avoid cross-contamination, and properly store leftovers to keep your family gathering safe and enjoyable.
Ready to make your meal even more special? Check out Pillsbury’s Thanksgiving recipes for more ideas that will turn your family gathering into a delicious holiday hit. Now that you have everything you need to carve a turkey with ease, why not roll up your sleeves and start creating homemade memories in your kitchen?
(function() {
document.addEventListener('DOMContentLoaded', function() {
var componentMetadata = JSON.parse('\x7b\x22componentName\x22\x3a\x22NewsletterCTA_592b7e30-5c94-49d6-8316-3c4546d1dac2\x22,\x22deferOptions\x22\x3a\x7b\x22deferComponent\x22\x3atrue,\x22deferType\x22\x3a\x22OnDemand\x22,\x22deferId\x22\x3a\x22r6ce1e24d66a544f5bbe2f7dd8e25c26b\x22,\x22deferredContainerId\x22\x3a\x22\x2fprimaryColumn\x2finteropInlineNewsletterCta\x22,\x22deferredContainerView\x22\x3a\x22InteropDeferWrapper\x22\x7d,\x22viewName\x22\x3a\x22NewsletterCTA\x22\x7d');
var configuration = {"unsubscribedNewsletters":[{"listId":"6d3e858f-4804-4f38-9b8a-712a9a5668cc","thumbnailImageUrl":"/-/media/GMI/Core-Sites/PB/Images/Shared/myaccount/newsletters/PB_Email_Thumb_200x200.gif?sc_lang=en","previewUrl":"https://morpheus3.idpk.net/email_sends/10626/preview","name":"Pillsbury\u0027s Email","isPromo":false}],"settings":{"anonymousCopy":"Family-friendly meals made easy!","anonymousDescriptionCopy":"Make everyday family moments count, with easy recipes that everyone will love. Join our email community to receive tested recipes and tips.","anonymousThankYouCopy":"Thanks! Your first email is on its way.","anonymousThankYouDescriptionCopy":"\u003cp\u003e\u003cspan\u003eNow that you\u0026rsquo;re signed up, create an account on Pillsbury.com to save your favorite recipes, learn more about special promotions and get meal inspiration for any occasion.\u003c/span\u003e\u003c/p\u003e","anonymousButtonText":"Help me make mealtimes easier!","anonymousEmailInvalidErrorText":"Please enter a valid email address.","anonymousSubscribeErrorText":"We encountered an error while signing you up. Please try again.","anonymousEmailAddressPlaceholderText":"Enter your email address","anonymousEmailAddressLabel":"Email Address","anonymousLegalCopy":"By signing up, you accept our\u0026nbsp;\u003cspan style=\u0022text-decoration: underline;\u0022\u003e\u003ca rel=\u0022noopener noreferrer\u0022 href=\u0022https://www.generalmills.com/privacy-security/us-english-privacy-policy\u0022 target=\u0022_blank\u0022\u003ePrivacy Policy\u003c/a\u003e\u003c/span\u003e\u0026nbsp;and agree that your information may be used across our\u0026nbsp;\u003cspan style=\u0022text-decoration: underline;\u0022\u003e\u003ca rel=\u0022noopener noreferrer\u0022 href=\u0022https://www.generalmills.com/food-we-make/brands\u0022 target=\u0022_blank\u0022\u003efamily of brands\u003c/a\u003e.\u003c/span\u003e","requiredFieldText":"","backgroundColor":"#002E6D","accentColor":"","registrationUrl":"/user-profile/register?RegAction=SUBSCRIBERUPGRADE\u0026esrc=14171\u0026returnUrl=%2feveryday-eats%2fdinner-tonight%2fbreak-it-down-turkey-carving-basics","registrationLinkText":"Sign up now","enableExpandedFields":false,"hideForSessionCookieExpiration":0,"ctaType":"StandardAnonymous","location":"Inline","userState":"Anonymous","sourceCodeOverride":0}};
var moduleName = 'newsletterCta';
var isVueModule = true;
GeneralMills.PandoSites.RegisterControlInstance(moduleName, configuration, componentMetadata, isVueModule)
});
})();