(function() {
document.addEventListener('DOMContentLoaded', function() {
var componentMetadata = JSON.parse('\x7b\x22componentName\x22\x3a\x22UserLinks_e8af84a8-5198-47ca-bc1c-daf22247ecf7\x22,\x22deferOptions\x22\x3a\x7b\x22deferComponent\x22\x3afalse,\x22deferType\x22\x3a\x22None\x22,\x22deferId\x22\x3a\x22ra3fcfa841cff4fad81ff90fddb0a4434\x22,\x22deferredContainerId\x22\x3anull,\x22deferredContainerView\x22\x3anull\x7d,\x22viewName\x22\x3a\x22UserLinks\x22\x7d');
var configuration = {"isKnown":false,"favoritesCount":0,"joinNowText":"Sign Up","joinNowEsrcCode":"14171","joinNowRegAction":"HEADERJOINLOGIN","loginText":"Log In","loginEsrcCode":"14171","loginRegAction":"HEADERJOINLOGIN","myAccountText":"My Account","settingsText":"Manage","logOutText":"Log Out","returnUrl":"%2frecipes%2feasy-cherry-pie%2ffdad0859-2606-4553-a2e4-335818c04bc8%3fwt.dcsvid%3dnzi1odawodg4mgs2%26rvrin%3d1437097b-7001-4f7b-b4ec-fcd5bcd20720%26wt.mc_id%3dnewsletter_pbdaily_02_01_2012%26nicreatid2%3dnewsletter_pbdaily_02_01_2012"};
var moduleName = 'userLinks';
var isVueModule = true;
GeneralMills.PandoSites.RegisterControlInstance(moduleName, configuration, componentMetadata, isVueModule)
});
})();
(function() {
document.addEventListener('DOMContentLoaded', function() {
var componentMetadata = JSON.parse('\x7b\x22componentName\x22\x3a\x22TargetedNavigation_e8af84a8-5198-47ca-bc1c-daf22247ecf7\x22,\x22deferOptions\x22\x3a\x7b\x22deferComponent\x22\x3afalse,\x22deferType\x22\x3a\x22None\x22,\x22deferId\x22\x3a\x22r773f18c5556e44b9968118d3b5ab6e7c\x22,\x22deferredContainerId\x22\x3anull,\x22deferredContainerView\x22\x3anull\x7d,\x22viewName\x22\x3a\x22TargetedNavigation\x22\x7d');
var configuration = {};
var moduleName = 'targetedNav';
var isVueModule = false;
GeneralMills.PandoSites.RegisterControlInstance(moduleName, configuration, componentMetadata, isVueModule)
});
})();
(function() {
document.addEventListener('DOMContentLoaded', function() {
var componentMetadata = JSON.parse('\x7b\x22componentName\x22\x3a\x22SearchBox_e8af84a8-5198-47ca-bc1c-daf22247ecf7\x22,\x22deferOptions\x22\x3a\x7b\x22deferComponent\x22\x3afalse,\x22deferType\x22\x3a\x22None\x22,\x22deferId\x22\x3a\x22rc812a545de6b480d974f9f72e585b776\x22,\x22deferredContainerId\x22\x3anull,\x22deferredContainerView\x22\x3anull\x7d,\x22viewName\x22\x3a\x22SearchBox\x22\x7d');
var configuration = {"searchDefaultText":"What do you want to make today?","searchProcessingMessage":"Please Wait..","searchLinkButtonText":"","searchLinkButtonToolTip":"Search","headerSearchBoxTitle":"Search","searchBoxTitle":"","autocompleteSearchPath":"/search","autocompleteSuggestionLimit":10,"minimumSearchHintCharacters":3,"language":"en","id":"4f97cc7f-3af9-4601-96c2-61a40811b4b1","enableSearchTerms":true,"contentTypeFilter":"","dataSourceId":"35b4474e-0aa6-4b63-92bc-e950b5c2ada8"};
var moduleName = 'searchBox';
var isVueModule = true;
GeneralMills.PandoSites.RegisterControlInstance(moduleName, configuration, componentMetadata, isVueModule)
});
})();
(function() {
document.addEventListener('DOMContentLoaded', function() {
var componentMetadata = JSON.parse('\x7b\x22componentName\x22\x3a\x22RatingAndReviewCounts_e8af84a8-5198-47ca-bc1c-daf22247ecf7\x22,\x22deferOptions\x22\x3a\x7b\x22deferComponent\x22\x3afalse,\x22deferType\x22\x3a\x22None\x22,\x22deferId\x22\x3a\x22r8dd402b8a7fa45daa360d6fef7b19b2a\x22,\x22deferredContainerId\x22\x3a\x22\x2fmain\x2frdpRatingAndReview\x22,\x22deferredContainerView\x22\x3anull\x7d,\x22viewName\x22\x3a\x22RatingAndReviewCounts\x22\x7d');
var configuration = {};
var moduleName = 'ratingAndReviewCounts';
var isVueModule = false;
GeneralMills.PandoSites.RegisterControlInstance(moduleName, configuration, componentMetadata, isVueModule)
});
})();
Save Recipe
(function() {
document.addEventListener('DOMContentLoaded', function() {
var componentMetadata = JSON.parse('\x7b\x22componentName\x22\x3a\x22ActionToolbar_54e6f361-54b7-493c-a3f6-899e08a2e456\x22,\x22deferOptions\x22\x3a\x7b\x22deferComponent\x22\x3afalse,\x22deferType\x22\x3a\x22None\x22,\x22deferId\x22\x3a\x22r8649c57ec9c442528f5f1678f82bd134\x22,\x22deferredContainerId\x22\x3a\x22\x2fmain\x2finlineActionToolbarMobile\x22,\x22deferredContainerView\x22\x3anull\x7d,\x22viewName\x22\x3a\x22ActionToolbar\x22\x7d');
var configuration = {"contentId":"fdad0859-2606-4553-a2e4-335818c04bc8","toolbarSettings":{"id":"54e6f361-54b7-493c-a3f6-899e08a2e456","registrationUrl":"/GMI/CoreSites/PB/Home/register/reg-fp","regAction":"FAVORITE","eSourceCode":11275,"namePassedToEvents":"RDPToolbarBODY","buttons":[{"addFavoriteErrorMessage":"Sorry, something went wrong. Please save again.","removeFavoriteErrorMessage":"Error occurred while removing from favorites","registrationUrl":"/GMI/CoreSites/PB/Home/register/reg-fp","regAction":"FAVORITE","eSourceCode":11275,"isCurrentUserAnonymous":false,"isFavoriteItem":false,"id":"3f2f45db-633c-4198-aa86-3b916997c539","allowedForAnonymousUsers":false,"type":"Favorite","displayName":"Save Recipe","namePassedToEvents":"Favorite","cssClassName":"atButtonFavorite","privacyOptOutMessage":"\u003cdiv class=\u0027privacyMessage\u0027\u003e\n\u003ch3\u003eThis feature is not available with your current cookie settings.\u003c/h3\u003e\n\u003cp\u003eYou can \u003ca href=\u0027#\u0027 data-show-preference-center=\u00271\u0027\u003eupdate your privacy settings\u003c/a\u003e to enable this content. Please enable “Functional Cookies” to use this feature.\u003c/p\u003e\n\u003c/div\u003e","showPrivacyOptOutMessage":false},{"providerName":"pinterest","providerNamePassedToEvents":"Pinterest","shareUrlFormat":"//pinterest.com/pin/create/link/?url={0}","id":"f3e30ca4-da79-4842-8b1d-209ce34f733f","allowedForAnonymousUsers":true,"type":"Social","displayName":"Pinterest","namePassedToEvents":"Pinterest","cssClassName":"atButtonPinterest","privacyOptOutMessage":"\u003cdiv class=\u0027privacyMessage\u0027\u003e\n\u003ch3\u003eThis feature is not available with your current cookie settings.\u003c/h3\u003e\n\u003cp\u003eYou can \u003ca href=\u0027#\u0027 data-show-preference-center=\u00271\u0027\u003eupdate your privacy settings\u003c/a\u003e to enable this content. Please enable “Functional Cookies” to use this feature.\u003c/p\u003e\n\u003c/div\u003e","showPrivacyOptOutMessage":false},{"providerName":"facebook","providerNamePassedToEvents":"Facebook","shareUrlFormat":"//facebook.com/sharer/sharer.php?u={0}","id":"e81fd2b5-a56f-46e8-8cf7-ec03e6a8d023","allowedForAnonymousUsers":true,"type":"Social","displayName":"Facebook","namePassedToEvents":"Facebook","cssClassName":"atButtonFacebook","privacyOptOutMessage":"\u003cdiv class=\u0027privacyMessage\u0027\u003e\n\u003ch3\u003eThis feature is not available with your current cookie settings.\u003c/h3\u003e\n\u003cp\u003eYou can \u003ca href=\u0027#\u0027 data-show-preference-center=\u00271\u0027\u003eupdate your privacy settings\u003c/a\u003e to enable this content. Please enable “Functional Cookies” to use this feature.\u003c/p\u003e\n\u003c/div\u003e","showPrivacyOptOutMessage":false},{"templateId":"25dd0d5d-57f4-47c6-a2e1-4de692d643eb","dialogHeading":"Email Recipe","emailCode":"PB_ContentEmail","dialogSettings":{"cancelButtonText":"Cancel","copyToSenderLabel":"Send a copy to myself","emailAddressesLabel":"* Email Address","emailInstructionText":"Separate email addresses with commas","fromText":"From:","privacyPolicyText":"\u003cp\u003e\u0026copy;2024 General Mills, Inc. All Rights Reserved. This information will only be used to send an email to your friend(s) and will not be saved. Please read our \u003ca rel=\u0022noopener noreferrer\u0022 rel=\u0022noopener noreferrer\u0022 href=\u0022http://www.generalmills.com/company/privacy-policies/privacy-policy-us\u0022 target=\u0022_blank\u0022 shape=\u0022rect\u0022\u003ePrivacy Policy\u003c/a\u003e.\u003c/p\u003e","requiredFieldText":"* Required","sendButtonText":"Send","senderEmailAddressLabel":"* Your Email Address","senderFirstNameLabel":"* Your First Name","sendToText":"Send To:"},"id":"b0f363cb-0754-4105-9112-52fcb7e2c639","allowedForAnonymousUsers":true,"type":"Email","displayName":"Email","namePassedToEvents":"Email","cssClassName":"atButtonEmail","privacyOptOutMessage":"\u003cdiv class=\u0027privacyMessage\u0027\u003e\n\u003ch3\u003eThis feature is not available with your current cookie settings.\u003c/h3\u003e\n\u003cp\u003eYou can \u003ca href=\u0027#\u0027 data-show-preference-center=\u00271\u0027\u003eupdate your privacy settings\u003c/a\u003e to enable this content. Please enable “Functional Cookies” to use this feature.\u003c/p\u003e\n\u003c/div\u003e","showPrivacyOptOutMessage":false}],"isSticky":false},"userSettings":{"isCurrentUserAnonymous":true,"isFavoriteItem":false},"pageAttributes":{"url":"https%3a%2f%2fwww.pillsbury.com%2frecipes%2feasy-cherry-pie%2ffdad0859-2606-4553-a2e4-335818c04bc8%3fwt.dcsvid%3dnzi1odawodg4mgs2%26rvrin%3d1437097b-7001-4f7b-b4ec-fcd5bcd20720%26wt.mc_id%3dnewsletter_pbdaily_02_01_2012%26nicreatid2%3dnewsletter_pbdaily_02_01_2012","contentId":"fdad0859-2606-4553-a2e4-335818c04bc8"},"recaptchaPublicKey":"6LceAigUAAAAAC8aIQvJ9yRpRl3r1ZBKbou-tIDe"};
var moduleName = 'actionToolbar';
var isVueModule = true;
GeneralMills.PandoSites.RegisterControlInstance(moduleName, configuration, componentMetadata, isVueModule)
});
})();
(function() {
document.addEventListener('DOMContentLoaded', function() {
var componentMetadata = JSON.parse('\x7b\x22componentName\x22\x3a\x22VideoOverlay_e8af84a8-5198-47ca-bc1c-daf22247ecf7\x22,\x22deferOptions\x22\x3a\x7b\x22deferComponent\x22\x3afalse,\x22deferType\x22\x3a\x22None\x22,\x22deferId\x22\x3a\x22rb470793df26e4c26bd9380798fff3903\x22,\x22deferredContainerId\x22\x3a\x22\x2fmain\x2frdpImage\x22,\x22deferredContainerView\x22\x3anull\x7d,\x22viewName\x22\x3a\x22VideoOverlay\x22\x7d');
var configuration = {"id":"oI8YZ2p0zaI","name":"Easy Cherry Pie","aspectRatioPercent":56.2500,"autoplay":true,"playButtonText":"Watch Video","loadingImageUrl":"/-/media/GMI/Core-Sites/PB/PB/Images/Shared/YouTube/loading.gif?sc_lang=en","loadingImageAltText":"Loading","privacyScreenContent":"\u003cdiv class=\u0022privacyMessage\u0022\u003e\n\u003ch3\u003eThis feature is not available with your current cookie settings.\u003c/h3\u003e\n\u003cp\u003eYou can \u003ca href=\u0022#\u0022 data-show-preference-center=\u00221\u0022\u003eupdate your privacy settings\u003c/a\u003e to enable this content. Please enable all cookies to use this feature.\u003c/p\u003e\n\u003c/div\u003e"};
var moduleName = 'videoOverlay';
var isVueModule = true;
GeneralMills.PandoSites.RegisterControlInstance(moduleName, configuration, componentMetadata, isVueModule)
});
})();
Prep 25min
Total1hr10min
Ingredients4
Servings8
(function() {
document.addEventListener('DOMContentLoaded', function() {
var componentMetadata = JSON.parse('\x7b\x22componentName\x22\x3a\x22ThirdPartyScript_dae1ab9f-d286-4125-bf30-b7695b6641fe\x22,\x22deferOptions\x22\x3a\x7b\x22deferComponent\x22\x3atrue,\x22deferType\x22\x3a\x22OnDemand\x22,\x22deferId\x22\x3a\x22r05f93b01146045cf8e5da67d5e5d0629\x22,\x22deferredContainerId\x22\x3a\x22\x2fmain\x2frdpBuyNowTop\x22,\x22deferredContainerView\x22\x3a\x22ThirdPartyScript\x22\x7d,\x22viewName\x22\x3a\x22ThirdPartyScript\x22\x7d');
var configuration = {"domContent":"\u003cdiv id=\u0022whisk-target-container-rdp-top\u0022\u003e\u003c/div\u003e","scriptContent":"https://cdn.whisk.com/sdk/shopping-list.js","onLoadScript":"var whisk = window.whisk || {};\r\nwhisk.queue = whisk.queue || [];\r\nvar whiskViewEventHasFired = window.whiskViewEventHasFired || false;\r\n\r\nvar whiskcontainer = document.getElementById(\u0022whisk-target-container-rdp-top\u0022);\r\nif (whiskcontainer != null) {\r\n //whiskcontainer.setAttribute(\u0022id\u0022, \u0022whisk-ingredients-id\u0022);\r\n\r\n whisk.queue.push(function () {\r\n whisk.shoppingList.defineWidget(\u0022whisk-target-container-rdp-top\u0022, {\r\n trackingId: \u0022wx-75324683-bf8a0d24\u0022, // social share bar button\r\n whiteLabel: \u0022pillsbury\u0022\r\n });\r\n\r\n\r\n whisk.events.subscribe(\u0022whisk-target-container-rdp-top\u0022, \u0022view\u0022, function (type, data) {\r\n // your code on widget view\r\n if (!whiskViewEventHasFired) {\r\n whiskViewEventHasFired = true;\r\n GeneralMills.Analytics.raiseEvent({\r\n EventType: \u0022Buy_view\u0022,\r\n VendorExperience: \u0022Whisk_recipe\u0022\r\n });\r\n }\r\n });\r\n\r\n\r\n whisk.events.subscribe(\u0022whisk-target-container-rdp-top\u0022, \u0022click\u0022, function (type, data) {\r\n // your code on widget click\r\n GeneralMills.Analytics.raiseEvent({\r\n EventType: \u0022Buy_click\u0022,\r\n Position: \u0022Inline Toolbar\u0022,\r\n VendorExperience: \u0022Whisk_recipe\u0022\r\n });\r\n });\r\n\r\n });\r\n\r\n whisk.queue.push(function () {\r\n whisk.display(\u0022whisk-target-container-rdp-top\u0022);\r\n });\r\n}","scriptReferenceId":"Whisk_scriptId"};
var moduleName = 'thirdPartyScript';
var isVueModule = true;
GeneralMills.PandoSites.RegisterControlInstance(moduleName, configuration, componentMetadata, isVueModule)
});
})();
Save
Print
Pinterest
Facebook
Email
(function() {
document.addEventListener('DOMContentLoaded', function() {
var componentMetadata = JSON.parse('\x7b\x22componentName\x22\x3a\x22ActionToolbar_a83c5fda-5921-40ec-b87a-8f5097489f6c\x22,\x22deferOptions\x22\x3a\x7b\x22deferComponent\x22\x3afalse,\x22deferType\x22\x3a\x22None\x22,\x22deferId\x22\x3a\x22r509ba634873b4c46b79ad32d3c484f1b\x22,\x22deferredContainerId\x22\x3a\x22\x2fmain\x2finlineActionToolbarDesktop\x22,\x22deferredContainerView\x22\x3anull\x7d,\x22viewName\x22\x3a\x22ActionToolbar\x22\x7d');
var configuration = {"contentId":"fdad0859-2606-4553-a2e4-335818c04bc8","toolbarSettings":{"id":"a83c5fda-5921-40ec-b87a-8f5097489f6c","registrationUrl":"/GMI/CoreSites/PB/Home/register/reg-fp","regAction":"FAVORITE","eSourceCode":11275,"namePassedToEvents":"RDPToolbarBODY","buttons":[{"addFavoriteErrorMessage":"Sorry, something went wrong. Please save again.","removeFavoriteErrorMessage":"Error occurred while removing from favorites","registrationUrl":"/GMI/CoreSites/PB/Home/register/reg-fp","regAction":"FAVORITE","eSourceCode":11275,"isCurrentUserAnonymous":false,"isFavoriteItem":false,"id":"351369d5-f1b1-4a90-b495-16074575bb8a","allowedForAnonymousUsers":false,"type":"Favorite","displayName":"Save","namePassedToEvents":"Favorite","cssClassName":"atButtonFavorite","privacyOptOutMessage":"\u003cdiv class=\u0027privacyMessage\u0027\u003e\n\u003ch3\u003eThis feature is not available with your current cookie settings.\u003c/h3\u003e\n\u003cp\u003eYou can \u003ca href=\u0027#\u0027 data-show-preference-center=\u00271\u0027\u003eupdate your privacy settings\u003c/a\u003e to enable this content. Please enable “Functional Cookies” to use this feature.\u003c/p\u003e\n\u003c/div\u003e","showPrivacyOptOutMessage":false},{"layoutParameter":"p%3d1","id":"783fefb5-010a-4be1-b84d-f0447da7c52c","allowedForAnonymousUsers":true,"type":"Print","displayName":"Print","namePassedToEvents":"Print","cssClassName":"atButtonPrint","privacyOptOutMessage":"\u003cdiv class=\u0027privacyMessage\u0027\u003e\n\u003ch3\u003eThis feature is not available with your current cookie settings.\u003c/h3\u003e\n\u003cp\u003eYou can \u003ca href=\u0027#\u0027 data-show-preference-center=\u00271\u0027\u003eupdate your privacy settings\u003c/a\u003e to enable this content. Please enable “Functional Cookies” to use this feature.\u003c/p\u003e\n\u003c/div\u003e","showPrivacyOptOutMessage":false},{"providerName":"pinterest","providerNamePassedToEvents":"Pinterest","shareUrlFormat":"//pinterest.com/pin/create/link/?url={0}","id":"63cf42f0-8fed-4b1c-acbe-0fe44811231d","allowedForAnonymousUsers":true,"type":"Social","displayName":"Pinterest","namePassedToEvents":"Pinterest","cssClassName":"atButtonPinterest","privacyOptOutMessage":"\u003cdiv class=\u0027privacyMessage\u0027\u003e\n\u003ch3\u003eThis feature is not available with your current cookie settings.\u003c/h3\u003e\n\u003cp\u003eYou can \u003ca href=\u0027#\u0027 data-show-preference-center=\u00271\u0027\u003eupdate your privacy settings\u003c/a\u003e to enable this content. Please enable “Functional Cookies” to use this feature.\u003c/p\u003e\n\u003c/div\u003e","showPrivacyOptOutMessage":false},{"providerName":"facebook","providerNamePassedToEvents":"Facebook","shareUrlFormat":"//facebook.com/sharer/sharer.php?u={0}","id":"6d176960-1afd-4a34-83b5-795429359551","allowedForAnonymousUsers":true,"type":"Social","displayName":"Facebook","namePassedToEvents":"Facebook","cssClassName":"atButtonFacebook","privacyOptOutMessage":"\u003cdiv class=\u0027privacyMessage\u0027\u003e\n\u003ch3\u003eThis feature is not available with your current cookie settings.\u003c/h3\u003e\n\u003cp\u003eYou can \u003ca href=\u0027#\u0027 data-show-preference-center=\u00271\u0027\u003eupdate your privacy settings\u003c/a\u003e to enable this content. Please enable “Functional Cookies” to use this feature.\u003c/p\u003e\n\u003c/div\u003e","showPrivacyOptOutMessage":false},{"templateId":"25dd0d5d-57f4-47c6-a2e1-4de692d643eb","dialogHeading":"Email Recipe","emailCode":"PB_ContentEmail","dialogSettings":{"cancelButtonText":"Cancel","copyToSenderLabel":"Send a copy to myself","emailAddressesLabel":"* Email Address","emailInstructionText":"Separate email addresses with commas","fromText":"From:","privacyPolicyText":"\u003cp\u003e\u0026copy;2024 General Mills, Inc. All Rights Reserved. This information will only be used to send an email to your friend(s) and will not be saved. Please read our \u003ca rel=\u0022noopener noreferrer\u0022 rel=\u0022noopener noreferrer\u0022 href=\u0022http://www.generalmills.com/company/privacy-policies/privacy-policy-us\u0022 target=\u0022_blank\u0022 shape=\u0022rect\u0022\u003ePrivacy Policy\u003c/a\u003e.\u003c/p\u003e","requiredFieldText":"* Required","sendButtonText":"Send","senderEmailAddressLabel":"* Your Email Address","senderFirstNameLabel":"* Your First Name","sendToText":"Send To:"},"id":"c2c657e7-baa7-4952-8b5d-4adff90b4a1b","allowedForAnonymousUsers":true,"type":"Email","displayName":"Email","namePassedToEvents":"Email","cssClassName":"atButtonEmail","privacyOptOutMessage":"\u003cdiv class=\u0027privacyMessage\u0027\u003e\n\u003ch3\u003eThis feature is not available with your current cookie settings.\u003c/h3\u003e\n\u003cp\u003eYou can \u003ca href=\u0027#\u0027 data-show-preference-center=\u00271\u0027\u003eupdate your privacy settings\u003c/a\u003e to enable this content. Please enable “Functional Cookies” to use this feature.\u003c/p\u003e\n\u003c/div\u003e","showPrivacyOptOutMessage":false}],"isSticky":false},"userSettings":{"isCurrentUserAnonymous":true,"isFavoriteItem":false},"pageAttributes":{"url":"https%3a%2f%2fwww.pillsbury.com%2frecipes%2feasy-cherry-pie%2ffdad0859-2606-4553-a2e4-335818c04bc8%3fwt.dcsvid%3dnzi1odawodg4mgs2%26rvrin%3d1437097b-7001-4f7b-b4ec-fcd5bcd20720%26wt.mc_id%3dnewsletter_pbdaily_02_01_2012%26nicreatid2%3dnewsletter_pbdaily_02_01_2012","contentId":"fdad0859-2606-4553-a2e4-335818c04bc8"},"recaptchaPublicKey":"6LceAigUAAAAAC8aIQvJ9yRpRl3r1ZBKbou-tIDe"};
var moduleName = 'actionToolbar';
var isVueModule = true;
GeneralMills.PandoSites.RegisterControlInstance(moduleName, configuration, componentMetadata, isVueModule)
});
})();
(function() {
document.addEventListener('DOMContentLoaded', function() {
var componentMetadata = JSON.parse('\x7b\x22componentName\x22\x3a\x22WakeLock_e8af84a8-5198-47ca-bc1c-daf22247ecf7\x22,\x22deferOptions\x22\x3a\x7b\x22deferComponent\x22\x3afalse,\x22deferType\x22\x3a\x22None\x22,\x22deferId\x22\x3a\x22re3ede3de168044bf89ba3b0713e6f939\x22,\x22deferredContainerId\x22\x3a\x22\x2fmain\x2frdpWakeLockTop\x22,\x22deferredContainerView\x22\x3anull\x7d,\x22viewName\x22\x3a\x22WakeLock\x22\x7d');
var configuration = {"heading":"Ready to make?","button":{"errorMessage":"","id":"f9fa8e1c-2dc5-4470-8ca2-83ff8bd5ffd2","allowedForAnonymousUsers":true,"type":"WakeLock","displayName":"Keep Screen On","namePassedToEvents":"Wakelock","cssClassName":"atButtonWakeLock","privacyOptOutMessage":"\u003cdiv class=\u0027privacyMessage\u0027\u003e\n\u003ch3\u003eThis feature is not available with your current cookie settings.\u003c/h3\u003e\n\u003cp\u003eYou can \u003ca href=\u0027#\u0027 data-show-preference-center=\u00271\u0027\u003eupdate your privacy settings\u003c/a\u003e to enable this content. Please enable “Functional Cookies” to use this feature.\u003c/p\u003e\n\u003c/div\u003e","showPrivacyOptOutMessage":false}};
var moduleName = 'wakeLockShared';
var isVueModule = true;
GeneralMills.PandoSites.RegisterControlInstance(moduleName, configuration, componentMetadata, isVueModule)
});
})();
Save
Shop
Share
Keep Screen On
(function() {
document.addEventListener('DOMContentLoaded', function() {
var componentMetadata = JSON.parse('\x7b\x22componentName\x22\x3a\x22ActionToolbar_73c8fdfd-5ac3-49e5-81ef-20637924c32d\x22,\x22deferOptions\x22\x3a\x7b\x22deferComponent\x22\x3afalse,\x22deferType\x22\x3a\x22None\x22,\x22deferId\x22\x3a\x22r543dab8a19094ac8b1b7819045a7bc82\x22,\x22deferredContainerId\x22\x3a\x22\x2fmain\x2fdockingActionToolbar\x22,\x22deferredContainerView\x22\x3anull\x7d,\x22viewName\x22\x3a\x22ActionToolbar\x22\x7d');
var configuration = {"contentId":"fdad0859-2606-4553-a2e4-335818c04bc8","toolbarSettings":{"id":"73c8fdfd-5ac3-49e5-81ef-20637924c32d","registrationUrl":"/GMI/CoreSites/PB/Home/register/reg-fp","regAction":"FAVORITE","eSourceCode":11275,"namePassedToEvents":"RDPToolbarSTICKY","buttons":[{"addFavoriteErrorMessage":"Sorry, something went wrong. Please save again.","removeFavoriteErrorMessage":"Error occurred while removing from favorites","registrationUrl":"/GMI/CoreSites/PB/Home/register/reg-fp","regAction":"FAVORITE","eSourceCode":11275,"isCurrentUserAnonymous":false,"isFavoriteItem":false,"id":"351369d5-f1b1-4a90-b495-16074575bb8a","allowedForAnonymousUsers":false,"type":"Favorite","displayName":"Save","namePassedToEvents":"Favorite","cssClassName":"atButtonFavorite","privacyOptOutMessage":"\u003cdiv class=\u0027privacyMessage\u0027\u003e\n\u003ch3\u003eThis feature is not available with your current cookie settings.\u003c/h3\u003e\n\u003cp\u003eYou can \u003ca href=\u0027#\u0027 data-show-preference-center=\u00271\u0027\u003eupdate your privacy settings\u003c/a\u003e to enable this content. Please enable “Functional Cookies” to use this feature.\u003c/p\u003e\n\u003c/div\u003e","showPrivacyOptOutMessage":false},{"scriptUrl":"https://cdn.whisk.com/sdk/shopping-list.js","onLoadFunction":"var whisk = window.whisk || {};\r\nwhisk.queue = whisk.queue || [];\r\nwhisk.queue.push(function () {\r\n whisk.shoppingList.addRecipeToList({\r\n recipeUrl: window.location.href.replace(\u0027q.pillsbury.com\u0027, \u0027pillsbury.com\u0027),\r\n trackingId: \u0022wx-75324683-9b085240\u0022, // new action toolbar button\r\n whiteLabel: \u0022pillsbury\u0022\r\n });\r\n GeneralMills.Analytics.raiseEvent({\r\n EventType: \u0022Buy_click\u0022,\r\n Position: \u0022Floating Toolbar\u0022,\r\n VendorExperience: \u0022Whisk_recipe\u0022\r\n });\r\n});\r\n","scriptId":"recipeBuyNow","id":"b8510384-7475-408e-867a-741cbb14435f","allowedForAnonymousUsers":true,"type":"ThirdPartyScript","displayName":"Shop","namePassedToEvents":"Shop Recipe","cssClassName":"atButtonShop ","privacyCategories":[3],"privacyOptOutMessage":"\u003cdiv class=\u0027privacyMessage\u0027\u003e\n\u003ch3\u003eThis feature is not available with your current cookie settings.\u003c/h3\u003e\n\u003cp\u003eYou can \u003ca href=\u0027#\u0027 data-show-preference-center=\u00271\u0027\u003eupdate your privacy settings\u003c/a\u003e to enable this content. Please enable “Functional Cookies” to use this feature.\u003c/p\u003e\n\u003c/div\u003e","showPrivacyOptOutMessage":false},{"nestedButtons":[{"layoutParameter":"p%3d1","id":"6ef3ad08-2257-498f-9214-0be4f04b08ce","allowedForAnonymousUsers":true,"type":"Print","displayName":"Print Recipe","namePassedToEvents":"Print","cssClassName":"atButtonPrint","privacyOptOutMessage":"\u003cdiv class=\u0027privacyMessage\u0027\u003e\n\u003ch3\u003eThis feature is not available with your current cookie settings.\u003c/h3\u003e\n\u003cp\u003eYou can \u003ca href=\u0027#\u0027 data-show-preference-center=\u00271\u0027\u003eupdate your privacy settings\u003c/a\u003e to enable this content. Please enable “Functional Cookies” to use this feature.\u003c/p\u003e\n\u003c/div\u003e","showPrivacyOptOutMessage":false},{"providerName":"pinterest","providerNamePassedToEvents":"Pinterest","shareUrlFormat":"//pinterest.com/pin/create/link/?url={0}","id":"d6565c28-a8e4-4055-8668-fbfd5eccba88","allowedForAnonymousUsers":true,"type":"Social","displayName":"Save To Pinterest","namePassedToEvents":"Pinterest","cssClassName":"atButtonPinterest","privacyOptOutMessage":"\u003cdiv class=\u0027privacyMessage\u0027\u003e\n\u003ch3\u003eThis feature is not available with your current cookie settings.\u003c/h3\u003e\n\u003cp\u003eYou can \u003ca href=\u0027#\u0027 data-show-preference-center=\u00271\u0027\u003eupdate your privacy settings\u003c/a\u003e to enable this content. Please enable “Functional Cookies” to use this feature.\u003c/p\u003e\n\u003c/div\u003e","showPrivacyOptOutMessage":false},{"templateId":"25dd0d5d-57f4-47c6-a2e1-4de692d643eb","dialogHeading":"Email Recipe","emailCode":"PB_ContentEmail","dialogSettings":{"cancelButtonText":"Cancel","copyToSenderLabel":"Send a copy to myself","emailAddressesLabel":"* Email Address","emailInstructionText":"Separate email addresses with commas","fromText":"From:","privacyPolicyText":"\u003cp\u003e\u0026copy;2024 General Mills, Inc. All Rights Reserved. This information will only be used to send an email to your friend(s) and will not be saved. Please read our \u003ca rel=\u0022noopener noreferrer\u0022 rel=\u0022noopener noreferrer\u0022 href=\u0022http://www.generalmills.com/company/privacy-policies/privacy-policy-us\u0022 target=\u0022_blank\u0022 shape=\u0022rect\u0022\u003ePrivacy Policy\u003c/a\u003e.\u003c/p\u003e","requiredFieldText":"* Required","sendButtonText":"Send","senderEmailAddressLabel":"* Your Email Address","senderFirstNameLabel":"* Your First Name","sendToText":"Send To:"},"id":"80c3b664-b383-41b5-b97a-91845639d5a0","allowedForAnonymousUsers":true,"type":"Email","displayName":"Share via Email","namePassedToEvents":"Email","cssClassName":"atButtonEmail","privacyOptOutMessage":"\u003cdiv class=\u0027privacyMessage\u0027\u003e\n\u003ch3\u003eThis feature is not available with your current cookie settings.\u003c/h3\u003e\n\u003cp\u003eYou can \u003ca href=\u0027#\u0027 data-show-preference-center=\u00271\u0027\u003eupdate your privacy settings\u003c/a\u003e to enable this content. Please enable “Functional Cookies” to use this feature.\u003c/p\u003e\n\u003c/div\u003e","showPrivacyOptOutMessage":false},{"providerName":"facebook","providerNamePassedToEvents":"Facebook","shareUrlFormat":"//facebook.com/sharer/sharer.php?u={0}","id":"d4600f53-4919-44a0-aed3-6b7322540b1a","allowedForAnonymousUsers":true,"type":"Social","displayName":"Share on Facebook","namePassedToEvents":"Facebook","cssClassName":"atButtonFacebook","privacyOptOutMessage":"\u003cdiv class=\u0027privacyMessage\u0027\u003e\n\u003ch3\u003eThis feature is not available with your current cookie settings.\u003c/h3\u003e\n\u003cp\u003eYou can \u003ca href=\u0027#\u0027 data-show-preference-center=\u00271\u0027\u003eupdate your privacy settings\u003c/a\u003e to enable this content. Please enable “Functional Cookies” to use this feature.\u003c/p\u003e\n\u003c/div\u003e","showPrivacyOptOutMessage":false},{"successMessage":"Copied.","errorMessage":"Press Ctrl+C and Enter to copy to clipboard","successMessageDuration":3000,"errorMessageDuration":10000,"id":"13718d3d-801f-4dbf-abe1-4369ca03e9cd","allowedForAnonymousUsers":true,"type":"CopyLink","displayName":"Copy Link","namePassedToEvents":"Copy","cssClassName":"atButtonCopyLink","privacyOptOutMessage":"\u003cdiv class=\u0027privacyMessage\u0027\u003e\n\u003ch3\u003eThis feature is not available with your current cookie settings.\u003c/h3\u003e\n\u003cp\u003eYou can \u003ca href=\u0027#\u0027 data-show-preference-center=\u00271\u0027\u003eupdate your privacy settings\u003c/a\u003e to enable this content. Please enable “Functional Cookies” to use this feature.\u003c/p\u003e\n\u003c/div\u003e","showPrivacyOptOutMessage":false}],"id":"168a1a35-42c5-40ba-8eaa-9e789eefeaed","allowedForAnonymousUsers":true,"type":"Reveal","displayName":"Share","namePassedToEvents":"Share","cssClassName":"atButtonReveal","privacyOptOutMessage":"\u003cdiv class=\u0027privacyMessage\u0027\u003e\n\u003ch3\u003eThis feature is not available with your current cookie settings.\u003c/h3\u003e\n\u003cp\u003eYou can \u003ca href=\u0027#\u0027 data-show-preference-center=\u00271\u0027\u003eupdate your privacy settings\u003c/a\u003e to enable this content. Please enable “Functional Cookies” to use this feature.\u003c/p\u003e\n\u003c/div\u003e","showPrivacyOptOutMessage":false},{"errorMessage":"","id":"f9fa8e1c-2dc5-4470-8ca2-83ff8bd5ffd2","allowedForAnonymousUsers":true,"type":"WakeLock","displayName":"Keep Screen On","namePassedToEvents":"Wakelock","cssClassName":"atButtonWakeLock","privacyOptOutMessage":"\u003cdiv class=\u0027privacyMessage\u0027\u003e\n\u003ch3\u003eThis feature is not available with your current cookie settings.\u003c/h3\u003e\n\u003cp\u003eYou can \u003ca href=\u0027#\u0027 data-show-preference-center=\u00271\u0027\u003eupdate your privacy settings\u003c/a\u003e to enable this content. Please enable “Functional Cookies” to use this feature.\u003c/p\u003e\n\u003c/div\u003e","showPrivacyOptOutMessage":false}],"isSticky":true},"userSettings":{"isCurrentUserAnonymous":true,"isFavoriteItem":false},"pageAttributes":{"url":"https%3a%2f%2fwww.pillsbury.com%2frecipes%2feasy-cherry-pie%2ffdad0859-2606-4553-a2e4-335818c04bc8%3fwt.dcsvid%3dnzi1odawodg4mgs2%26rvrin%3d1437097b-7001-4f7b-b4ec-fcd5bcd20720%26wt.mc_id%3dnewsletter_pbdaily_02_01_2012%26nicreatid2%3dnewsletter_pbdaily_02_01_2012","contentId":"fdad0859-2606-4553-a2e4-335818c04bc8"},"recaptchaPublicKey":"6LceAigUAAAAAC8aIQvJ9yRpRl3r1ZBKbou-tIDe"};
var moduleName = 'actionToolbar';
var isVueModule = true;
GeneralMills.PandoSites.RegisterControlInstance(moduleName, configuration, componentMetadata, isVueModule)
});
})();
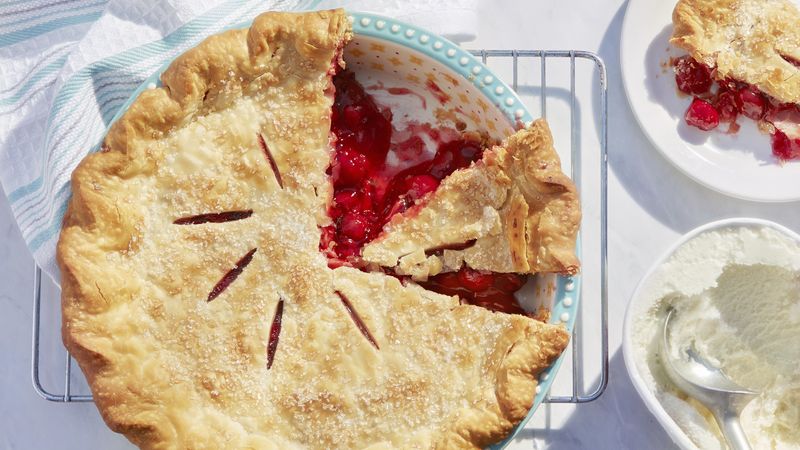
Is it Cherry Pie or cheery pie? Our Easy Cherry Pie is both! Whether you are cheering about a homemade pie that only needs 4 ingredients, or you’re smiling at the vibrant color and cheery look of a cherry pie, this pie has it all.
Our delicious recipe is perfect for any occasion, whether it is a weeknight dessert or the star of a potluck meal. The bright red filling of this simple-to-make dessert fits right in at any holiday spread, too. Whether you want to add a little color to a mostly tan and brown Thanksgiving meal, stick to the red and green theme of Christmas, or need a spring color boost at Easter, you can’t go wrong with cherry pie on the menu!
Made with the amazingly flaky, homemade taste of refrigerated Pillsbury™ Pie Crusts, all you have to do is unroll it and fill it with cherry pie filing. Using this great pie pastry takes the pressure off making your own crust, and no one will know just how easy it was! But this recipe goes a step further, giving the top crust a bakery-like, eye-catching texture simply using milk and sugar. Wait until you dive into this little crunchy gem on top of an already delicious crust and the sweet-sour burst of delicious cherry filling—it’s simply swoon-worthy.
(function() {
document.addEventListener('DOMContentLoaded', function() {
var componentMetadata = JSON.parse('\x7b\x22componentName\x22\x3a\x22ActionToolbar_73c8fdfd-5ac3-49e5-81ef-20637924c32d\x22,\x22deferOptions\x22\x3a\x7b\x22deferComponent\x22\x3afalse,\x22deferType\x22\x3a\x22None\x22,\x22deferId\x22\x3a\x22r3d1d072b038a46b89c7fbff8cff2bdc2\x22,\x22deferredContainerId\x22\x3a\x22\x2fmain\x2fdockingActionToolbarMobile\x22,\x22deferredContainerView\x22\x3anull\x7d,\x22viewName\x22\x3a\x22ActionToolbar\x22\x7d');
var configuration = {"contentId":"fdad0859-2606-4553-a2e4-335818c04bc8","toolbarSettings":{"id":"73c8fdfd-5ac3-49e5-81ef-20637924c32d","registrationUrl":"/GMI/CoreSites/PB/Home/register/reg-fp","regAction":"FAVORITE","eSourceCode":11275,"namePassedToEvents":"RDPToolbarSTICKY","buttons":[{"addFavoriteErrorMessage":"Sorry, something went wrong. Please save again.","removeFavoriteErrorMessage":"Error occurred while removing from favorites","registrationUrl":"/GMI/CoreSites/PB/Home/register/reg-fp","regAction":"FAVORITE","eSourceCode":11275,"isCurrentUserAnonymous":false,"isFavoriteItem":false,"id":"351369d5-f1b1-4a90-b495-16074575bb8a","allowedForAnonymousUsers":false,"type":"Favorite","displayName":"Save","namePassedToEvents":"Favorite","cssClassName":"atButtonFavorite","privacyOptOutMessage":"\u003cdiv class=\u0027privacyMessage\u0027\u003e\n\u003ch3\u003eThis feature is not available with your current cookie settings.\u003c/h3\u003e\n\u003cp\u003eYou can \u003ca href=\u0027#\u0027 data-show-preference-center=\u00271\u0027\u003eupdate your privacy settings\u003c/a\u003e to enable this content. Please enable “Functional Cookies” to use this feature.\u003c/p\u003e\n\u003c/div\u003e","showPrivacyOptOutMessage":false},{"scriptUrl":"https://cdn.whisk.com/sdk/shopping-list.js","onLoadFunction":"var whisk = window.whisk || {};\r\nwhisk.queue = whisk.queue || [];\r\nwhisk.queue.push(function () {\r\n whisk.shoppingList.addRecipeToList({\r\n recipeUrl: window.location.href.replace(\u0027q.pillsbury.com\u0027, \u0027pillsbury.com\u0027),\r\n trackingId: \u0022wx-75324683-9b085240\u0022, // new action toolbar button\r\n whiteLabel: \u0022pillsbury\u0022\r\n });\r\n GeneralMills.Analytics.raiseEvent({\r\n EventType: \u0022Buy_click\u0022,\r\n Position: \u0022Floating Toolbar\u0022,\r\n VendorExperience: \u0022Whisk_recipe\u0022\r\n });\r\n});\r\n","scriptId":"recipeBuyNow","id":"b8510384-7475-408e-867a-741cbb14435f","allowedForAnonymousUsers":true,"type":"ThirdPartyScript","displayName":"Shop","namePassedToEvents":"Shop Recipe","cssClassName":"atButtonShop ","privacyCategories":[3],"privacyOptOutMessage":"\u003cdiv class=\u0027privacyMessage\u0027\u003e\n\u003ch3\u003eThis feature is not available with your current cookie settings.\u003c/h3\u003e\n\u003cp\u003eYou can \u003ca href=\u0027#\u0027 data-show-preference-center=\u00271\u0027\u003eupdate your privacy settings\u003c/a\u003e to enable this content. Please enable “Functional Cookies” to use this feature.\u003c/p\u003e\n\u003c/div\u003e","showPrivacyOptOutMessage":false},{"nestedButtons":[{"layoutParameter":"p%3d1","id":"6ef3ad08-2257-498f-9214-0be4f04b08ce","allowedForAnonymousUsers":true,"type":"Print","displayName":"Print Recipe","namePassedToEvents":"Print","cssClassName":"atButtonPrint","privacyOptOutMessage":"\u003cdiv class=\u0027privacyMessage\u0027\u003e\n\u003ch3\u003eThis feature is not available with your current cookie settings.\u003c/h3\u003e\n\u003cp\u003eYou can \u003ca href=\u0027#\u0027 data-show-preference-center=\u00271\u0027\u003eupdate your privacy settings\u003c/a\u003e to enable this content. Please enable “Functional Cookies” to use this feature.\u003c/p\u003e\n\u003c/div\u003e","showPrivacyOptOutMessage":false},{"providerName":"pinterest","providerNamePassedToEvents":"Pinterest","shareUrlFormat":"//pinterest.com/pin/create/link/?url={0}","id":"d6565c28-a8e4-4055-8668-fbfd5eccba88","allowedForAnonymousUsers":true,"type":"Social","displayName":"Save To Pinterest","namePassedToEvents":"Pinterest","cssClassName":"atButtonPinterest","privacyOptOutMessage":"\u003cdiv class=\u0027privacyMessage\u0027\u003e\n\u003ch3\u003eThis feature is not available with your current cookie settings.\u003c/h3\u003e\n\u003cp\u003eYou can \u003ca href=\u0027#\u0027 data-show-preference-center=\u00271\u0027\u003eupdate your privacy settings\u003c/a\u003e to enable this content. Please enable “Functional Cookies” to use this feature.\u003c/p\u003e\n\u003c/div\u003e","showPrivacyOptOutMessage":false},{"templateId":"25dd0d5d-57f4-47c6-a2e1-4de692d643eb","dialogHeading":"Email Recipe","emailCode":"PB_ContentEmail","dialogSettings":{"cancelButtonText":"Cancel","copyToSenderLabel":"Send a copy to myself","emailAddressesLabel":"* Email Address","emailInstructionText":"Separate email addresses with commas","fromText":"From:","privacyPolicyText":"\u003cp\u003e\u0026copy;2024 General Mills, Inc. All Rights Reserved. This information will only be used to send an email to your friend(s) and will not be saved. Please read our \u003ca rel=\u0022noopener noreferrer\u0022 rel=\u0022noopener noreferrer\u0022 href=\u0022http://www.generalmills.com/company/privacy-policies/privacy-policy-us\u0022 target=\u0022_blank\u0022 shape=\u0022rect\u0022\u003ePrivacy Policy\u003c/a\u003e.\u003c/p\u003e","requiredFieldText":"* Required","sendButtonText":"Send","senderEmailAddressLabel":"* Your Email Address","senderFirstNameLabel":"* Your First Name","sendToText":"Send To:"},"id":"80c3b664-b383-41b5-b97a-91845639d5a0","allowedForAnonymousUsers":true,"type":"Email","displayName":"Share via Email","namePassedToEvents":"Email","cssClassName":"atButtonEmail","privacyOptOutMessage":"\u003cdiv class=\u0027privacyMessage\u0027\u003e\n\u003ch3\u003eThis feature is not available with your current cookie settings.\u003c/h3\u003e\n\u003cp\u003eYou can \u003ca href=\u0027#\u0027 data-show-preference-center=\u00271\u0027\u003eupdate your privacy settings\u003c/a\u003e to enable this content. Please enable “Functional Cookies” to use this feature.\u003c/p\u003e\n\u003c/div\u003e","showPrivacyOptOutMessage":false},{"providerName":"facebook","providerNamePassedToEvents":"Facebook","shareUrlFormat":"//facebook.com/sharer/sharer.php?u={0}","id":"d4600f53-4919-44a0-aed3-6b7322540b1a","allowedForAnonymousUsers":true,"type":"Social","displayName":"Share on Facebook","namePassedToEvents":"Facebook","cssClassName":"atButtonFacebook","privacyOptOutMessage":"\u003cdiv class=\u0027privacyMessage\u0027\u003e\n\u003ch3\u003eThis feature is not available with your current cookie settings.\u003c/h3\u003e\n\u003cp\u003eYou can \u003ca href=\u0027#\u0027 data-show-preference-center=\u00271\u0027\u003eupdate your privacy settings\u003c/a\u003e to enable this content. Please enable “Functional Cookies” to use this feature.\u003c/p\u003e\n\u003c/div\u003e","showPrivacyOptOutMessage":false},{"successMessage":"Copied.","errorMessage":"Press Ctrl+C and Enter to copy to clipboard","successMessageDuration":3000,"errorMessageDuration":10000,"id":"13718d3d-801f-4dbf-abe1-4369ca03e9cd","allowedForAnonymousUsers":true,"type":"CopyLink","displayName":"Copy Link","namePassedToEvents":"Copy","cssClassName":"atButtonCopyLink","privacyOptOutMessage":"\u003cdiv class=\u0027privacyMessage\u0027\u003e\n\u003ch3\u003eThis feature is not available with your current cookie settings.\u003c/h3\u003e\n\u003cp\u003eYou can \u003ca href=\u0027#\u0027 data-show-preference-center=\u00271\u0027\u003eupdate your privacy settings\u003c/a\u003e to enable this content. Please enable “Functional Cookies” to use this feature.\u003c/p\u003e\n\u003c/div\u003e","showPrivacyOptOutMessage":false}],"id":"168a1a35-42c5-40ba-8eaa-9e789eefeaed","allowedForAnonymousUsers":true,"type":"Reveal","displayName":"Share","namePassedToEvents":"Share","cssClassName":"atButtonReveal","privacyOptOutMessage":"\u003cdiv class=\u0027privacyMessage\u0027\u003e\n\u003ch3\u003eThis feature is not available with your current cookie settings.\u003c/h3\u003e\n\u003cp\u003eYou can \u003ca href=\u0027#\u0027 data-show-preference-center=\u00271\u0027\u003eupdate your privacy settings\u003c/a\u003e to enable this content. Please enable “Functional Cookies” to use this feature.\u003c/p\u003e\n\u003c/div\u003e","showPrivacyOptOutMessage":false},{"errorMessage":"","id":"f9fa8e1c-2dc5-4470-8ca2-83ff8bd5ffd2","allowedForAnonymousUsers":true,"type":"WakeLock","displayName":"Keep Screen On","namePassedToEvents":"Wakelock","cssClassName":"atButtonWakeLock","privacyOptOutMessage":"\u003cdiv class=\u0027privacyMessage\u0027\u003e\n\u003ch3\u003eThis feature is not available with your current cookie settings.\u003c/h3\u003e\n\u003cp\u003eYou can \u003ca href=\u0027#\u0027 data-show-preference-center=\u00271\u0027\u003eupdate your privacy settings\u003c/a\u003e to enable this content. Please enable “Functional Cookies” to use this feature.\u003c/p\u003e\n\u003c/div\u003e","showPrivacyOptOutMessage":false}],"isSticky":true},"userSettings":{"isCurrentUserAnonymous":true,"isFavoriteItem":false},"pageAttributes":{"url":"https%3a%2f%2fwww.pillsbury.com%2frecipes%2feasy-cherry-pie%2ffdad0859-2606-4553-a2e4-335818c04bc8%3fwt.dcsvid%3dnzi1odawodg4mgs2%26rvrin%3d1437097b-7001-4f7b-b4ec-fcd5bcd20720%26wt.mc_id%3dnewsletter_pbdaily_02_01_2012%26nicreatid2%3dnewsletter_pbdaily_02_01_2012","contentId":"fdad0859-2606-4553-a2e4-335818c04bc8"},"recaptchaPublicKey":"6LceAigUAAAAAC8aIQvJ9yRpRl3r1ZBKbou-tIDe"};
var moduleName = 'actionToolbar';
var isVueModule = true;
GeneralMills.PandoSites.RegisterControlInstance(moduleName, configuration, componentMetadata, isVueModule)
});
})();
How to Make Cherry Pie
Whether you are brand-new to baking or a seasoned pro, you’ll love the easy prep and the homemade goodness you get with this fresh cherry pie. Follow the recipe for the great guidance specifics, but here is the general scoop on how to make cherry pie:
Start with a Premade Pie Crust: Unroll the refrigerated pie pastry into your glass pie plate—it is so simple!
Load Up on Cherry Pie Filling: You will need two cans of cherry pie filling to give the pie enough filling to feel generous. You can use regular pie filling which has a lot of nice cherry glaze, or you can use the “more fruit” variety, which has more cherries and less glaze. Both are delicious—it is completely up to you which one you prefer!
Top and Seal the Crusts: Seal the two crusts together, to prevent any of that delicious filling from oozing out, using our terrific tips, if you’ve never crimped or fluted your way around a pie before. It will look like it was done by a professional!
Brush and Sprinkle: Brush the top crust with milk and sprinkle it with sugar, for a finish that adds sparkle and crunch, just like you would see on a bakery pie (but it is freshly homemade, so you know it will taste even better.)
What’s The Best Cherry Pie Filling
We love the convenience, flavor, and color that canned cherry pie filling brings to this easy homemade pie. The cherries are picked at the peak of ripeness and all the work of taking out each tiny pit and making the thick, juicy glaze is done for you! Simply open the cans and spoon it into the crust, being sure to get every drop of the wonderful glaze that may be sticking to the bottom of the can.
We use two cans, so that each piece of pie is full of plump, juicy cherry filling goodness. Learn about the different varieties of canned cherry pie filling above, in the How to Make Cherry Pie section. You can usually find cherry pie filling in the baking aisle of your grocery store or discount store that carries groceries. Or look near the other canned fruit, as an alternative location where it might be.
If you love to make your own filling from scratch, from fresh sour cherries when they are in season, you will love our Fresh Cherry Pie recipe.
What Are Delicious Cherry Pie Toppings I Can Serve with This Pie?
The best cherry pie is one that’s served with either whipped cream or ice cream! The dairy notes make the luscious cherry filing and flaky crust even more delicious. Pick from any of these choices:
Whipped Cream: Use any of the varieties of whipped cream you can get in an aerosol can. Squirt it onto the pie just before serving. Or you can add a dollop or two of frozen (thawed) whipped topping.
Ice Cream: Vanilla or vanilla bean ice cream would be a wonderful choice, or you could branch out a bit, with something less expected! Try chocolate chip, butter pecan or coffee ice cream.
A Cherry on Top: If you really want to go the extra mile, add one of these garnishes, for an over-the-top dessert experience, without any extra work! Garnish with a sugar cookie or chocolate wafer cookie into the ice cream or whipped cream. Pick up themed sugar cookies with sprinkles around the holidays from the grocery store as a special touch. Sprinkle granola, chopped candy bar or nuts over the ice cream or whipped cream—soo delicious.!
How Can I Make Easy Cherry Pie Crust Designs?
Homemade cherry pie is so special (especially with the sugary crust treatment we have as part of the recipe), that you do not have to feel like you need to do anything else to make a pretty presentation. However, if you’re the type that likes to add a creative flair (or you excelled at clay modeling in school), check out these 4 Easy Ways to Decorate Your Pie Crust.
Enlist your budding chefs to help choose and make one from the pie crust designs, if you’re looking for ways to spend time together. You can practice with an extra package of pie crust before doing it on your cherry pie, so you feel confident before fully committing. (Sprinkle the practice pie pastry pieces with cinnamon sugar and bake, as a tasty reward for your work!
Heat oven to 425°F. Make pie crusts as directed on box for Two-Crust Pie, using 9-inch glass pie plate.
2
Spoon pie filling into crust-lined plate. Top with second crust; seal edge and flute. Brush top crust with milk; sprinkle with sugar. Cut slits in several places on top crust.
3
Bake 40 to 45 minutes or until crust is golden brown. After 15 to 20 minutes of baking, cover crust edge with strips of foil to prevent excessive browning. Cool at least 1 hour before serving.
(function() {
document.addEventListener('DOMContentLoaded', function() {
var componentMetadata = JSON.parse('\x7b\x22componentName\x22\x3a\x22RecipeSteps_e8af84a8-5198-47ca-bc1c-daf22247ecf7\x22,\x22deferOptions\x22\x3a\x7b\x22deferComponent\x22\x3atrue,\x22deferType\x22\x3a\x22OnDemand\x22,\x22deferId\x22\x3a\x22rea644e0af2404098a911ebc25c24e642\x22,\x22deferredContainerId\x22\x3a\x22\x2fmain\x2frdpSteps\x22,\x22deferredContainerView\x22\x3a\x22RecipeDetail\x22\x7d,\x22viewName\x22\x3a\x22RecipeSteps\x22\x7d');
var configuration = {"initAreImagesHidden":false,"hideImagesEventName":"HideStepShots","showImagesEventName":"ShowStepShots","hideImagesButtonText":"Hide Images","showImagesButtonText":"Show Images","hideImagesClass":"rdpHideStepImages"};
var moduleName = 'recipeStepShots';
var isVueModule = true;
GeneralMills.PandoSites.RegisterControlInstance(moduleName, configuration, componentMetadata, isVueModule)
});
})();
Tips from the Pillsbury Kitchens
tip 1
One package (12 oz) frozen Pillsbury™ Deep Dish Pie Crusts (2 Count) may be substituted for the refrigerated Pillsbury™ Pie Crusts in this recipe. Place cookie sheet on oven rack. Heat oven as directed. Prepare filling and follow directions on package for Two-Crust Filled Pie.
tip 2
Place a large piece of heavy-duty foil on lower oven rack to catch any juices that may bubble over.
tip 3
For perfect crimps in your pie crust, use the handle of a wooden spoon to mark evenly-spaced sections, then pinch the crust around the handle with your fingers.
tip 4
For a decorated look, before placing top crust over the filling, use small cookie cutters to cut out small shapes which create vents to release steam. For more of a glazed top crust, brush cream and sprinkle coarse sparkling sugar over top, before sliding it into the oven.
tip 5
Have strips of foil or aluminum pie crust shields at the ready to prevent over-browning around the top edges of the pastry. You don’t want to underbake the pie, or you may have a gummy bottom crust.
(function() {
document.addEventListener('DOMContentLoaded', function() {
var componentMetadata = JSON.parse('\x7b\x22componentName\x22\x3a\x22RecipeTipsNonPrint_e8af84a8-5198-47ca-bc1c-daf22247ecf7\x22,\x22deferOptions\x22\x3a\x7b\x22deferComponent\x22\x3atrue,\x22deferType\x22\x3a\x22Simple\x22,\x22deferId\x22\x3a\x22r6dc0a91d3cf04f9c9e5da0f4f42d7b8d\x22,\x22deferredContainerId\x22\x3a\x22\x2fmain\x2frdpTips\x22,\x22deferredContainerView\x22\x3a\x22RecipeDetail\x22\x7d,\x22viewName\x22\x3a\x22RecipeTipsNonPrint\x22\x7d');
var configuration = {};
var moduleName = 'expandableTextContainer';
var isVueModule = true;
GeneralMills.PandoSites.RegisterControlInstance(moduleName, configuration, componentMetadata, isVueModule)
});
})();
Frequently Asked Questions
How to Store Cherry Pie
About as great as eating cherry pie for the first time is having leftovers to be able to enjoy another piece, later! Here’s how you can store, freeze, and thaw either unbaked or baked pies or reheat individual pieces of cherry pie:
On the Counter: You can cover any leftover pie with plastic wrap and store at room temperature for up to 2 days.
In the Fridge: Store leftover pie covered with plastic wrap in the refrigerator for up to 4 days.
In the Freezer: For unbaked pie: Prepare pie as directed through Step 2, but do not cut slits in pie. Wrap or baked cherry pie with plastic wrap and freeze until firm. Wrap the entire pie tightly with a layer of aluminum foil and store in the freezer for up to 3 months.
Thawing Baked Frozen Cherry Pie: Thaw unwrapped pie at room temperature several hours or overnight or unwrap and thaw at room temperature 1 hour, then bake at 375°F 35 to 40 minutes or until warm.
Bake Frozen Unbaked Cherry Pie: Unwrap and cut slits in top crust. Bake at 425°F for 15 minutes. Reduce oven temperature to 375°F; bake 30 to 45 minutes longer until juices begin to bubble through the crust.
Warming a Slice of Pie: Place a piece of pie on a microwavable plate. Cover loosely with plastic wrap. Microwave on Medium-High (70%) about 1 minute for room temperature pie or up to 3 minutes for refrigerated pie or until warm.
How Long to Bake Cherry Pie?
Because the pastry edge of any pie usually gets brown before the center, you must cover it with foil or a pie shield to stop browning, while the pastry in the middle can continue browning. In this recipe, it’s added after the pie has partially baked, giving it time to hold its shape when covered.
Since canned cherry pie filling is already cooked, you can go by the color of the top crust in the center to know when it is fully cooked. If spots of the top crust are getting too brown before the rest of it has a chance to turn golden, top them with tiny pieces of aluminum foil big enough to cover them during baking.
The best crust: Is a golden-brown color. The pastry will be flaky, and the crust will have almost no flavor so that the filling can take center stage. Underbaked crust: It will look light golden, will have a floury taste and a dough-like texture (this can also happen if slits were not made in the top pastry to let the steam out).
Overbaked pie: Will have a dark golden-brown color. The pastry will be tougher with more of a pronounced flavor, taking attention off the flavor of the filling.
What’s the Best Premade Pie Crust?
Refrigerated Pillsbury™ Pie Crusts are the top choice for premade pie crust. They are incredibly easy to use and bake up very flaky and with a great, homemade flavor. Be sure to follow the directions on the box for softening them before using. Once you have done that, they can be easily molded into the pie plate and crimped into a decorative edge very easily. You can use one at a time for one-crust pies (refrigerate the remaining pastry to make another yummy pie later) or both, as we did for this luscious two-crust pie.
Nutrition Information
380 Calories, 12g Total Fat, 2g Protein, 65g Total Carbohydrate, 30g Sugars
*Percent Daily Values are based on a 2,000 calorie diet.
(function() {
document.addEventListener('DOMContentLoaded', function() {
var componentMetadata = JSON.parse('\x7b\x22componentName\x22\x3a\x22RecipeNutritionNonPrint_e8af84a8-5198-47ca-bc1c-daf22247ecf7\x22,\x22deferOptions\x22\x3a\x7b\x22deferComponent\x22\x3atrue,\x22deferType\x22\x3a\x22Simple\x22,\x22deferId\x22\x3a\x22r1cd57918585c49778262456c0f3e0d1a\x22,\x22deferredContainerId\x22\x3a\x22\x2fmain\x2frdpNutrition\x22,\x22deferredContainerView\x22\x3a\x22RecipeDetail\x22\x7d,\x22viewName\x22\x3a\x22RecipeNutritionNonPrint\x22\x7d');
var configuration = {"initIsExpanded":false,"expandEventName":"NutritionExpand","collapseEventName":"NutritionCollapse"};
var moduleName = 'recipeNutrition';
var isVueModule = true;
GeneralMills.PandoSites.RegisterControlInstance(moduleName, configuration, componentMetadata, isVueModule)
});
})();
More About This Recipe
A fresh, homemade pie with a delicious filling and flaky pastry is hard to beat. No wonder pies are a loved dessert, no matter what time of year! We have terrific pie recipes of every size, flavor, and type for you to try next! Our delectable apple pie can be made any time of the year or try our Pumpkin Pie with your Thanksgiving or Christmas spread. Love individual pies you do not have to share? Try any of our scrumptious mini pies. Or for even more top-rated pie recipes, scroll through our drool-worthy pie collection.
(function() {
document.addEventListener('DOMContentLoaded', function() {
var componentMetadata = JSON.parse('\x7b\x22componentName\x22\x3a\x22RecipeTipCategory_e8af84a8-5198-47ca-bc1c-daf22247ecf7\x22,\x22deferOptions\x22\x3a\x7b\x22deferComponent\x22\x3atrue,\x22deferType\x22\x3a\x22Simple\x22,\x22deferId\x22\x3a\x22rdf4d177c0fdf4f01be17c6487a519923\x22,\x22deferredContainerId\x22\x3a\x22\x2fmain\x2frdpStories\x22,\x22deferredContainerView\x22\x3a\x22RecipeDetail\x22\x7d,\x22viewName\x22\x3a\x22RecipeTipCategory\x22\x7d');
var configuration = {"expandEventName":"MoreAboutRecipeExpand","collapseEventName":"MoreAboutRecipeCollapse"};
var moduleName = 'recipeTipCategory';
var isVueModule = true;
GeneralMills.PandoSites.RegisterControlInstance(moduleName, configuration, componentMetadata, isVueModule)
});
})();
(function() {
document.addEventListener('DOMContentLoaded', function() {
var componentMetadata = JSON.parse('\x7b\x22componentName\x22\x3a\x22RelatedContent_d71390e3-0c2b-4b8a-843d-201bfd75ec76\x22,\x22deferOptions\x22\x3a\x7b\x22deferComponent\x22\x3atrue,\x22deferType\x22\x3a\x22OnDemand\x22,\x22deferId\x22\x3a\x22r0ddbec8249c74f219965fdea5518318d\x22,\x22deferredContainerId\x22\x3a\x22\x2fmain\x2frdpRelatedContent1\x22,\x22deferredContainerView\x22\x3a\x22RecipeDetail\x22\x7d,\x22viewName\x22\x3a\x22RelatedContent\x22\x7d');
var configuration = {"dataSourceId":"d71390e3-0c2b-4b8a-843d-201bfd75ec76","isCurrentUserAnonymous":true,"relatedContentList":{"contentId":"fdad0859-2606-4553-a2e4-335818c04bc8","listSettings":{"pageSize":3,"startPage":1,"listType":1,"title":"Explore Categories","useModalRegistration":false,"regAction":"","esrcCode":0,"favoriteButtonLabelFormat":"Add {0} to favorites","contentTypes":["Category"],"showImages":false,"showRatings":false,"allowFavoriting":false,"cssClassName":"relatedContentWithoutImages"},"items":[{"contentId":"b539360f-df80-4c38-95fd-6955f5f6d3a5","contentType":"Category","title":"Cherry Pie Recipes","isFavorite":false,"linkUrl":"/recipes/dish-type/pies/fruit/cherry","numberOfRatings":"0","averageRating":"0","averageRatingStars":"0","smallImageUrl":"/-/media/GMI/Core-Sites/PB/PB/Images/recipes-hero/desserts/super-easy-fruit-pie_hero.jpg?W=276","mediumImageUrl":"/-/media/GMI/Core-Sites/PB/PB/Images/recipes-hero/desserts/super-easy-fruit-pie_hero.jpg?W=680"},{"contentId":"625603f3-c462-4bf5-bbd9-604dc8223238","contentType":"Category","title":"Cherry Cobbler Recipes","isFavorite":false,"linkUrl":"/recipes/dish-type/cobblers/cherry","numberOfRatings":"0","averageRating":"0","averageRatingStars":"0","smallImageUrl":"/-/media/GMI/Core-Sites/PB/PB/Images/recipes-hero/desserts/cinnamon-roll-topped-cobbler_hero.jpg?W=276","mediumImageUrl":"/-/media/GMI/Core-Sites/PB/PB/Images/recipes-hero/desserts/cinnamon-roll-topped-cobbler_hero.jpg?W=680"},{"contentId":"b4165d99-bb99-444f-9c68-68a0d43d451b","contentType":"Category","title":"Cherry Crisp Recipes","isFavorite":false,"linkUrl":"/recipes/dish-type/crisps/cherry","numberOfRatings":"0","averageRating":"0","averageRatingStars":"0","smallImageUrl":"/-/media/GMI/Core-Sites/PB/PB/Images/recipes-hero/desserts/gluten-free-mini-cherry-crisp_hero.jpg?sc_lang=en?W=276","mediumImageUrl":"/-/media/GMI/Core-Sites/PB/PB/Images/recipes-hero/desserts/gluten-free-mini-cherry-crisp_hero.jpg?sc_lang=en?W=680"}],"availableItems":[{"contentId":"b539360f-df80-4c38-95fd-6955f5f6d3a5","contentType":"Category","title":"Cherry Pie Recipes","isFavorite":false,"linkUrl":"/recipes/dish-type/pies/fruit/cherry","numberOfRatings":"0","averageRating":"0","averageRatingStars":"0","smallImageUrl":"/-/media/GMI/Core-Sites/PB/PB/Images/recipes-hero/desserts/super-easy-fruit-pie_hero.jpg?W=276","mediumImageUrl":"/-/media/GMI/Core-Sites/PB/PB/Images/recipes-hero/desserts/super-easy-fruit-pie_hero.jpg?W=680"},{"contentId":"625603f3-c462-4bf5-bbd9-604dc8223238","contentType":"Category","title":"Cherry Cobbler Recipes","isFavorite":false,"linkUrl":"/recipes/dish-type/cobblers/cherry","numberOfRatings":"0","averageRating":"0","averageRatingStars":"0","smallImageUrl":"/-/media/GMI/Core-Sites/PB/PB/Images/recipes-hero/desserts/cinnamon-roll-topped-cobbler_hero.jpg?W=276","mediumImageUrl":"/-/media/GMI/Core-Sites/PB/PB/Images/recipes-hero/desserts/cinnamon-roll-topped-cobbler_hero.jpg?W=680"},{"contentId":"b4165d99-bb99-444f-9c68-68a0d43d451b","contentType":"Category","title":"Cherry Crisp Recipes","isFavorite":false,"linkUrl":"/recipes/dish-type/crisps/cherry","numberOfRatings":"0","averageRating":"0","averageRatingStars":"0","smallImageUrl":"/-/media/GMI/Core-Sites/PB/PB/Images/recipes-hero/desserts/gluten-free-mini-cherry-crisp_hero.jpg?sc_lang=en?W=276","mediumImageUrl":"/-/media/GMI/Core-Sites/PB/PB/Images/recipes-hero/desserts/gluten-free-mini-cherry-crisp_hero.jpg?sc_lang=en?W=680"}]}};
var moduleName = 'relatedContent';
var isVueModule = true;
GeneralMills.PandoSites.RegisterControlInstance(moduleName, configuration, componentMetadata, isVueModule)
});
})();
(function() {
document.addEventListener('DOMContentLoaded', function() {
var componentMetadata = JSON.parse('\x7b\x22componentName\x22\x3a\x22ConsumerGeneratedContent_e8af84a8-5198-47ca-bc1c-daf22247ecf7\x22,\x22deferOptions\x22\x3a\x7b\x22deferComponent\x22\x3atrue,\x22deferType\x22\x3a\x22OnDemand\x22,\x22deferId\x22\x3a\x22re113f605e25a4ec3a31b86db921b6664\x22,\x22deferredContainerId\x22\x3a\x22\x2fmain\x2frdpCgc\x22,\x22deferredContainerView\x22\x3a\x22RecipeDetail\x22\x7d,\x22viewName\x22\x3a\x22ConsumerGeneratedContent\x22\x7d');
var configuration = {"loaderScript":"https://apps.bazaarvoice.com/deployments/pillsbury-en_us/main_site/production/en_US/bv.js","type":"RatingAndReview","language":"en","includeRatings":true};
var moduleName = 'consumerGeneratedContent';
var isVueModule = true;
GeneralMills.PandoSites.RegisterControlInstance(moduleName, configuration, componentMetadata, isVueModule)
});
})();
(function() {
document.addEventListener('DOMContentLoaded', function() {
var componentMetadata = JSON.parse('\x7b\x22componentName\x22\x3a\x22ConsumerGeneratedContent_e8af84a8-5198-47ca-bc1c-daf22247ecf7\x22,\x22deferOptions\x22\x3a\x7b\x22deferComponent\x22\x3atrue,\x22deferType\x22\x3a\x22OnDemand\x22,\x22deferId\x22\x3a\x22r4d420be27bd541bf93b24587f47eb07c\x22,\x22deferredContainerId\x22\x3a\x22\x2fmain\x2frdpCgc\x22,\x22deferredContainerView\x22\x3a\x22RecipeDetail\x22\x7d,\x22viewName\x22\x3a\x22ConsumerGeneratedContent\x22\x7d');
var configuration = {"loaderScript":"https://apps.bazaarvoice.com/deployments/pillsbury-en_us/main_site/production/en_US/bv.js","type":"QuestionAndAnswer","language":"en","includeRatings":false};
var moduleName = 'consumerGeneratedContent';
var isVueModule = true;
GeneralMills.PandoSites.RegisterControlInstance(moduleName, configuration, componentMetadata, isVueModule)
});
})();
(function() {
document.addEventListener('DOMContentLoaded', function() {
var componentMetadata = JSON.parse('\x7b\x22componentName\x22\x3a\x22DoubleClick_ada1eeda-a2cc-40ec-b38b-ce2b90014cba\x22,\x22deferOptions\x22\x3a\x7b\x22deferComponent\x22\x3afalse,\x22deferType\x22\x3a\x22None\x22,\x22deferId\x22\x3a\x22r75c46ef7946a46f3a8878889646d6b31\x22,\x22deferredContainerId\x22\x3a\x22\x2fmain\x2frdpSecondaryAd\x22,\x22deferredContainerView\x22\x3a\x22DoubleClick\x22\x7d,\x22viewName\x22\x3a\x22DoubleClick\x22\x7d');
var configuration = {"adId":"OMP/pillsbury/recipe/300x250_bottom","minPageWidth":"1000","maxPageWidth":"9999","defaultMinPageWidth":"1000","defaultMaxPageWidth":"9999","size":"[[300,600],[300,250]]","refreshWhenViewed":false,"adContainerId":"65b556c3-67a2-4d4a-a652-d05658c940f8","doubleClickAdContainerId":"ddb3ac36-6235-41bb-8934-cd387c0c7db6","adCaptionText":"Advertisement","networkCode":"/15704463/","relevantMetadata":["Dessert","Pie"],"privacyOptOut":false,"adProvider":"Sovrn","sovrnCssClass":"pillsbury_right_rail","responsive":true,"contentType":"Recipe","itemId":"fdad0859-2606-4553-a2e4-335818c04bc8","continuesBelowText":"Recipe Continues Below"};
var moduleName = 'sovrn';
var isVueModule = true;
GeneralMills.PandoSites.RegisterControlInstance(moduleName, configuration, componentMetadata, isVueModule)
});
})();
(function() {
document.addEventListener('DOMContentLoaded', function() {
var componentMetadata = JSON.parse('\x7b\x22componentName\x22\x3a\x22DoubleClick_6888191a-ef06-440e-a5ea-a3c8d1e006f9\x22,\x22deferOptions\x22\x3a\x7b\x22deferComponent\x22\x3afalse,\x22deferType\x22\x3a\x22None\x22,\x22deferId\x22\x3a\x22r1293bbfaa65b4744af9a208dd6f32ee4\x22,\x22deferredContainerId\x22\x3a\x22\x2fmain\x2frdpSecondaryAd\x22,\x22deferredContainerView\x22\x3a\x22DoubleClick\x22\x7d,\x22viewName\x22\x3a\x22DoubleClick\x22\x7d');
var configuration = {"adId":"OMP/m_pillsbury/recipes/300x250_bottom","minPageWidth":"299","maxPageWidth":"767","defaultMinPageWidth":"1000","defaultMaxPageWidth":"9999","size":"[[300,250], [300,600]]","refreshWhenViewed":false,"adContainerId":"95bc92c5-e9a9-4e94-b099-d6f5f2a2e4a3","doubleClickAdContainerId":"a277994f-31f2-48dd-9b64-25b8c6d3b4cf","adCaptionText":"Advertisement","networkCode":"/15704463/","relevantMetadata":["Dessert","Pie"],"privacyOptOut":false,"adProvider":"Sovrn","sovrnCssClass":"pillsbury_content_standard_rdp","responsive":true,"contentType":"Recipe","itemId":"fdad0859-2606-4553-a2e4-335818c04bc8","continuesBelowText":"Recipe Continues Below"};
var moduleName = 'sovrn';
var isVueModule = true;
GeneralMills.PandoSites.RegisterControlInstance(moduleName, configuration, componentMetadata, isVueModule)
});
})();
(function() {
document.addEventListener('DOMContentLoaded', function() {
var componentMetadata = JSON.parse('\x7b\x22componentName\x22\x3a\x22NewsletterCTA_750a0129-7efb-4ea1-b271-19394f58ba28\x22,\x22deferOptions\x22\x3a\x7b\x22deferComponent\x22\x3atrue,\x22deferType\x22\x3a\x22OnDemand\x22,\x22deferId\x22\x3a\x22ra6ad9e39ee944ff48c1743037c9a1c6d\x22,\x22deferredContainerId\x22\x3a\x22\x2fmain\x2frdpMobileSubscriber\x22,\x22deferredContainerView\x22\x3a\x22RecipeDetail\x22\x7d,\x22viewName\x22\x3a\x22NewsletterCTA\x22\x7d');
var configuration = {"unsubscribedNewsletters":[{"listId":"6d3e858f-4804-4f38-9b8a-712a9a5668cc","thumbnailImageUrl":"/-/media/GMI/Core-Sites/PB/Images/Shared/myaccount/newsletters/PB_Email_Thumb_200x200.gif?sc_lang=en","previewUrl":"https://morpheus3.idpk.net/email_sends/10626/preview","name":"Pillsbury\u0027s Email","isPromo":false}],"settings":{"anonymousCopy":"Looking For Something More?","anonymousDescriptionCopy":"You’ll love seeing our daily tips, trends and tasty recipes in your inbox.","anonymousThankYouCopy":"Thanks! Your first email is on its way.","anonymousThankYouDescriptionCopy":"\u003cp\u003e\u003cspan\u003eNow that you\u0026rsquo;re signed up, create an account on Pillsbury.com to save your favorite recipes, learn more about special promotions and get meal inspiration for any occasion.\u003c/span\u003e\u003c/p\u003e","anonymousButtonText":"Sign Me Up","anonymousEmailInvalidErrorText":"Please enter a valid email address.","anonymousSubscribeErrorText":"We encountered an error while signing you up. Please try again.","anonymousEmailAddressPlaceholderText":"Enter your email address","anonymousEmailAddressLabel":"Email Address","anonymousLegalCopy":"By signing up, you accept our\u0026nbsp;\u003ca rel=\u0022noopener noreferrer\u0022 href=\u0022https://www.generalmills.com/privacy-security/us-english-privacy-policy\u0022 target=\u0022_blank\u0022\u003e\u003cspan style=\u0022text-decoration: underline;\u0022\u003ePrivacy Policy\u003c/span\u003e\u003c/a\u003e\u0026nbsp;and agree that your information may be used across our\u0026nbsp;\u003ca rel=\u0022noopener noreferrer\u0022 href=\u0022https://www.generalmills.com/food-we-make/brands\u0022 target=\u0022_blank\u0022\u003e\u003cspan style=\u0022text-decoration: underline;\u0022\u003efamily of brands\u003c/span\u003e.\u003c/a\u003e","requiredFieldText":"","backgroundColor":"#EEEEEE","accentColor":"","registrationUrl":"/register/reg-fp?RegAction=SUBSCRIBERUPGRADE\u0026esrc=14171\u0026returnUrl=%2frecipes%2feasy-cherry-pie%2ffdad0859-2606-4553-a2e4-335818c04bc8%3fwt.dcsvid%3dnzi1odawodg4mgs2%26rvrin%3d1437097b-7001-4f7b-b4ec-fcd5bcd20720%26wt.mc_id%3dnewsletter_pbdaily_02_01_2012%26nicreatid2%3dnewsletter_pbdaily_02_01_2012","registrationLinkText":"Sign Up!","enableExpandedFields":false,"hideForSessionCookieExpiration":0,"ctaType":"StandardAnonymous","location":"Inline","userState":"Anonymous","sourceCodeOverride":0}};
var moduleName = 'newsletterCta';
var isVueModule = true;
GeneralMills.PandoSites.RegisterControlInstance(moduleName, configuration, componentMetadata, isVueModule)
});
})();
(function() {
document.addEventListener('DOMContentLoaded', function() {
var componentMetadata = JSON.parse('\x7b\x22componentName\x22\x3a\x22NewsletterCTA_0dc75a39-1c1e-4402-8652-7d0468ad2038\x22,\x22deferOptions\x22\x3a\x7b\x22deferComponent\x22\x3atrue,\x22deferType\x22\x3a\x22OnDemand\x22,\x22deferId\x22\x3a\x22raaa9cfe2564e4376b91c267ca6e6159c\x22,\x22deferredContainerId\x22\x3a\x22\x2fmain\x2frdpInlineSubscriber\x22,\x22deferredContainerView\x22\x3a\x22RecipeDetail\x22\x7d,\x22viewName\x22\x3a\x22NewsletterCTA\x22\x7d');
var configuration = {"unsubscribedNewsletters":[{"listId":"6d3e858f-4804-4f38-9b8a-712a9a5668cc","thumbnailImageUrl":"/-/media/GMI/Core-Sites/PB/Images/Shared/myaccount/newsletters/PB_Email_Thumb_200x200.gif?sc_lang=en","previewUrl":"https://morpheus3.idpk.net/email_sends/10626/preview","name":"Pillsbury\u0027s Email","isPromo":false}],"settings":{"anonymousCopy":"Delicious meal inspiration found here.","anonymousDescriptionCopy":"Spend less time searching and more time with your family. With Pillsbury\u0027s newsletter, you\u0027ll have easy access to all the quick \u0026amp; easy, kid-pleasing recipes that make dinnertime a breeze.","anonymousThankYouCopy":"Thanks! Your first email is on its way.","anonymousThankYouDescriptionCopy":"\u003cp\u003e\u003cspan\u003eNow that you\u0026rsquo;re signed up, create an account on Pillsbury.com to save your favorite recipes, learn more about special promotions and get meal inspiration for any occasion.\u003c/span\u003e\u003c/p\u003e","anonymousButtonText":"Sign up now","anonymousEmailInvalidErrorText":"Please enter a valid email address.","anonymousSubscribeErrorText":"We encountered an error while signing you up. Please try again.","anonymousEmailAddressPlaceholderText":"Enter your email address","anonymousEmailAddressLabel":"Email Address","anonymousLegalCopy":"By signing up, you accept our\u0026nbsp;\u003ca rel=\u0022noopener noreferrer\u0022 href=\u0022https://www.generalmills.com/privacy-security/us-english-privacy-policy\u0022 target=\u0022_blank\u0022\u003e\u003cspan style=\u0022text-decoration: underline;\u0022\u003ePrivacy Policy\u003c/span\u003e\u003c/a\u003e\u0026nbsp;and agree that your information may be used across our\u0026nbsp;\u003ca rel=\u0022noopener noreferrer\u0022 href=\u0022https://www.generalmills.com/food-we-make/brands\u0022 target=\u0022_blank\u0022\u003e\u003cspan style=\u0022text-decoration: underline;\u0022\u003efamily of brands\u003c/span\u003e.\u003c/a\u003e","requiredFieldText":"","backgroundColor":"#002e6d","accentColor":"","registrationUrl":"/register/reg-fp?RegAction=SUBSCRIBERUPGRADE\u0026esrc=14171\u0026returnUrl=%2frecipes%2feasy-cherry-pie%2ffdad0859-2606-4553-a2e4-335818c04bc8%3fwt.dcsvid%3dnzi1odawodg4mgs2%26rvrin%3d1437097b-7001-4f7b-b4ec-fcd5bcd20720%26wt.mc_id%3dnewsletter_pbdaily_02_01_2012%26nicreatid2%3dnewsletter_pbdaily_02_01_2012","registrationLinkText":"Sign up now","enableExpandedFields":false,"hideForSessionCookieExpiration":0,"ctaType":"StandardAnonymous","location":"Rail","userState":"Anonymous","sourceCodeOverride":0}};
var moduleName = 'newsletterCta';
var isVueModule = true;
GeneralMills.PandoSites.RegisterControlInstance(moduleName, configuration, componentMetadata, isVueModule)
});
})();
(function() {
document.addEventListener('DOMContentLoaded', function() {
var componentMetadata = JSON.parse('\x7b\x22componentName\x22\x3a\x22DoubleClick_19a506b6-0306-4245-8826-f3cd4e04d386\x22,\x22deferOptions\x22\x3a\x7b\x22deferComponent\x22\x3afalse,\x22deferType\x22\x3a\x22None\x22,\x22deferId\x22\x3a\x22rc6a8931d95a6428b84931492a144efc1\x22,\x22deferredContainerId\x22\x3a\x22\x2fmain\x2frdpTernaryAd\x22,\x22deferredContainerView\x22\x3a\x22DoubleClick\x22\x7d,\x22viewName\x22\x3a\x22DoubleClick\x22\x7d');
var configuration = {"adId":"OMP/pillsbury/recipe/300x250_bottom2","minPageWidth":"1000","maxPageWidth":"9999","defaultMinPageWidth":"1000","defaultMaxPageWidth":"9999","size":"[[300,600],[300,250]]","refreshWhenViewed":false,"adContainerId":"0a0e0171-82c2-4403-9a99-f4e55ce70e3e","doubleClickAdContainerId":"477c565a-704e-4eaa-b32d-a31d5fec3d8a","adCaptionText":"Advertisement","networkCode":"/15704463/","relevantMetadata":["Dessert","Pie"],"privacyOptOut":false,"adProvider":"Sovrn","sovrnCssClass":"pillsbury_right_rail","responsive":true,"contentType":"Recipe","itemId":"fdad0859-2606-4553-a2e4-335818c04bc8","continuesBelowText":"Recipe Continues Below"};
var moduleName = 'sovrn';
var isVueModule = true;
GeneralMills.PandoSites.RegisterControlInstance(moduleName, configuration, componentMetadata, isVueModule)
});
})();
(function() {
document.addEventListener('DOMContentLoaded', function() {
var componentMetadata = JSON.parse('\x7b\x22componentName\x22\x3a\x22NewsletterCTA_e408bfac-a9a5-4f9f-8ce2-a693d736410d\x22,\x22deferOptions\x22\x3a\x7b\x22deferComponent\x22\x3atrue,\x22deferType\x22\x3a\x22OnDemand\x22,\x22deferId\x22\x3a\x22r21b47eebb069442f8fb573830d6e22e6\x22,\x22deferredContainerId\x22\x3a\x22\x2ffooterNewsLetterCTA\x22,\x22deferredContainerView\x22\x3a\x22Default\x22\x7d,\x22viewName\x22\x3a\x22NewsletterCTA\x22\x7d');
var configuration = {"unsubscribedNewsletters":[{"listId":"6d3e858f-4804-4f38-9b8a-712a9a5668cc","thumbnailImageUrl":"/-/media/GMI/Core-Sites/PB/Images/Shared/myaccount/newsletters/PB_Email_Thumb_200x200.gif?sc_lang=en","previewUrl":"https://morpheus3.idpk.net/email_sends/10626/preview","name":"Pillsbury\u0027s Email","isPromo":false}],"settings":{"anonymousCopy":"Quick and easy meal ideas just for you.","anonymousDescriptionCopy":"Spread smiles around the dinner table with delicious, easy recipes from Pillsbury. Our newsletter brings the best, kid-pleasing dinner ideas Pillsbury has to offer directly to your inbox.","anonymousThankYouCopy":"Thanks! Your first email is on its way.","anonymousThankYouDescriptionCopy":"Now that you\u0027re signed up, create an account on Pillsbury.com to save your favorite recipes, learn more about special promotions and get meal inspiration for any occasion.","anonymousButtonText":"Sign up now","anonymousEmailInvalidErrorText":"Please enter a valid email address","anonymousSubscribeErrorText":"We encountered an error while signing you up. Please try again.","anonymousEmailAddressPlaceholderText":"","anonymousEmailAddressLabel":"Your Email Address","anonymousLegalCopy":"By signing up, you accept our\u0026nbsp;\u003ca rel=\u0022noopener noreferrer\u0022 href=\u0022https://www.generalmills.com/privacy-security/us-english-privacy-policy\u0022 target=\u0022_blank\u0022\u003e\u003cspan style=\u0022text-decoration: underline;\u0022\u003ePrivacy Policy\u003c/span\u003e\u003c/a\u003e\u0026nbsp;and agree that your information may be used across our\u0026nbsp;\u003ca rel=\u0022noopener noreferrer\u0022 href=\u0022https://www.generalmills.com/food-we-make/brands\u0022 target=\u0022_blank\u0022\u003e\u003cspan style=\u0022text-decoration: underline;\u0022\u003efamily of brands\u003c/span\u003e.\u003c/a\u003e","requiredFieldText":"","standardSmallImageUrl":"/-/media/GMI/Core-Sites/PB/PB/Images/MyAccount/acq-landing-pages-2024/Organic-Acquisition_Bottom-Banner_800x450_GrandsMonkeyBread.jpg?sc_lang=en","standardLargeImageUrl":"/-/media/GMI/Core-Sites/PB/PB/Images/MyAccount/acq-landing-pages-2024/Organic-Acquisition_Bottom-Banner_800x450_GrandsMonkeyBread.jpg?sc_lang=en","backgroundColor":"#002E6D","accentColor":"","patternImageUrl":"/-/media/GMI/Core-Sites/PB/Images/Shared/myaccount/newsletter_cta_images/pb-footer-doughboy2x.png?sc_lang=en","registrationUrl":"/register/reg-fp?RegAction=SUBSCRIBERUPGRADE\u0026esrc=14171\u0026returnUrl=%2frecipes%2feasy-cherry-pie%2ffdad0859-2606-4553-a2e4-335818c04bc8%3fwt.dcsvid%3dnzi1odawodg4mgs2%26rvrin%3d1437097b-7001-4f7b-b4ec-fcd5bcd20720%26wt.mc_id%3dnewsletter_pbdaily_02_01_2012%26nicreatid2%3dnewsletter_pbdaily_02_01_2012","registrationLinkText":"Sign up now","enableExpandedFields":false,"hideForSessionCookieExpiration":0,"ctaType":"StandardAnonymous","location":"Footer","userState":"Anonymous","sourceCodeOverride":0}};
var moduleName = 'newsletterCta';
var isVueModule = true;
GeneralMills.PandoSites.RegisterControlInstance(moduleName, configuration, componentMetadata, isVueModule)
});
})();